Shoes in the middle ages is a massive subject. There are dozens of patterning types, great variety in decoration techniques and styles, and many different closures that were used across the centuries. I feel that this subject is one of the most underappreciated aspects of medieval reenactment.
“For European leather shoes, a total of 17 primary cutting patterns were used, six integral soled patterns with two sub-patterns, four hybrid patterns, including the examples from the Byzantine, and seven separate soled primary cutting patterns, with 33 sub-patterns…” (Volken p73)

The factors that play into the specific shoe that will be most appropriate for a given portrayal are the place and time of the portrayal, the type of person they are, and the social status of the person. The first question I will address is the primary cutting pattern. The person that I portray is in 1190, originally from Norman Sicily but re-settled in Antioch. The “Crusader States” refer to the Kingdom of Jerusalem, Principality of Antioch, County of Tripoli, and County of Edessa which were formed during and immediately after the First Crusade (1096-1099). I will also refer to these states as the Latin East or Frankish States, and the entire region as Outremer or the Near East. The term “Crusader” in this context specifically refers to a Christian pilgrim under arms who has taken an oath to visit or capture religious sites in the Near East. Europeans who settled in these lands after Jerusalem was taken and the Crusade ended were known as Franks or Franj. They ceased to be crusaders or pilgrims when their vows were fulfilled.
“…At the present moment they are actively besieging Tyre, attacking day and night, and their numbers are so great that they are like a swarm of ants covering the whole face of the earth from Tyre to Jerusalem, even as far as Gaza. Find it in yourselves to come with all haste to our aid and that of Eastern Christendom which is, at present, totally lost, so that through God and with the support of your eminent brotherhood we may save the cities that remain. Farewell.” Excerpt of a letter from Terricus, Grand Preceptor of the Temple, to all preceptors and brethren of the Temple, Between 10 July and 6 August, 1187. (Barber p78-79)

The Crusader States were constantly short of manpower, dozens of such letters from the Frankish states survive to this day. They constantly beg for support from Europe in the form of immigration, arms, and funds. There were several incentives for pilgrims and settlers of the Latin East including absolution of sins, individual masses being said on the death of the participant, promises of a place in heaven upon the death of the participant, as well as a change in social status. If a peasant wished to join the crusade, their feudal lords could not legally prevent them. On completing their pilgrimage and settling in the Frankish states, foot-soldiers and peasantry became free men and were classified as burgesses, city dwellers. Feudal requirements of being bound to their land and mandatory service to their lord were never established in the Latin East. Some burgesses rose to be extremely wealthy, and the class had substantial political power. There were still public duties they required to undertake, such as participation in the levée en masse, where all able bodied men were called to arms for the defense of their city or kingdom. There was also an opportunity to voluntarily serve the kingdom for stipulated pay as a serviens, or serjant. This is the social class that I portray: a professional shoemaker in Antioch originally from Norman Sicily, therefore a burgess, who also works as a serjant.(Prawer p76-85)

This social status and occupation have a great effect on what shoes I should be making. There were particular fashions worn by high ecclesiastic figures(Figure 1), lower clergy, fashions worn by peasantry and laborers(Figure 2), fashions for nobility, soldiers, and more. For this project, I focused on individuals depicted as craftsmen and serjants. The native governments which have reigned over Outremer after wresting cities and castles back from the Franks saw little or no value in the artwork they created, so very little domestically produced artwork remains. It therefore becomes difficult to know how the Franks saw themselves, apart from referring back to the lands they emigrated from.
I conducted a survey of over three hundred surviving depictions of individuals in French and Italian manuscripts and carvings dating from 1140-1240, fifty years in either direction of my target year. I recorded the footwear shown on individuals of different social statuses.(Table 1) These statuses are at times difficult to determine, so I will explain my rationale. I determined an individual is a knight if they are wearing a helmet, mail hauberk, and mail chausses (leggings); if they are wearing at least a helmet, mail hauberk, and are riding a horse; if they are wearing at least a helmet, mail hauberk, and they are carrying a lance; if they are wearing at least a helmet, mail hauberk, and are carrying a banner. I determined an individual was a serjant if they were wearing at maximum a helmet and mail hauberk and did not meet the listed criteria for a knight; if they are wearing civilian dress and are armed with shield and spear. I determined an individual was a craftsman if they are depicted practicing their craft, i.e. a carpenter, smith, etc. I determined an individual was a commoner if they are depicted working in an agricultural setting, in a laborer setting, and if they wear civilian dress with no adornment. I did not consider depictions of individuals wearing civilian dress and armed with swords, as these could be either serjants or knights. I also did not consider depictions of individuals wearing clothing or armor outside of the norm, intended to portray historical or culturally separate individuals.
| Shoes | Ankle boots | High boots | |
| Knight | 15 | 7 | 0 |
| Serjant | 7 | 45 | 0 |
| Craftsman | 0 | 5 | 0 |
| Commoner | 12 | 43 | 1 |
I did not record the footwear of nobility, but all examples were of low shoes. Low status individuals are also commonly depicted as being barefoot, wearing soled hose as footwear, or no shoes being depicted simply due to a lack of detail in the artwork. These options were not seen on craftsmen or serjants, so I did not record that data. My criteria is not flawless and the survey was not comprehensive, but I think it gave me a reasonable idea of what different social groups wore.
Knights were most often depicted wearing full mail chausses, but when they wore shoes they seemed to most often gravitate toward the low shoes that nobility wore. Serjants, who may have been expected to travel by foot more often, were most commonly depicted wearing ankle boots. Craftsmen were a rarity in the survey, and most often wore ankle boots. Commoners also most commonly wore ankle boots but had more variety than serjants. Based on this survey, I decided that the most appropriate height of shoes for my project should be an ankle boot. The fidelity of the artwork is typically too low to guess at a pattern, but luckily there are numerous examples of extant shoes and shoe parts to look at.
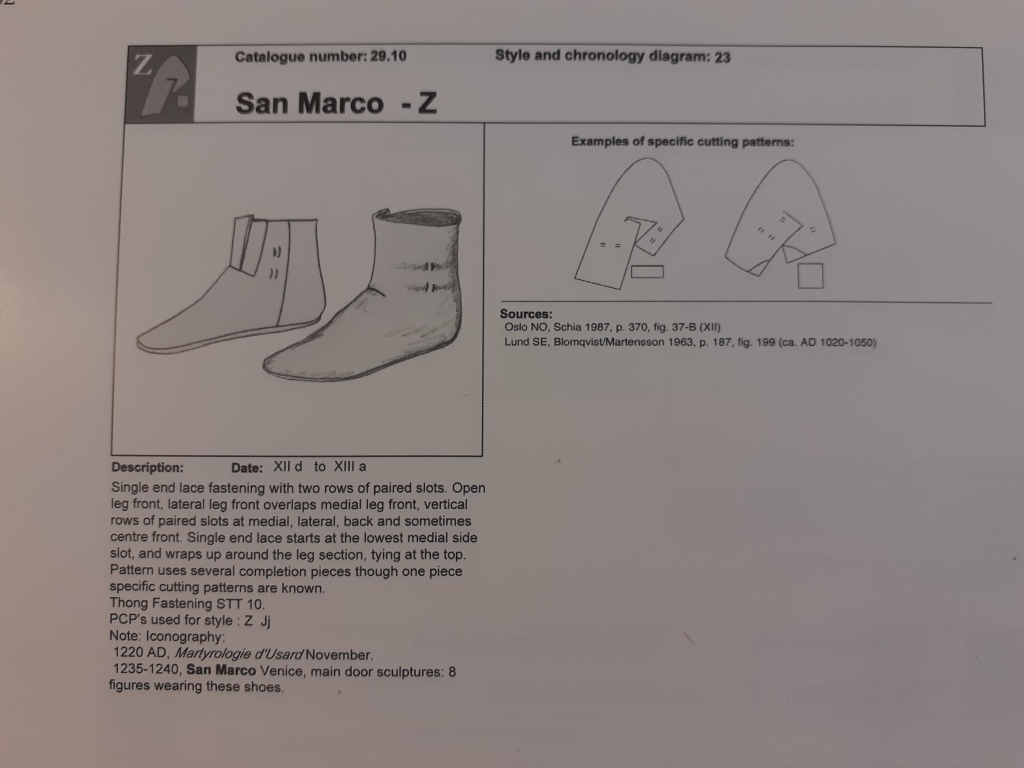
The method of marking and cutting a shoe pattern in period has two possibilities. The pattern may be laid out according to measurements taken from the client, and then cut freehand, or a pattern may be used, which is then modified to fit the client.(Grew p46-47) In the past, I have copied old worn out shoes and used them as patterns for a new pair. In this instance I wanted to make a new pattern, so I was forced to use the method of measurement and iteration. Armed with the requirement of an ankle boot, I searched for a shoe pattern which appeared closest to my place and time and was different from previous shoes I had made. The type I arrived at is the San Marco – Z type, according to the typology of Marquita Volken in Archological Footwear.(Figure 4) This shoe type is described for the fourth quarter of the twelfth century and first quarter of the thirteenth century.
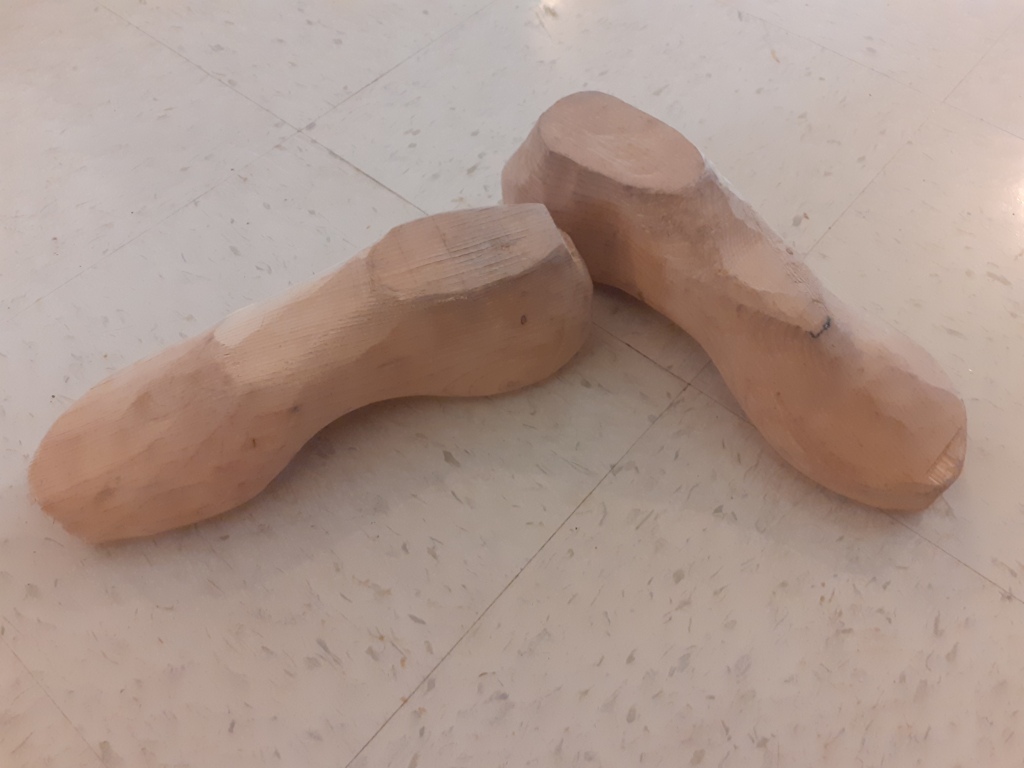
This type of shoe made in the twelfth century is called a turn shoe. Is it so called because the shoe is initially stitched together inside out, and then it is turned right-side out. This process protects the seams from wear. These shoes were also lasted, meaning they were sewn over a wooden form called a last. The last may either be made to match the measurements of the client’s foot, or can be used simply as an internal support when assembling the shoe, with the same last being used for multiple sizes of shoe.(Goubitz p103-106) For this project, I used a pair of lasts I had previously made to my measurements.(Figure 5)

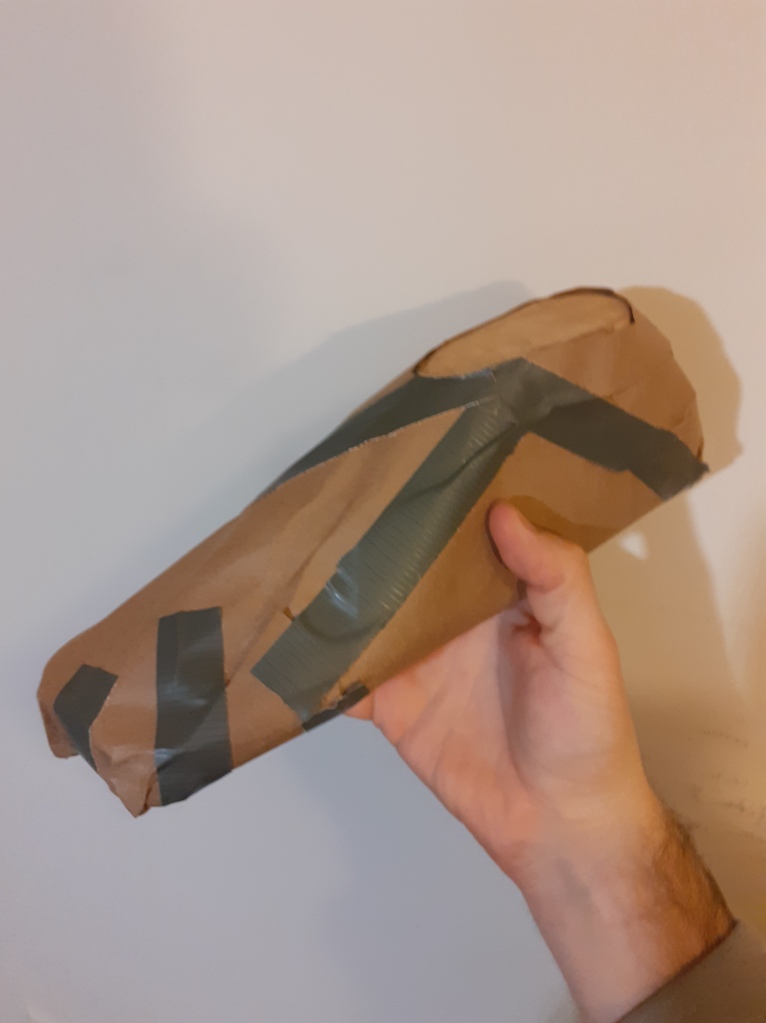
The primary measurements which are important when designing a shoe are the outline of the foot, the circumference of the foot at the ball, the circumference of the foot at the narrowest part, the circumference of the ankle and instep, and the circumference of the ankle. With these measurements and enough institutional knowledge, a skilled shoe maker should be able to make a pair of fitting shoes. Unfortunately, I am not that skilled yet and took a somewhat different approach. Because I had well carved lasts, I decided to wrap one in a layer of paper, mark it where the seams should be, and cut it off to be used as the beginning of my pattern.
This flattened pattern gave me a starting point, but several iterations were required to get a workable pattern. The ninth turned out to be good enough to attempt with leather.

The leather that I chose for the upper is a 5oz vegetable tanned cow leather. This relatively thin cowhide is intended to stand in for the calf which is often found in a late 12th century context, when the type of hide is given. Other types of leather used at the time were sheep or goat.(Grew p44) The sole of the shoe is always thicker than the upper, and so I used a 12oz vegetable tanned leather for that component.(Goubitz p75) A third component which became common in the late twelfth century was a rand. This was a thick piece of cattle leather cut to a triangular section and fitted between the sole and upper. Contrary to the sometimes quoted purpose of water resistance, (Grew p10) this piece serves to bridge the gap between those two pieces of leather, preventing the stitches from becoming exposed.(Goubitz p78) This piece does not appear to initially follow the entire seam between the upper and sole, but only the highest strain areas, the heel and sides of the shoe, but this may also be the result of incomplete artifacts.(Grew p49) I decided to follow the possible trend with this project.

A technique to further protect the seam that I used is to cut the sole oversized by a few millimeters, and then bevel it back on the flesh side. This angled surface covers and protects the stitches.(Goubitz p78)
Once the pattern was finalized, I cut out the pattern using a lunette knife, a traditional shoemaker’s tool. Variations have been found through the medieval and Roman eras, but I have not found good sources close to my specific context.(Grew p44)

Stitching of shoes is a simple process. The only seam type needed with this pattern was a saddle stitch,(Figure 9) though there are a couple variations. The soles of shoes were attached with an edge to flesh seam, where the thread passes through the rough side of the sole and exits the edge of the piece, thereby preventing the user from walking on the stitches. The thread then passes through the rand, and straight through the upper near to the edge. These holes would all be prepared using a triangular section awl. With a saddle stitch, the artisan uses two threads in concert, working them opposite directions and pulling them against one another to create a strong and tight seam. Rather than using needles, boar bristles seem to be used, with the thread tied and glued to the bristle with pitch, known as waxed ends. This creates a thinner overall profile than a threaded needle, as the thread doesn’t need to double over itself. Information about this technique is scant because the used bristles were treated as waste and decompose, but for instance a 4th century satirist wrote a piglet’s will, saying “And from my body I shall give and contribute to the cobblers my bristles”(Lockyer)
The earliest surviving shoes I have found where the thread joining the upper and sole survives and is described are dated to the 14th century. This thread is are a plied linen.(Grew p48) I used the same in my reconstruction, two strands of 16/2 linen thread which were plied again, and then coated in beeswax. The same stitch was used for the construction of the upper, except in that case the thread was only a regular 16/2 linen thread and both pieces of leather were butted edge to edge. The two ends passed through the back side and edge of each piece, concealing and protecting the stitches from the outside.

I initially was working on this project with a strict time constraint, and was forced to try simulating boar bristle waxed ends with pieces of heavy fishing line. A combination of my inexperience with the technique and the slippery fishing line made the technique fail. Given my time constraints, I pressed ahead using a pair of steel needles, pulling them through the awl holes with a pair of pliers.
The shoes went together quickly, first joining the upper into a loop and then fitting it onto the sole. The sole was attached to the last with small nails to prevent it from moving, though wooden pegs were also used historically.(Goubitz p105) To hole the work in place, I used a leather strap looped over the shoe and under my own foot. This enabled me to use both hands to work as I pulled the shoe against my thigh with my foot..(Figure 11) This device shows up in late medieval artwork and may be older, though I have not done extensive research in the subject.(Goubitz p107)
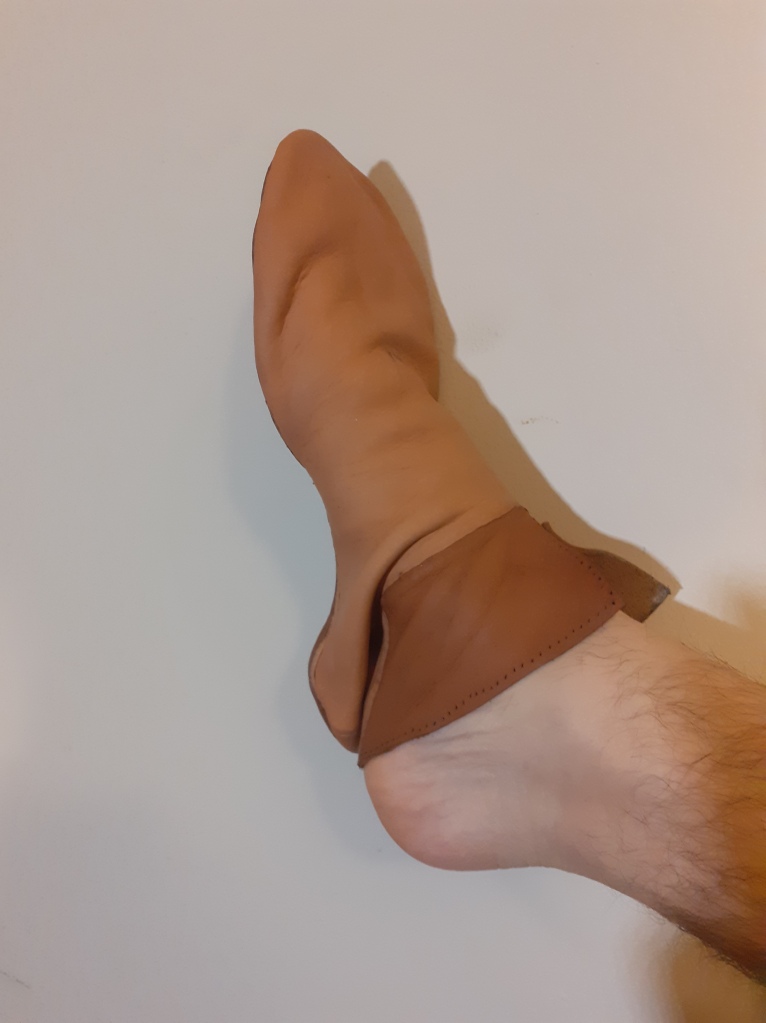
Once I stitched both shoes together, I had the difficult task of removing them from the lasts. After much tugging and tapping, I managed to free them. Unfortunately, the reason for the difficulty was an error on my part.(Figure 12) In my haste, I had forgotten to make sure the throat of the shoe was cut properly. This measurement cannot be smaller than the distance around the wearer’s heel and instep.
At the same time this happened, the deadline I was making this pair of shoes for was relaxed, so I could both reassess the pattern and wait for the boar bristles to arrive.
The only error with the pattern was placement of the shoe’s throat. With some careful measurements and a final iteration of my pattern, I soon had a second pair of shoes cut out and on the last.

The second pair of shoes went together as quickly as the first once the boar bristles arrived. The technique certainly is an improvement over fighting a needle, and I look forward to improving it. The pair of shoes took approximately one day of work to finish.(Figure 13)

Once the upper and the sole are joined, the excess material is trimmed away and the upper is completed with a small insert according to the cutting pattern.(Figure 4) This concluded the construction of the shoe, the last steps were the fastener and oiling.
According to the description in the shoe pattern typology (Figure 4), the proper fastening technique was two laces, one over the other which are secured by two pairs of loops cut into the upper, and sometimes a third pair in the back. I opted to go with the typical two pairs of loops. The laces were cut with my lunette knife out of the same leather as the upper. There is some scant evidence of the use of braided textile laces, but because there are copious examples of surviving leather laces, I decided they were a safer option.

The shoes were finished with a coating of tallow and considered finished. A possibility of edge treatment on the top edge of the boot exist. This could simply be a thread whip stitched over the edge or one of several leather edge finishing techniques, such as a top band.(Grew 13-14) Treatment like this are not ubiquitous, and because I usually add a top band, I decided to not apply one this time.
The second pair of shoes fit very well, I believe they show measurable improvement over my previous pairs in both technique and in research. Future projects will include more complicated fastening systems and various techniques of embellishment.
Bibligraphy
Barber, M., & Bate, K. (2016). Letters from the East: Crusaders, Pilgrims and Settlers in the 12th-13th Centuries. London: Taylor and Francis.
Grew, F., & Neergaard, M. D. (2006). Shoes and pattens. Woodbridge: Boydell Press.
Goubitz, O., Driel-Murray, C. V., & Waateringe, W. G. (2011). Stepping through time: Archaeological footwear from prehistoric times until 1800. Zwolle: SPA Uitgevers.
Kornbluth, G. (2020, May 31). Historical Archive: Liturgical Vestments said to have been worn by Thomas Becket. Retrieved June 22, 2020, from http://www.kornbluthphoto.com/VestmentsBecket.html
Lockyer,Terrance. “Testamentum Porcelli; a Little Pig’s Will.” A Phrontistery. (2012) Web. 29 June 2020.<https://tlockyer.wordpress.com/2012/04/20/testamen tum-porcelli-a-little-pigs-will/ >.
Manuscript Miniatures. (n.d.). Retrieved June 22, 2020, from http://manuscriptminiatures.com/
Prawer, J., The Cr. (1972). The Crusader Kingdom. New York, NY: Praeger.
Shoe. (2020, May 28). Retrieved June 22, 2020, from https://collections.museumoflondon.org.uk/online/object/32681.html
Volken, M. (2014). Archaeological Footwear. Assen: SPA Uitgevers.

I’m often to running a blog and i actually recognize your content. The article has actually peaks my interest. I’m going to bookmark your site and keep checking for new information.
LikeLike