I am an independent researcher, history enthusiast, and reenacter located in the United States. I am most interested in the late 12th century Norman Sicily and Outremer. The primary purpose of this blog is to consolidate research and publish projects so anyone can view them. Crafts I currently practice are sewing, leatherworking, woodworking, painting, and occasional cold work with metal.
High Medieval Foul Weather Clothing
1.0 Introduction
1.1 The Easiest Answer
1.2 Garnache (Hooded Tunics) in Artwork
1.3 Mantles in Artwork
1.4 Hoods in Artwork
2.0 Answering the Question
3.0 Surviving Hoods
3.1 Skjoldeham Hood
3.2 Greenland Hoods
3.3 Bocksten Man Hood
3.4 La Verna Hood
4.0 Surviving Mantles and Chasubles
4.1 High Status Mantles
4.2 Low Status Mantle
4.3 “Coronation Mantle” of King Stephen of Hungary
5.0 Pattern Requirements and Development
5.1 First Pattern
5.2 Second Pattern
5.3 Third Pattern
6.0 Materials and Construction Techniques
7.0 Execution
7.1 Resulting Garment
8.0 Summary
8.1 Bibliography
1.0 Introduction
Like most of my projects, this one began with dissatisfaction with an aspect of my reenactment portrayal. To date, I have used a combination of a hood and half circle mantle as outer layers against the wet and cold. The good side to these garments was that they could be mixed and matched based on conditions and didn’t require much research and development to construct.
Rather than starting with the answer and finding research to support it, a better approach is to ask a question and to answer it through research. The question for this project is: What would a city dwelling craftsman in the late 12th century do to protect himself against the cold and rain? If the answer involves an object, how was it made? The first part of my question can be answered with artistic and literary sources. Construction questions will be addressed by evaluating extant examples.
1.1 The Easiest Answer

The first possible answer is to stay indoors or get wet. The number of possessions owned by modern people would be mind-boggling to historical people of equivalent social status. We take things like raincoats, umbrellas, wellington boots, and insulation layers for granted; most people have access to appropriate clothing for any given weather where they live. In the early to high middle ages, the cheapest solution would be to stay indoors or under the eaves of buildings. A bit of chill and damp from a walk to the well during foul weather is quickly cured when back indoors. Besides that, the wool outer garments they wore were naturally water-resistant and stay warm when wet. Why go through the expense and trouble of having more garments when the issue is so minor? I don’t meant to argue that city dwellers always went without outer layers. Instead I’m pointing out that automatically putting historical people in foul weather clothing would be an assumption based on modern bias and not historical evidence. The person I portray is also a part time soldier, a serviens or serjeant, and could reasonably expect to be stuck out of doors for extended periods of time. Most modern reenactment happens in and around encampments. While participating I can expect to spend days on end in cold and wet conditions without the luxury of retreating indoors. Both are reason enough for me to explore more ways of keeping warm.
1.2 Garnache (Hooded Tunics) in Artwork
With that disclaimer out of the way, I can get into the more interesting answers. There are several types of foul weather clothing which show up in iconography and archeology. They are broadly categorized as hooded tunics or garnache, mantles, and hoods.

Bodleian Library, MS. Auct. D. 2. 6, f. 6v, England, ca. 1139-1158. 
Church of Saint Jacques, Aubeterre sur Dronne, France, ca. 1160-1171. 
Liber ad Honorem Augusti, bbb-cod. 120.ii f. 129r, Sicily, ca. 1194-1196. 
Gospels of Henry the Lion, BSB Clm 30055 f. 111, Germany, ca. 1188. 
Psalter of Eleanor of Aquitaine, Den Haag, Koninklijke Bibliotheek, KW 76 F 13 f.3v, France, ca. 1180-1185. 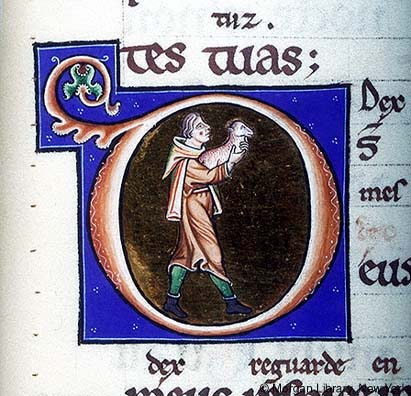
Psalter, MS M.338 f. 77r, Tournai, Belgium, ca. 1200. 
Canterbury Passionale, Harley 315 f. 15v, Canterbury, England, ca. 1123-1150. 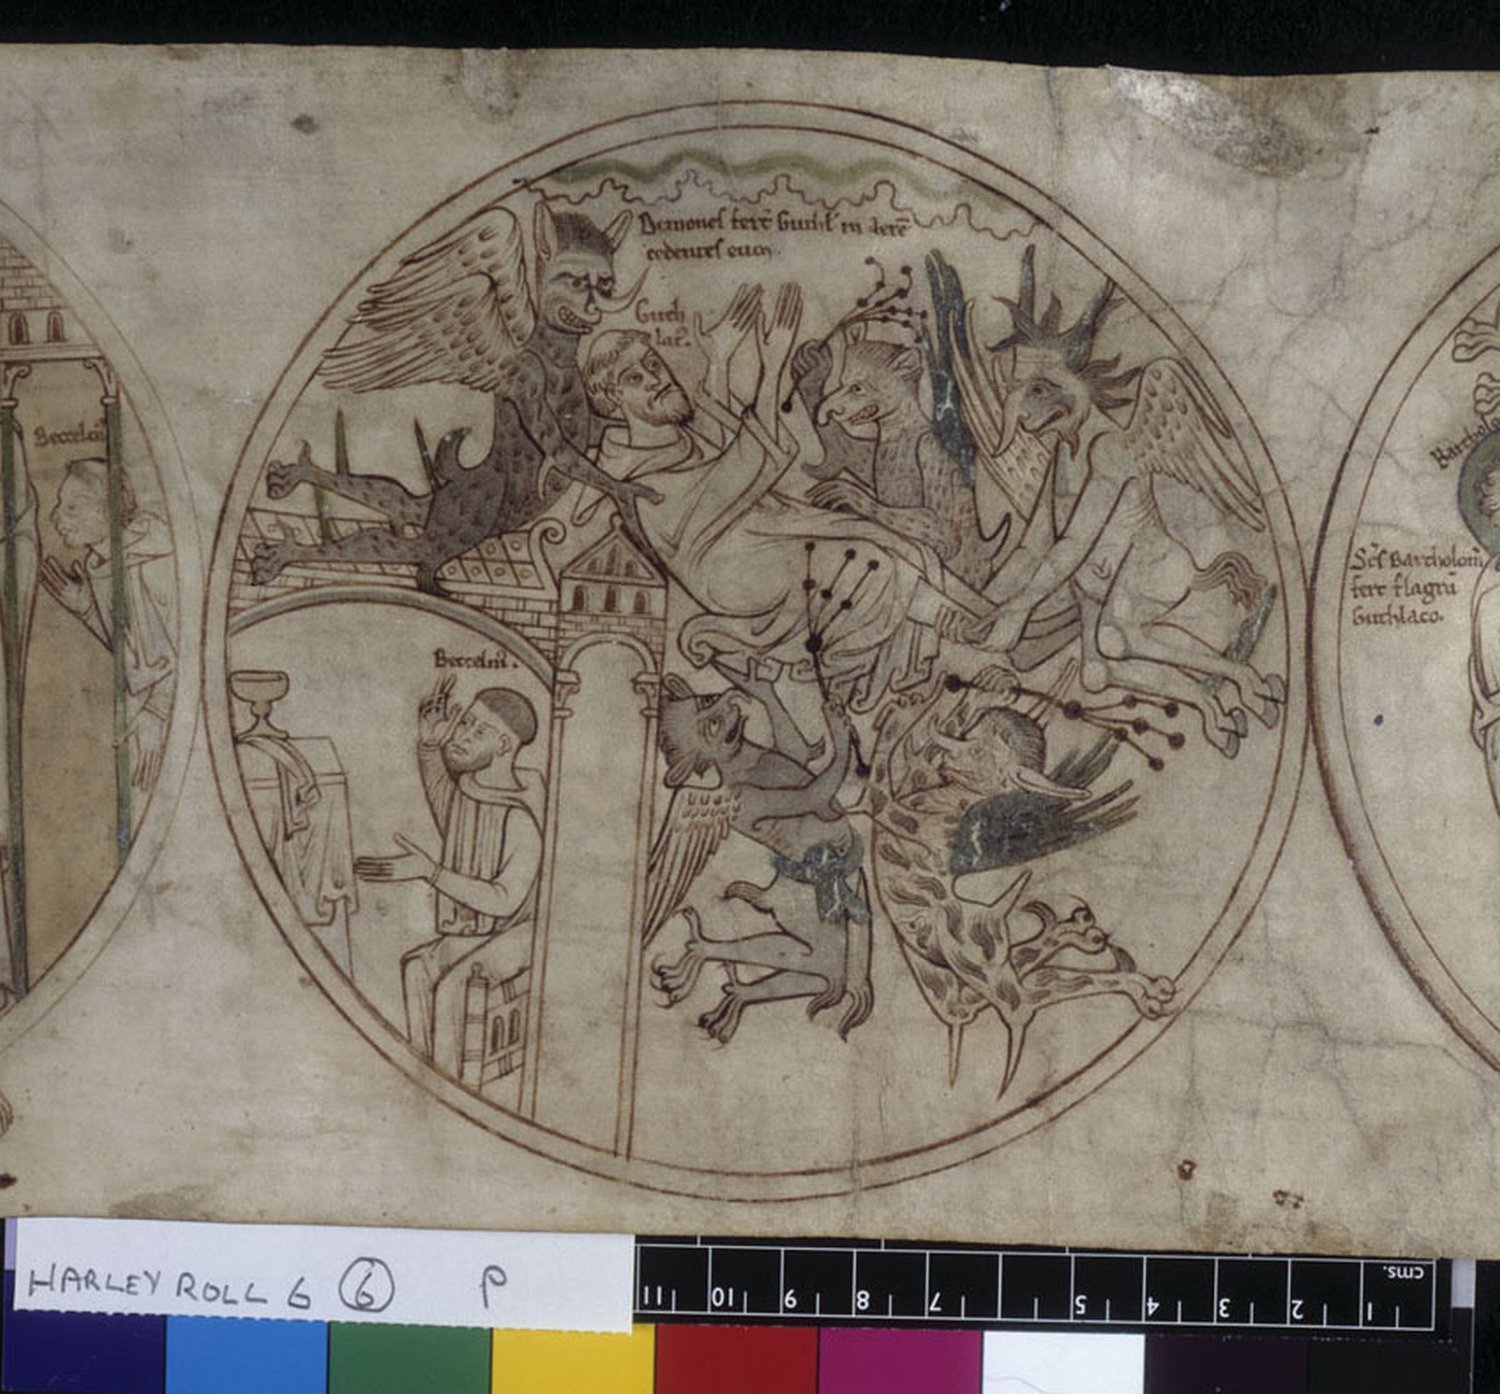
Life of Guthlac, Harley Y 6 Roundel 7, England, ca. 1175-1225. 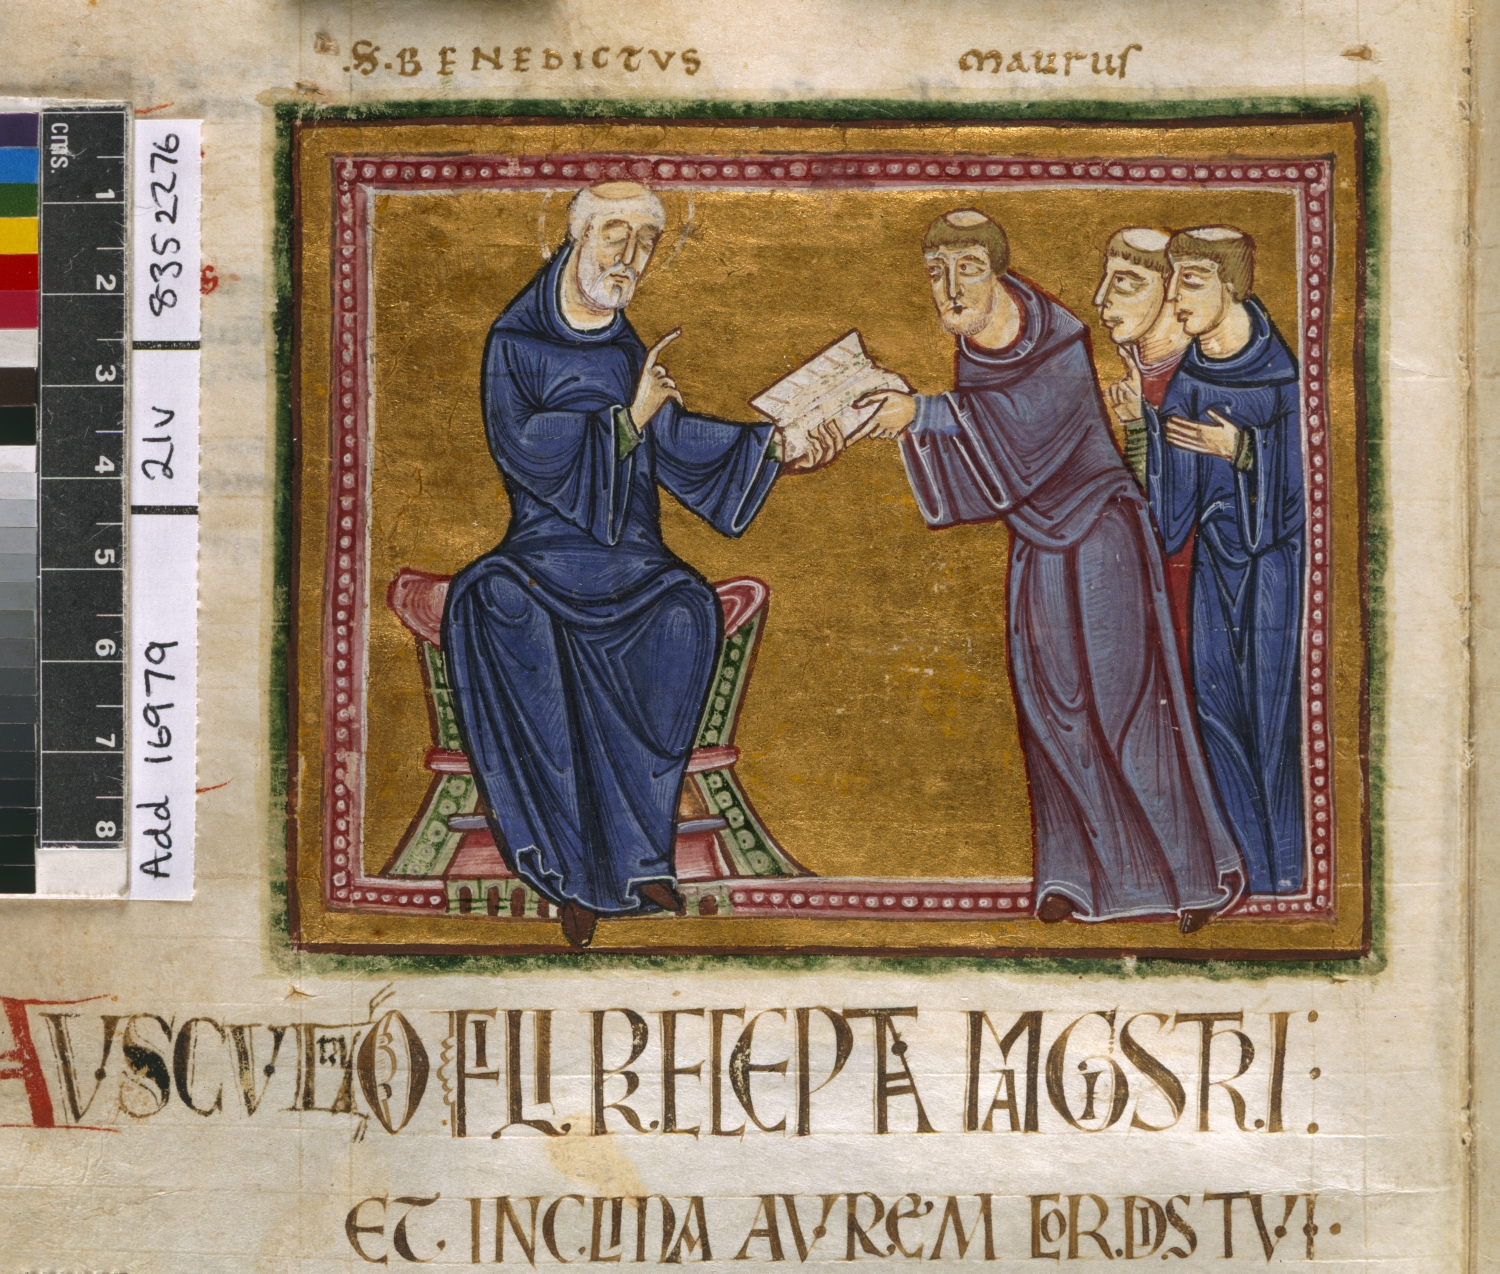
Obituarium and Commentary on the Rule of St Benedict, BL 16979, f. 21v, St Gilles, France, ca. 1129. 
Decretum by Gratianus, Amiens, BM 0354 f. 72, Amiens, France, ca. 1175-1200.
Garnache (cotte, etc.) are particularly interesting garments to me. I have most often seen artistic representations from Britain, France, and Germany in the mid-twelfth century. This may be the result of implicit bias of my manuscript sources which could only be fixed with statistical analysis. Garnache would become particularly popular in the 13th century among the merchant class and above, but for now they are usually depicted on lower status masculine individuals. Most of the examples depicted above are worn by people who work in all weather. An exception is a disguised Richard I in the Liber ad Honorem miniature. A garnache fills a laborer’s requirements well; the user is still able to use their hands and doesn’t have to muddle about with a mantle twisting during activity. The hood can be donned or doffed without a fuss. The other common users of this type of garment were monks and scribes. In later centuries they would become closely related to monasticism but for now other options still show up. Tunics with hoods are mentioned in the 1226 the Rule of St Francis, indicating the continued utilitarian use of the garment even as variations became fashionable.(Halsall and d’Assisi) To my knowledge there are no surviving examples of hooded tunics, though a pattern could be extrapolated from surviving tunics and hoods. I decided this garment was relatively specialized in a 12th century context and continued to look for alternatives.
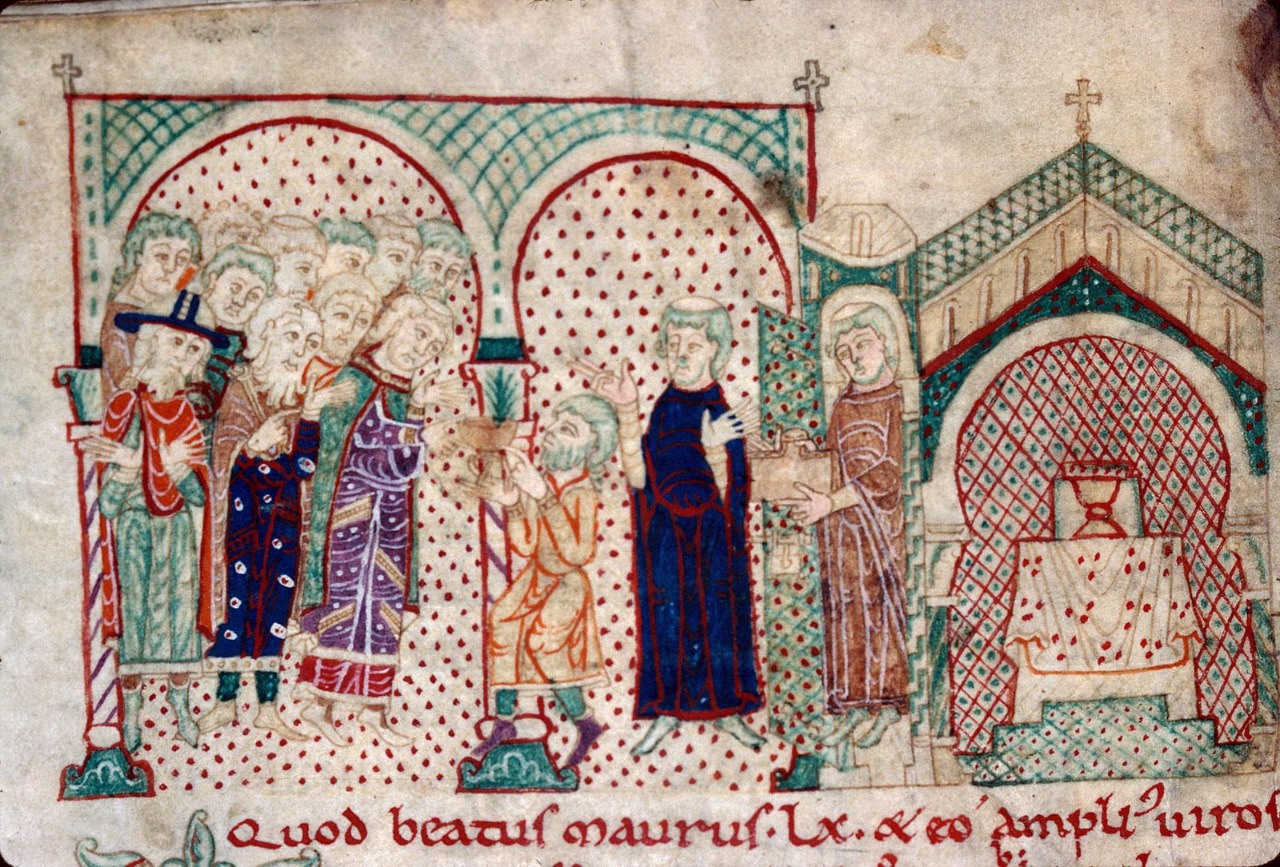
Vita et miracula s. Mauri, Troyes, Bibl. mun. ms. 2273 f. 069v, Troyes, France, ca. 1080-1120. 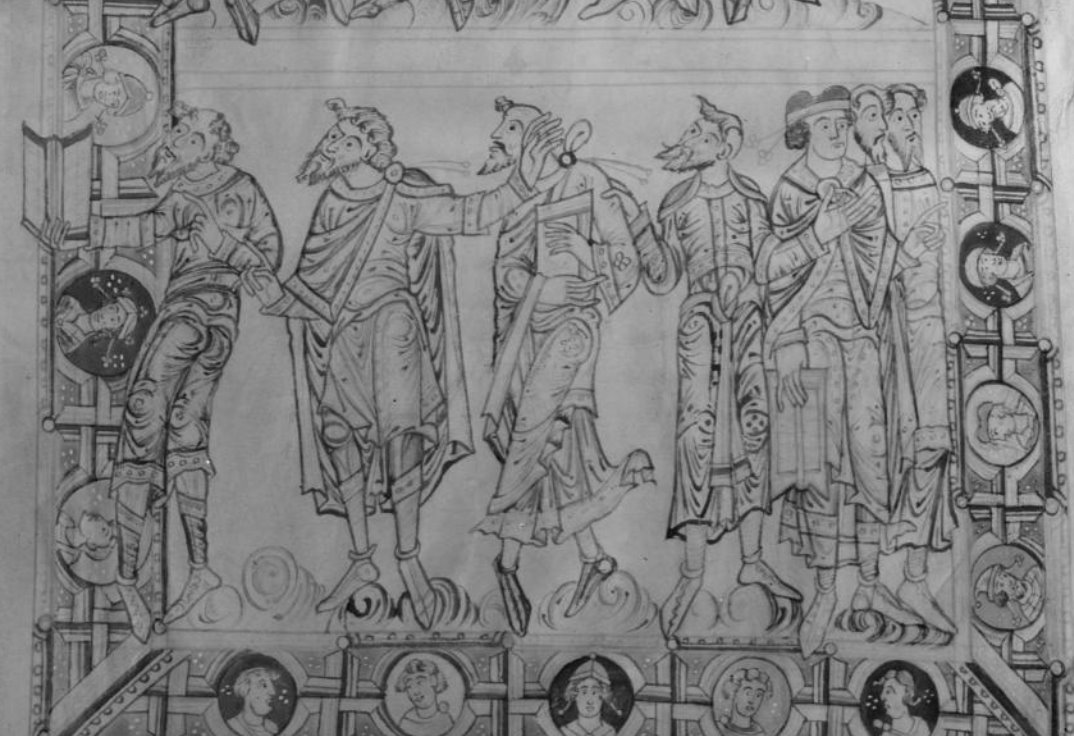
Augustini De civitate Dei, Biblioteca Medicea Laurenziana IT:FI0100_Plutei_12.17 f.4r, England, ca. 1201-1210. 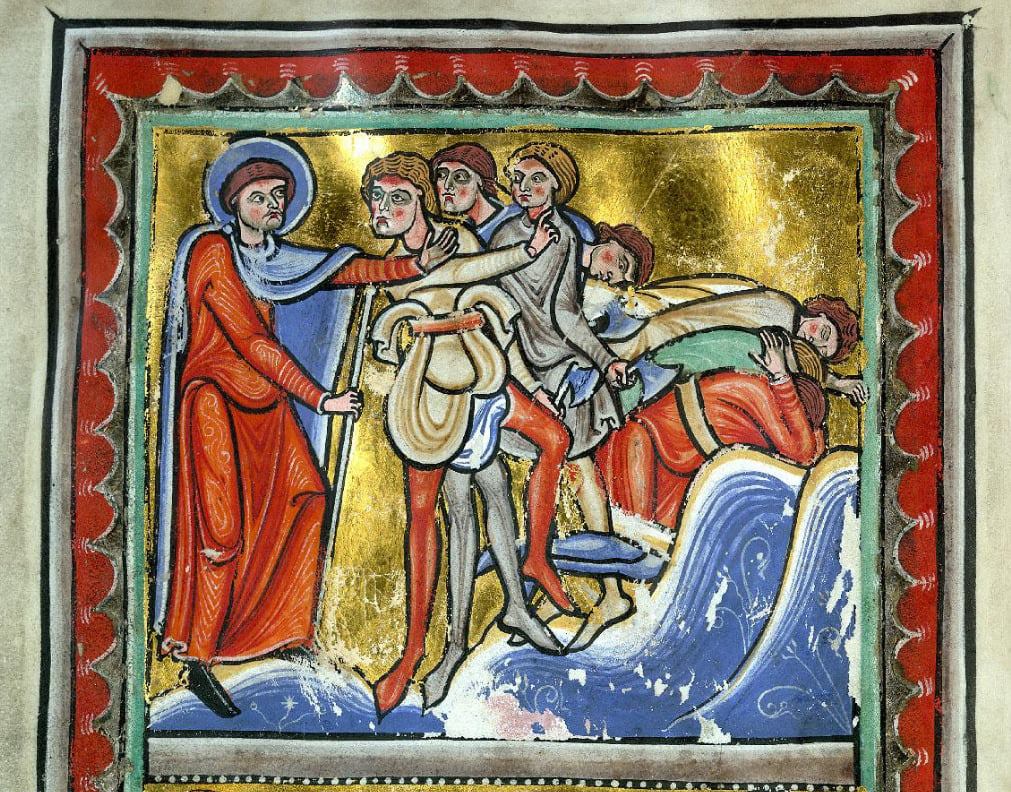
Vita et Miracula s. Mauri, Valenciennes, Bibl. mun., ms. 0500 f. 66v, France, ca. 1160-1170. 
The Admont Bible, Vienna: Osterreichische Nationalbibliothek Ser. n. 2701 f. 84r, Salzburg, Austria, ca. 1140-1150. 
Vita et Miracula s. Mauri, Valenciennes, Bibl. mun., ms. 0500, f. 59, France, ca. 1160-1170. 
Speyerer Evangelistar, Cod. Bruchsal 1 f. 11r, Speyer or Trier, Germany, ca. 1220. 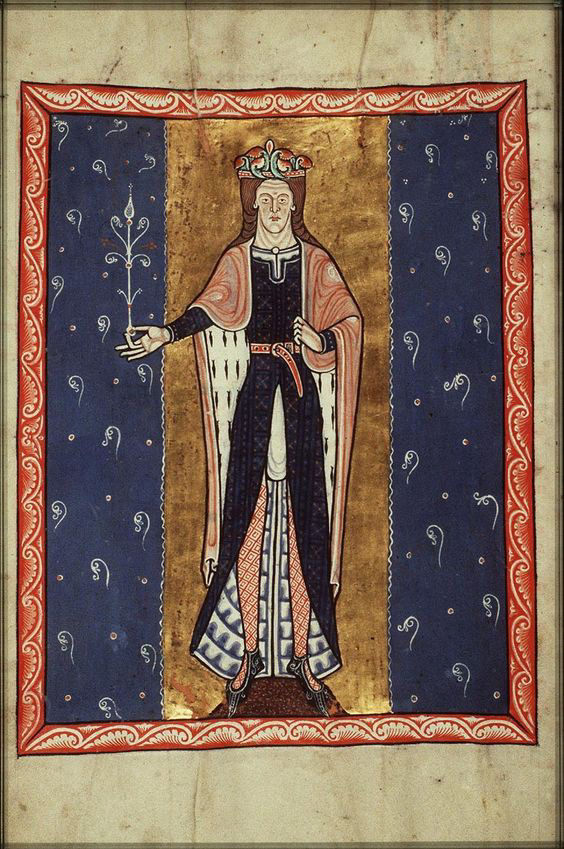
Psalter of Eleanor of Aquitaine, Den Haag, Koninklijke Bibliotheek, KW 76 F 13 f.4v, France, ca. 1180-1185.
1.3 Mantles in Artwork
Mantles are a popular option for much of the middle ages. The 12th century is chock full of different styles of mantles. They may be decorated with fur lining, embroidery, brocade, beadwork, cabochons, and more. They were worn fastened at one shoulder, at the front of the neck, or just draped over the shoulders. All mantles depicted in the 12th century appear to be the half-circle variety, though it is possible that blankets served as impromptu mantles. Mantles are the clear choice of the rich, from the very highest members of the social structure to the courtly retainers and lesser nobility. There are several extant examples; The Mantle of Otto IV (12th C HRE), the Chasuble of Bishop Bernhard (12th C HRE), Mantle of Roger II (12th C Sicilian), Cloak of St. Clara (13th C), as well as others from the 11th and later 13th centuries. (Coatsworth, kostym).
It is hard to draw a line across social strata where mantles stop. It’s often difficult to determine the intended social status of the less ornate figures in artwork. It is clear that the people wearing mantles are rarely performing manual labor. Instead they are talking, traveling, or sitting. I have not discovered sumptuary laws restricting the wear of mantles as of this writing. The chief limiting factor to the wear of mantles was the relative extravagance of a less practical garment. Anyone who needed to perform manual labor in all weather would prioritize more practical options.

The Life and Miracles of St. Edmund, Morgan Library & Museum MS M.736 fol. 9r, England, ca. 1130. 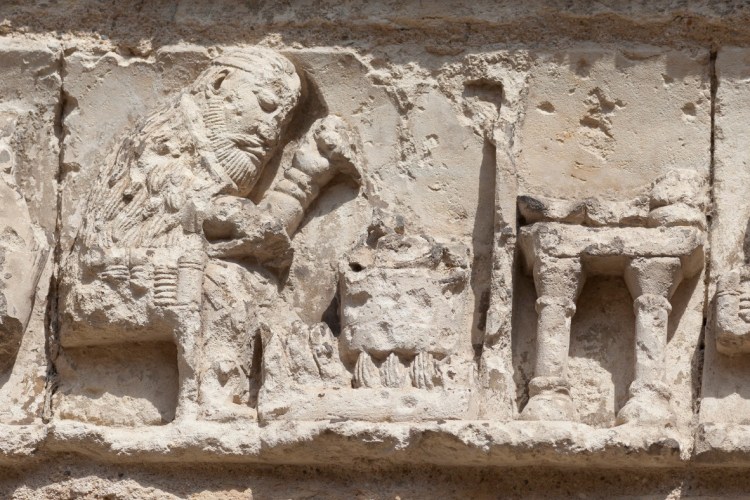
Church of Saint Jacques, Aubeterre sur Dronne, France, ca. 1160-1171. 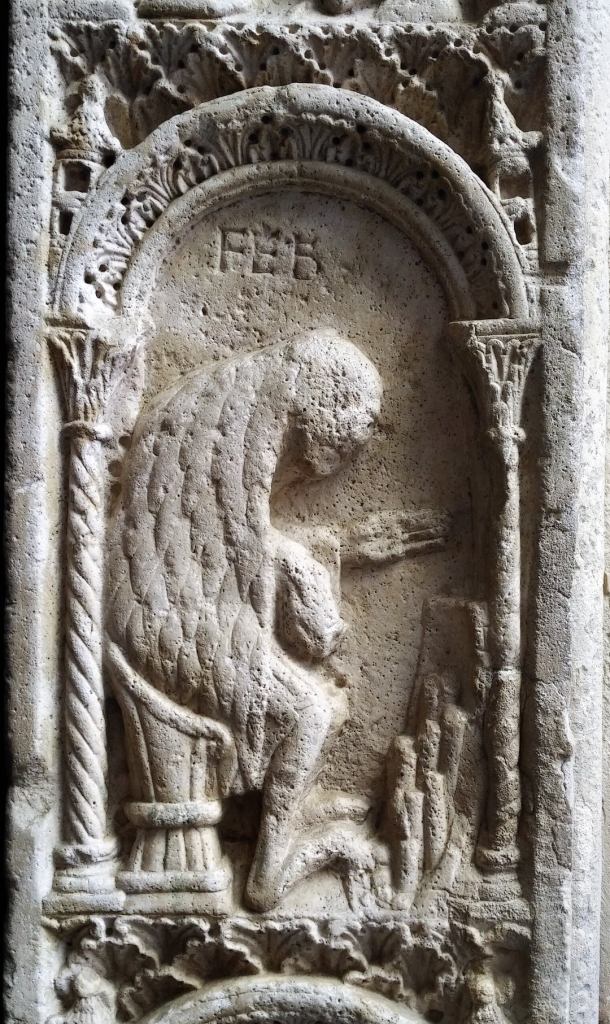
Porta della Pescheria, del Duomo di Modena, Italy, ca. 1130. 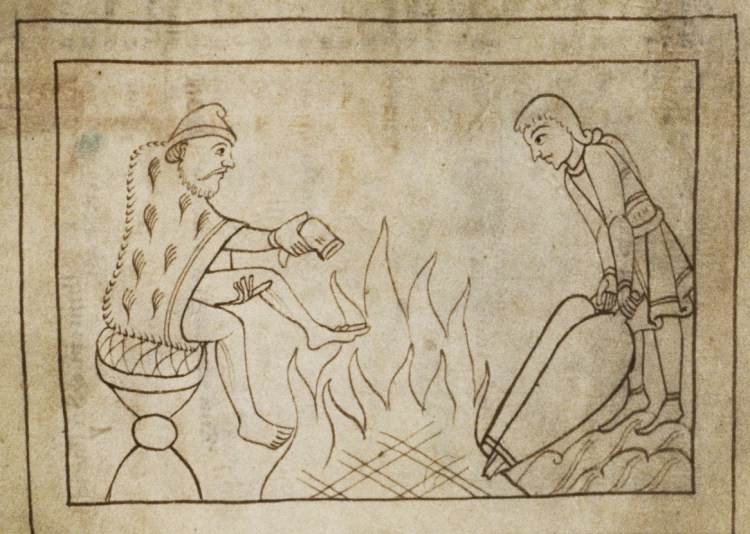
Bodleian Library MS. Bodl. 614 f. 4r, England, ca. 1140-1160. 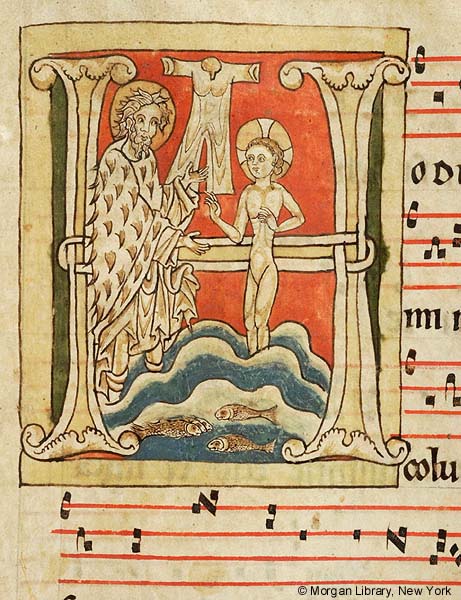
Antiphonary, Morgan Library & Museum MS M.966 fol. 36r, France or Germany, ca. 1200.
Mantles are also the outer garment of the poor. The above examples includes beggars, shepherds, John the Baptist (described in scripture as wearing clothes of camel hair), and individuals warming themselves at a fire. The form of these garments is very different from that of the nobility. Posh mantles already discussed were between floor and knee-length. In contrast, poor mantles are depicted at knee height or shorter and made of a shaggy material. Barring literary input, we can only speculate on if these garments are the skin and fur of an animal, raw fleeces, or woven cloth with piles. I find the pile cloth or fleece to be most likely for reasons of cost, as sheep skin can otherwise be used to make vellum or leather. It is also unclear if these are purpose made mantles, repurposed blankets, or a mixture of the two. I decided to not go with either of these styles of mantle because of the social status implications. While they were worn by the extremes of the social ladder, use by the artisan class is somewhat uncertain.
1.4 Hoods in Artwork
The final option for foul weather clothing is hoods. Starting in the mid-13th century, hoods were a fashion item with a myriad of decorative elements. In the late 12th and early 13th centuries they seem to have a more practical focus. The demographics depicted wearing hoods are masculine laborers, travelers, cripples, and scribes. None of the depicted hoods seem to have shaping around the face or chin and the bottom hems are straight. In other centuries they could be dagged or angled, but I have not noted examples in this context. These hoods usually boast an early version of liripipe, a tail at the back of the head. These liripipes usually have a distinct wedge shape and seem to be no longer than the depth of the head. Hoods with shoulder-length capes appear occasionally, but longer ones are much more prevalent.

Psalter of Eleanor of Aquitaine, Den Haag, Koninklijke Bibliotheek, KW 76 F 13 f. 105v, France, ca. 1180-1185. 
Psalter of Eleanor of Aquitaine, Den Haag, Koninklijke Bibliotheek, KW 76 F 13 f. 111v, France, ca. 1180-1185. 
Psalter of Eleanor of Aquitaine, Den Haag, Koninklijke Bibliotheek, KW 76 F 13 f. 124r, France, ca. 1180-1185. 
Psalter of Eleanor of Aquitaine, Den Haag, Koninklijke Bibliotheek, KW 76 F 13 f. 11v, France, ca. 1180-1185. 
Psalter of Eleanor of Aquitaine, Den Haag, Koninklijke Bibliotheek, KW 76 F 13 f. 10v, France, ca. 1180-1185.
Hoods with long capes (sometimes known as cappa) show up in a wide variety of manuscripts alongside other foul weather clothing. Rather than being the same length all the way around, there are often accommodations to enable the wearer to use their hands. I have noted two ways this was accomplished. The front of the garment may be shortened while the back remained long, creating a sweeping profile. Another approach is to leave the front of the cape open from the bottom hem up to the neck. Some example seem to have neither accommodation. Shaggy material shows up on some of these examples like the mantles. To date I have found no evidence of a separate hood being worn over a mantle in the late 12th to early 13th centuries.

Porto Della Pescheria in Modena, Italy, ca. 1140-1160. 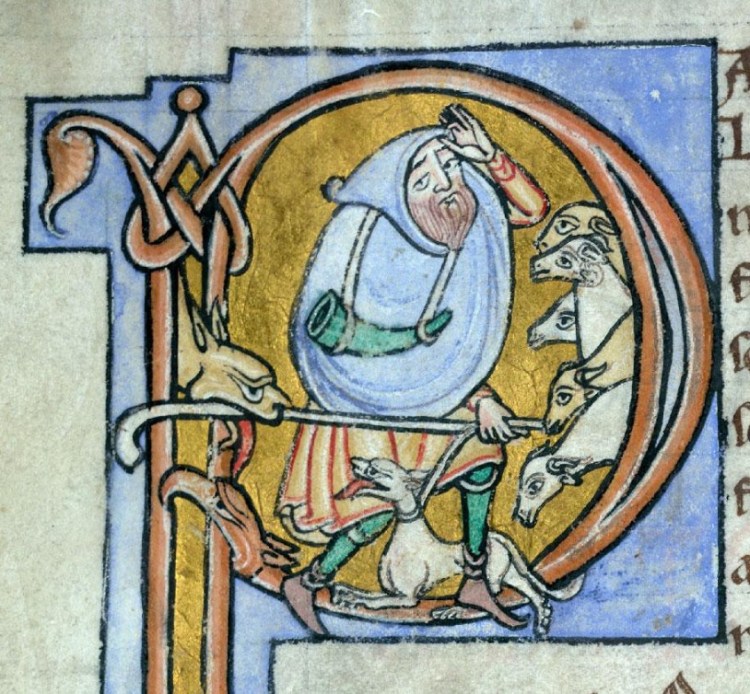
Vita s. Gregorii Magni, VALENCIENNES, Municipal Library, 0512 (470 bis) f. 100v, ca. 12c. 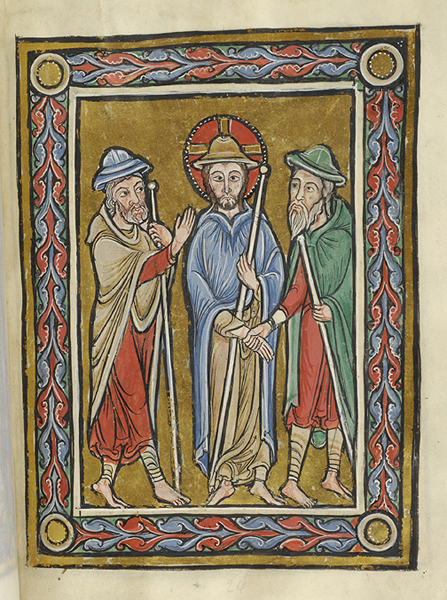
Vita Christi (Life of Christ), The Morgan Library and Museum, MS M.44, France, ca. 1175 
Canterbury Psalter, BnF, Mss., Latin 8846 f. 54v, England, 1175-1200. 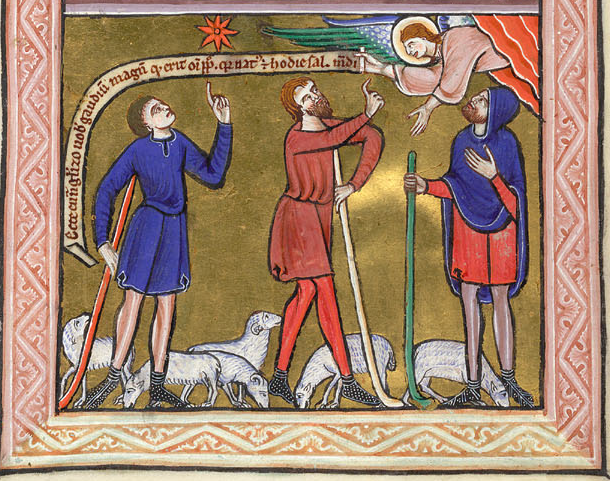
Psalter, BL Arundel 157 f. 3v, England, ca. 1200-1225. 
Psalter, BL Harley 2895 f. 1v, France, ca. 1175-1200. 
Gospel Book, MS M.565 fol. 38r, Saxony, Germany, ca. 1210-1220. 
Psalter, MS M.521r, Canterbury, England, ca. 1155-1160. 
Psalter of Eleanor of Aquitaine, Den Haag, Koninklijke Bibliotheek, KW 76 F 13 f. 2v, France, ca. 1180-1185. 
Légendier, Angers, BM, 0807 (0723) f. 85v, France, ca. 1150-1200. 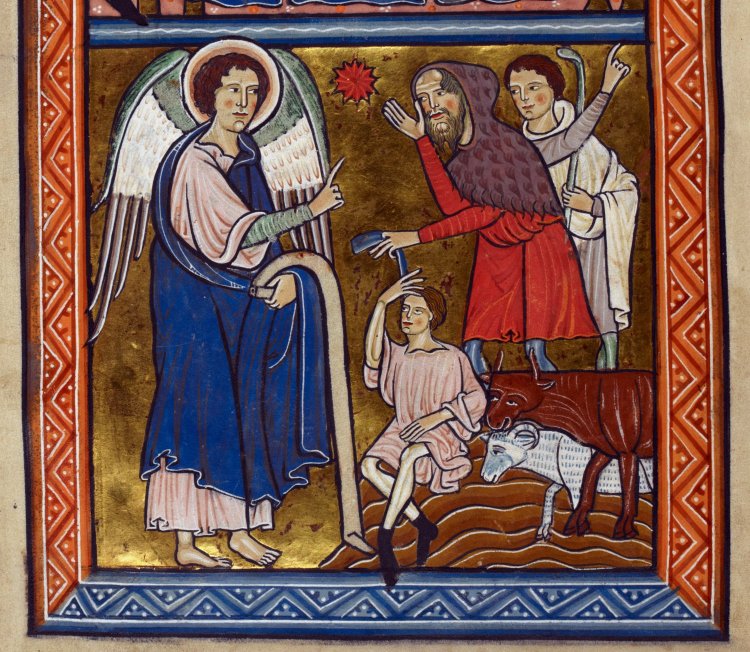
Psalter, BL Royal 1 D X f. 1v, England, ca. 1200-1220. 
Itinerarium peregrinorum et gesta regis Ricardi, Cambridge MS Ff.1.25.4 f. 126v, England, ca. 1240-1260.
2.0 Answering the Question
My decision for my project was this final form of hood. Short in the front, long in the back, stubby angular liripipe, and a smoothly shaped hem. The next problems to solve were the pattern and materials and techniques to assemble it with. Both answers need to come from extant garments. No hoods of the period survive, so I had to broaden my search to adjacent eras and other garments.
There are two ways to look at the target garment. Is this a mantle with a hood grafted on, or a hood with a long shoulder cape? The two different considerations for hand use may provide a clue. The split garment is very similar in concept to a mantle, wrapping around the body and fastening at the neck. The style which is complete all the way around and shorter in the front is similar in concept to long hood. It also closely resembles an ecclesiastic garment called a bell chasuble. Before deciding which patterning approach to follow, I looked at the available information from surviving garments.
3.0 Surviving Hoods
Hoods never had the same sort of ceremonial or ecclesiastic use as mantles and very few survive. Most what survives comes from exhumations of one type or another. Unfortunately, most of Europe does not have the right sort of climate and soil for fabric preservation. This means that these extant hoods have bias toward areas with favorable conditions, which tend to be Northern.
3.1 Skjoldeham Hood
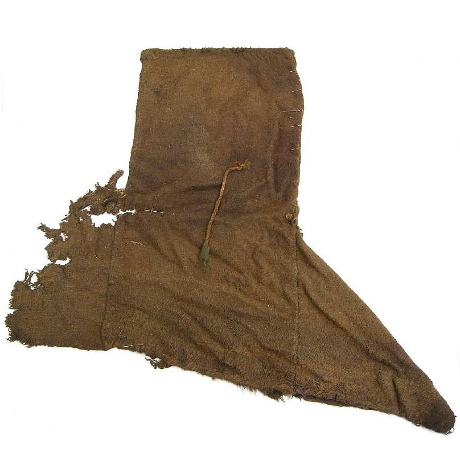
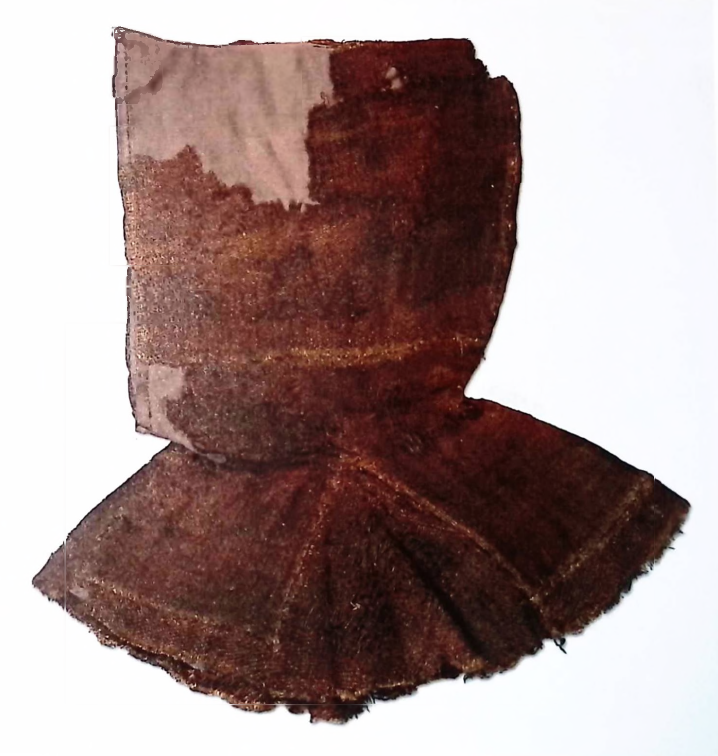
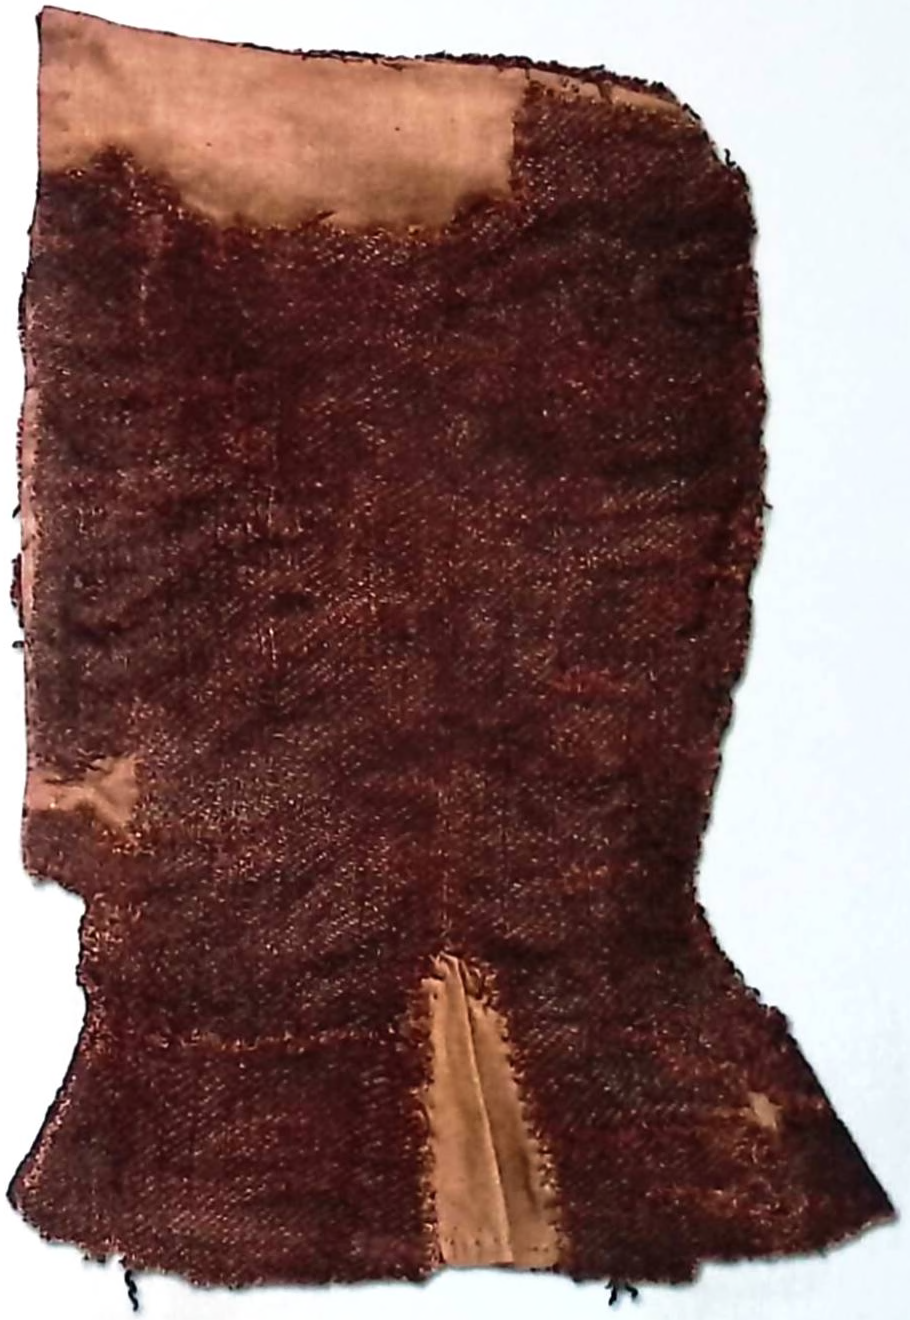
The hood which is closest in dating to my target of 1191 is the well known Skjoldeham hood from a bog burial in modern day Norway. The find has been radio-carbon dated to the late 11th century, only a century away from my target date.(Løvlid) Fashion of the time moved relatively slowly, so these artifacts are potentially very insightful. The find was attributed to a member of the Norwegian ethnic group in a 1938 study by Gutorm Gjessing, but more recent research has cast this evaluation into doubt. Dan Halvard Løvlid demonstrated significant similarities between the Skjoldeham finds and the traditional clothing of the indigenous Sami ethnic group. DNA analysis of the remains conducted in 1999 originally reported that no genetic markers attributed to the Sami were present, but this conclusion has since been discounted by one of the individuals who conducted the tests. Anders Gotherstrom of Archaeological Research Laboratory at Stockholm University has stated “Much in genetic science has changed since then, and the data they had access to was not good enough to draw the conclusions (in regards) to sex and ethnicity, with the certainty that they did in 1999”.(Løvlid) This new information and the anthropological fact that culture is a social construct and not a genetic one means there can be no genetic proof of an individual’s culture. Due to these complications, the information given by the find must be regarded with significant suspicion. The image below illustrates strong similarities between the Skjoldeham garments and traditional Sami garments. For more on the subject see Løvlid cited below.


The Skjoldeham hood is a simple construction of two square shaped godet panels and one rectangular body panel. The article is assembled with each square canted so that opposing corners connect with the bottom edges of the main rectangular panel. It is embellished with a sort of raised “comb” on top of the head and cords attached to each side, presumably for tensioning the garment. There are no cut-outs or shaping for the chin or face and the rear of the hood forms a point. The main takeaways from this garment are the large front and back godets which connect the sides of the single piece body.
3.2 Greenland Hoods
The next examples of surviving hoods are unfortunately farther from my target, coming Greenland in the 14th century. Of the sixteen hoods two have been radiocarbon dated; D10605 to 1390-1490 and D10606 to 1380-1440. The others have been dated based on the context of the finds. Even though these examples are two hundred years away from my target, I didn’t have the opportunity to be picky. These examples give the chance for small scale statistical analysis and provide design clues which may have remained through the centuries.
I have information about five hoods in this assemblage which have relatively large capes and are classified by Norlund as Type 1. They range from 1260mm-1540mm in fullness and lengths which seem to have reached the shoulders. All hoods of this type were constructed with a two piece body and have a front godet. One example, D10596, also has a godet at the rear of the garment. All others of the type have patterning which mimics the function of this rear godet with a broad flare of the body piece. D10596 also is slightly longer at the back than the front. This is facilitated by angled cuts at the bottom of each body panel and a generous curve to the hem of the rear godet. One of the main patterning issues with hoods is that the garment must go from the circumference of the wearer’s head to the circumference of their shoulders in a short distance. If the flare begins too low on the garment, it will bunch around the neck. Three of these garments addressed the issue by starting the flare above the chin level. D10596, is too degraded to make a determination and this information is not available about D10599.


The second type of hood from the Greenland assemblage is characterized by shorter capes. These eleven hoods are also patterned with two piece bodies. In contrast to the front and back godets and flare of Type 1 patterns, this type has side godets. The fullness Type 2 hoods ranges between 630mm-1210mm. This means there is no overlap where a Type 1 pattern has a smaller cape than a Type 2 pattern. The sample size is too small to claim there was a hard rule in manufacture, but there is a clear trend. The side godets, and indeed the whole hood may be pieced together. The goal of all piecing seems to combine available material into panels which match the shapes from non-pieced garments. See especially D10601 and D10603. The body panels of these hoods do not seem to flare toward the bottom hem. Side godets are inserted such that their peak is in line with the face opening. Of the available sixteen examples of both Type 1 and 2, seven of the garments are finished with two rows of “stab stitching” at the edge of the face opening. Two had the same technique applied to the bottom hem. This stitch is similar to a very small running stitch, but the needle is angled away from the direction of stitching each time it passes through the material, emerging on the other side through the hole of the previous stitch. This very tight stitching both stiffens and reinforces the material. All hoods with remaining traces of a liripipe appear to have a short section formed from the same pieces as the hood body. My main clues from the Greenland examples which have been used in the 12th century are the ubiquitous use of two piece construction and the two techniques to achieve the necessary fullness.(Østergård 203-218)

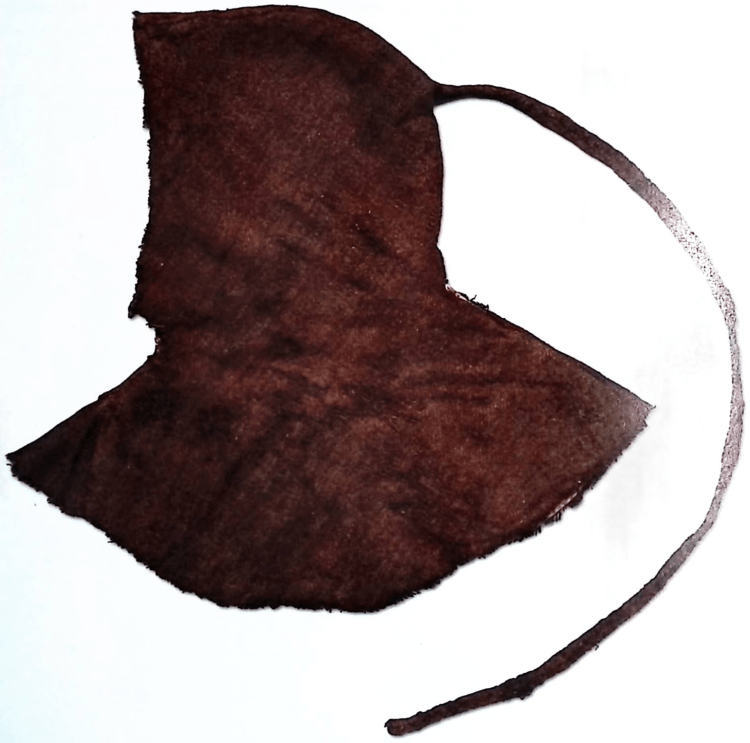
3.3 Bocksten Man Hood
The next surviving hood to discuss is the Bocksten Man hood. Like the Skjoldeham hood, it was found on a bog body in Northern Europe, this time in Varberg, Sweden. The hood is roughly contemporary to the Greenland finds, being dated to 1350-1370 according to a combination of dendrochronology and costume historical evidence. The hood is similar to the Greenland hoods in many ways. It falls neatly into the Type 1 pattern with its bottom hem reaching 1600mm. It sports a front godet and large arcing flare on the rear of the body panel mimicing a rear godet, shaped chin, and partially contiguous liripipe. In contrast to the Greenland hoods, the body of this example is constructed from a single piece of fabric. The edges of the bottom hem were extended by a few centimeters at each shoulder by adding long slivers of material. My main takeaways from this example are to confirm the information from Greenland is not merely the product of a disassociated population on a wind-swept island, but is relatively close to the fashion of the continent. It also adds the extra variation of a single piece body construction. (Coatsworth 37-39) Just like the Greenland examples, all of this information is tainted by the fact it’s two hundred years too late. I have made progress toward the goal but before I can begin, this needs to be translated into the patterning techniques and trends used in the high middle ages.
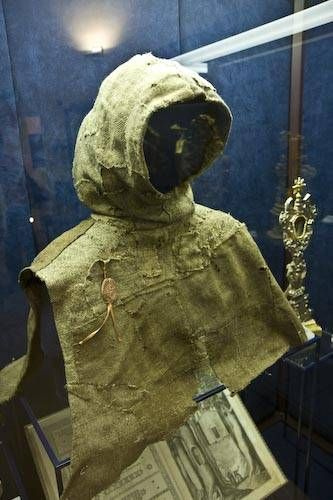
3.4 La Verna Hood
The final surviving hood is dated to 1290 according to an unknown basis and attributed to Giovanni della Verna. It is in the museum of La Verna Franciscan Monastery in Tuscany. If its provenance and dating can be verified, I think it could be an important data point. Contrary to the other hoods, this heavily repaired garment appears to have been patterned with separate head and shoulder pieces. I have not been able to find any more information about it from scientific publications and will make updates if I can find out more.
4.0 Surviving Mantles and Chasubles
Mantles and Chasubles were used as high status and ceremonial garments from the early middle ages to present day. There are many examples from the migh middle ages which survive and the list below does not include all of them. This group was chosen because of their relevance to the time period, historical reliability, and to illustrate certain points.
4.1 High Status Mantles
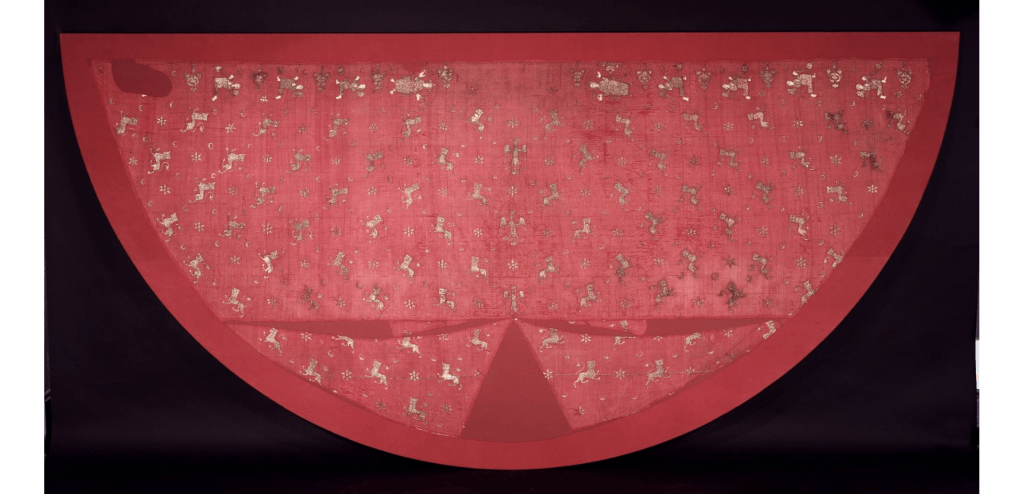
The main constraint of mantle patterns is the width of the fabric. Most surviving mantles are either too covered in decoration or too fragmentary to show seam lines, but he Mantle of Emperor Otto IV illustrates the concept. The pattern simply creates a large enough piece of fabric to wrap around the entire body and is shaped to fall to an even length when worn. Some mantles, like the Mantle of Thomas Becket are made of fabric which was wide enough to make an entire mantle without a seam. While most garments of the 12th century are cut with straight lines, the bottom edges of mantles is an exception. While the front edge is straight, the bottom hems are curved continuously to create a half circle. They may have relief cuts for the neck such as on the Mantle of King Roger II of Sicily (Coatsworth 84-88), mantle of St Kunigunde (Coatsworth 100-102), and Mantle of Thomas Becket(Simon-Cahn).
4.2 Low Status Mantle
The sole surviving example of a low status mantle I am aware of from the 13th century is the mantle of St Clara. All images I have found of this garment show it displayed on an mannequin or stand. This makes the evaluation of its pattern difficult, beyond being roughly half circle in shape. It is constructed from a bulky and coarse wool which should make obvious steams, but none are apparent. I have been able to find the following description of the garment and modifications which seem to have been made to it “This cloak is made of a piece of cloth about 55 cm wide and 356 cm long, which is gathered with a seam of about 20 cm on the edge of the collar to form a cape. The cloak is open in front and now also in the back; the pieces of cloth used for (the repair of) Francis’ habit are missing from the cloak at the point where the middle seam once was.”(Flury) I find it interesting that the low status garment seems to be made with the same large curve as the high status garments, and without significant piecing.

4.3 “Coronation Mantle” of King Stephen of Hungary
Half circle mantles and chasubles may seem like different garments in modern thinking, but this was not always the case in the late 12th and early 13th centuries. By this time, some mantles had achieved the status of ceremonial garments both in the clergy in a slightly different form. Rather than being fastened by a brooch, the straight edges of a mantle are sewn together, creating a sort of cone. A gap is left open at the peak, which the head passes through, creating the bell shape this type of chasuble is named for. Some surviving garments even crossed the boundary between secular and ecclesiastic. The “Coronation Mantle” of King Stephen of Hungary began its life as a chasuble (ca. 1031) according to decorative text on the garment itself. The front edges of the garment were originally joined, creating the conical shape. In the early 13th century, the front seam of the chasuble was opened up and collar added to create its current configuration. This change may have caused the pleats visible just below the collar, making the garment look like it is more than half of a circle. I have not been able to find further clarification about the pattern of this garment.

5.0 Pattern Requirements and Development
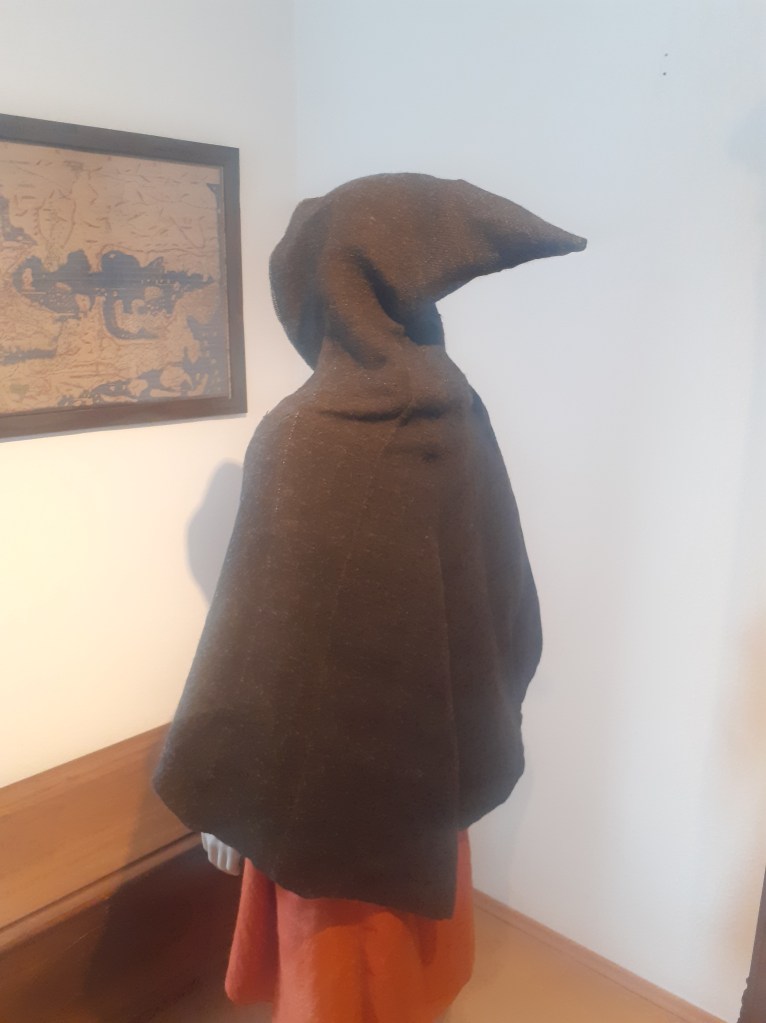
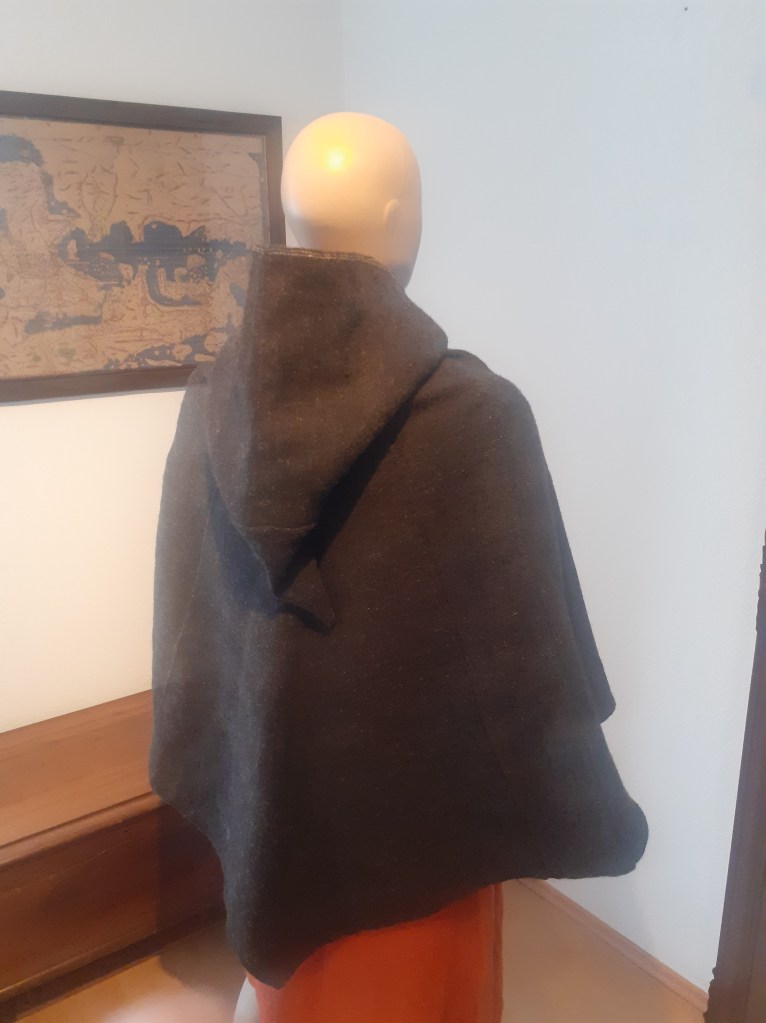
For my own project I decided to go with the style of hood which is shorter in the front than the back and does not have the front split. In my mind, the more appropriate way to approach the garment is to consider it hood-like. While patterns have somewhat graduated from being completely angular in the late 12th century, half circles are still very geometric shapes. In order for a chasuble-patterned garment to be shorter in the front than in the back it would need to be elliptical or a similar shape. I have not seen any extant garments of the period with that sort of abstract shape. Beginning with a chasuble or mantle pattern could be a valid option for one of the garments with a split in the front or constant length all the way around, but that is not what I was making.
5.1 First Pattern
Using a hood-like pattern presents challenges when trying to match the look of the garment from medieval iconography. The hem of the garment is always depicted as rounded and flowing, not angular. Much of the challenge of this pattern was maintaining the style of patterning used in the 12th century and matching the silhouette from iconography.
My first concept for a pattern was based on the same principles as the Type 1 Greenland hoods. First I had to take the 14th century patterns and adjust them to match the patterning style of my chosen context and the silhouette from artistic depictions. I included no shaping around the face or chin. The integral tongue of liripipe as on the 14th century examples seemed like a later innovation, and was omitted. Its addition would make the body panels unnecessarily wider since there would be no faux godet in the rear. My first pattern had a single body piece which went over the head and godets in the front and back. In order to get enough fullness and the length in the back, I made the back godet significantly larger than the front. Both were isosceles right triangles with the hypotenuse forming the hem. The body piece was also extended by piecing, an attempt to smooth the transition from front to rear. This idea was discarded before mock-up. Based on my concept sketches, the lines of the body extensions and rear godet would meet at a sharp angle instead of the smooth shape I was looking for.

5.2 Second Pattern
In order to smooth that transition between godet and body piece, I drafted the rear godet as smaller. Two large pieces formed an acute isosceles triangle panel. The front godet remained an isosceles right triangle. This version made it to the mock-up phase but it also had issues. The angles at the rear hem of the garment were gone, but the cape didn’t have enough fullness. The garment was also riding up on my neck and shoulders.
This draft also had issues with the hemline. My front godet needed to be narrower to smooth out the silhouette of the bottom hem like I had already done in the back. The problem with making the front godet narrower was it was how I changed the height of the hem. This was the difference between one half of the hypotenuse and one of the legs of the isosceles right triangle making up the front godet. The original math meant the front was still about 70% of the length of the back. This a marginal decrease at best, and the effect would diminish if I narrowed the front godet.
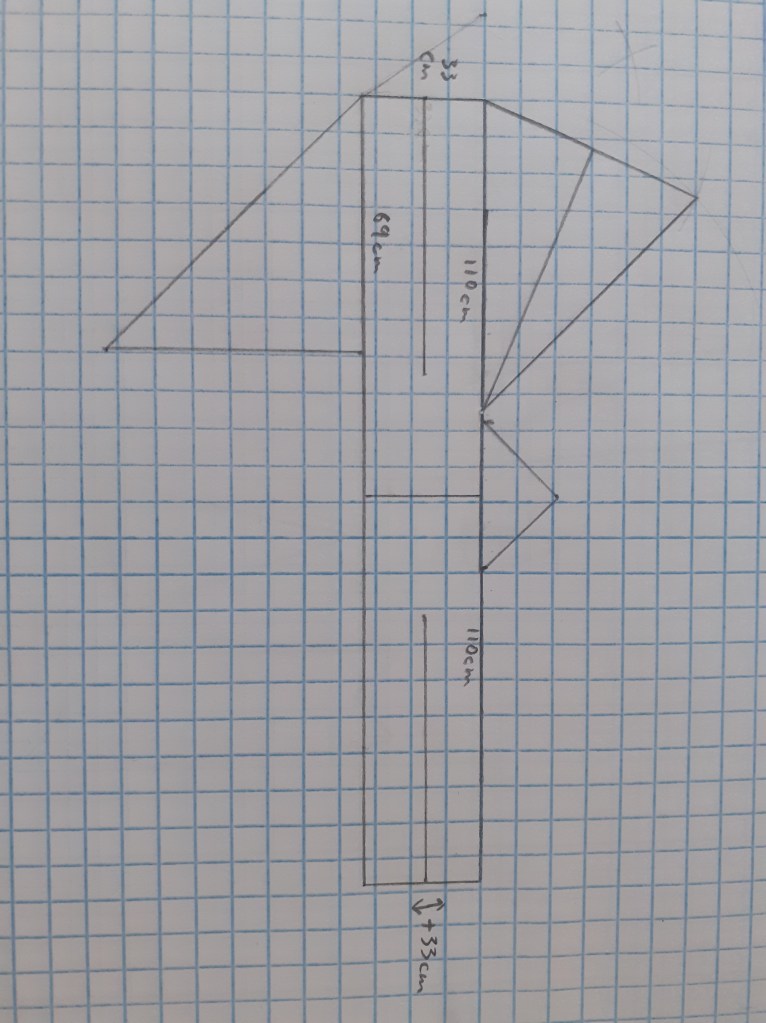
5.3 Third Pattern
I had four issues to fix with the next version: bunching of the neck, not enough fullness, angular hem, and hem which needed to smoothly change height. My answer to the first problem was a simple adjustment of godet height. All three of the others would be answered by the creative insertion of godets.
While all of the extant hoods above had at most two godets, none of them needed nearly as much fullness as mine. Garments of the period which addressed a similar problem are the Kragelund Tunic from Denmark dated to 1045-1155 and Moselund Tunic from Denmark dated 1050-1155. They both flare dramatically over the length of the garment. The designers did this by inserting front and back as well as side godets with pleats at the top.(Ostergard 124-127, 135-141) I did not feel pleats were necessary in this case, but inserting godets from each direction could solve my issues.
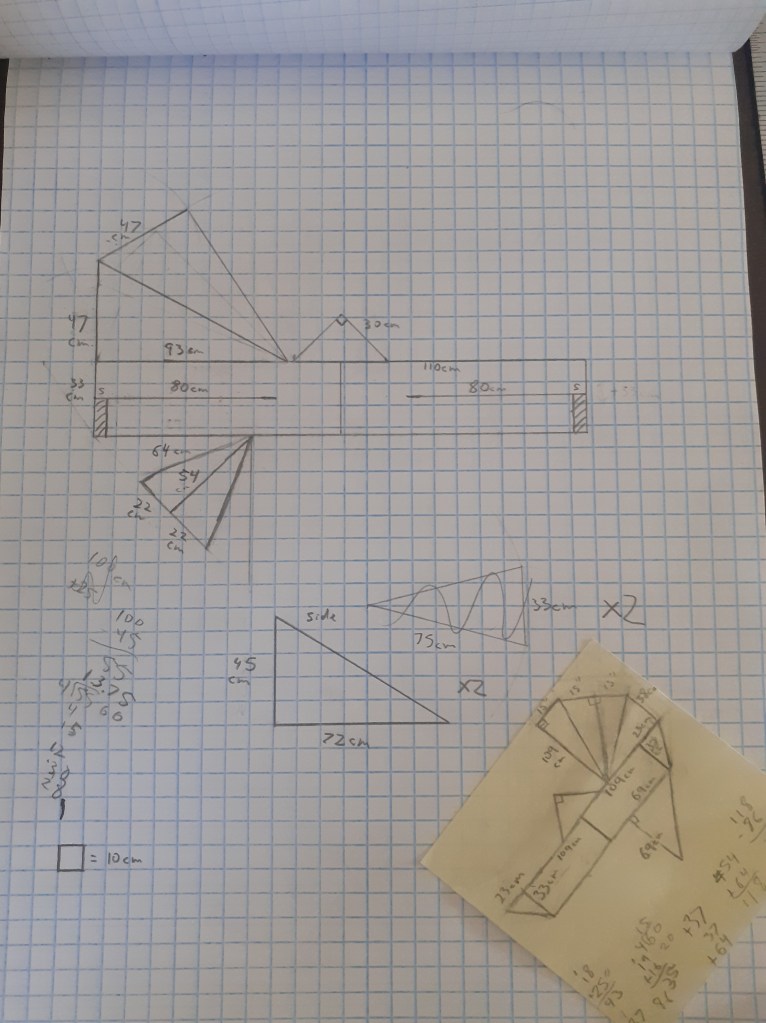
Instead of depending on one piece of the pattern to change the hem height, I decided that every piece along the circumference should play a part to make the idealized smooth hemline from period artwork. Isosceles triangles and balanced polygons are the typical shapes of high medieval godets. In this case, they wouldn’t be enough to make the desired silhouette. In my new pattern, the front was a standard balanced triangle, but the sides godets became scalene right triangles where the hypotenuse was oriented to the rear and shortest leg became the hem. The rear godet was pieced from two more scalene right triangles, and their hypotenuses were again turned to the rear for more length. I haven’t seen any examples of surviving garments of the period with godets shaped in this way, but I think it is less of a reach than the other options. This bit of geometry made the hem at the front only about 53% of the length of the hem at the rear, right on target. This arrangement fixed all of my issues with the pattern, meaning I was ready to move on to my materials and assembly techniques.
6.0 Materials and Construction Techniques
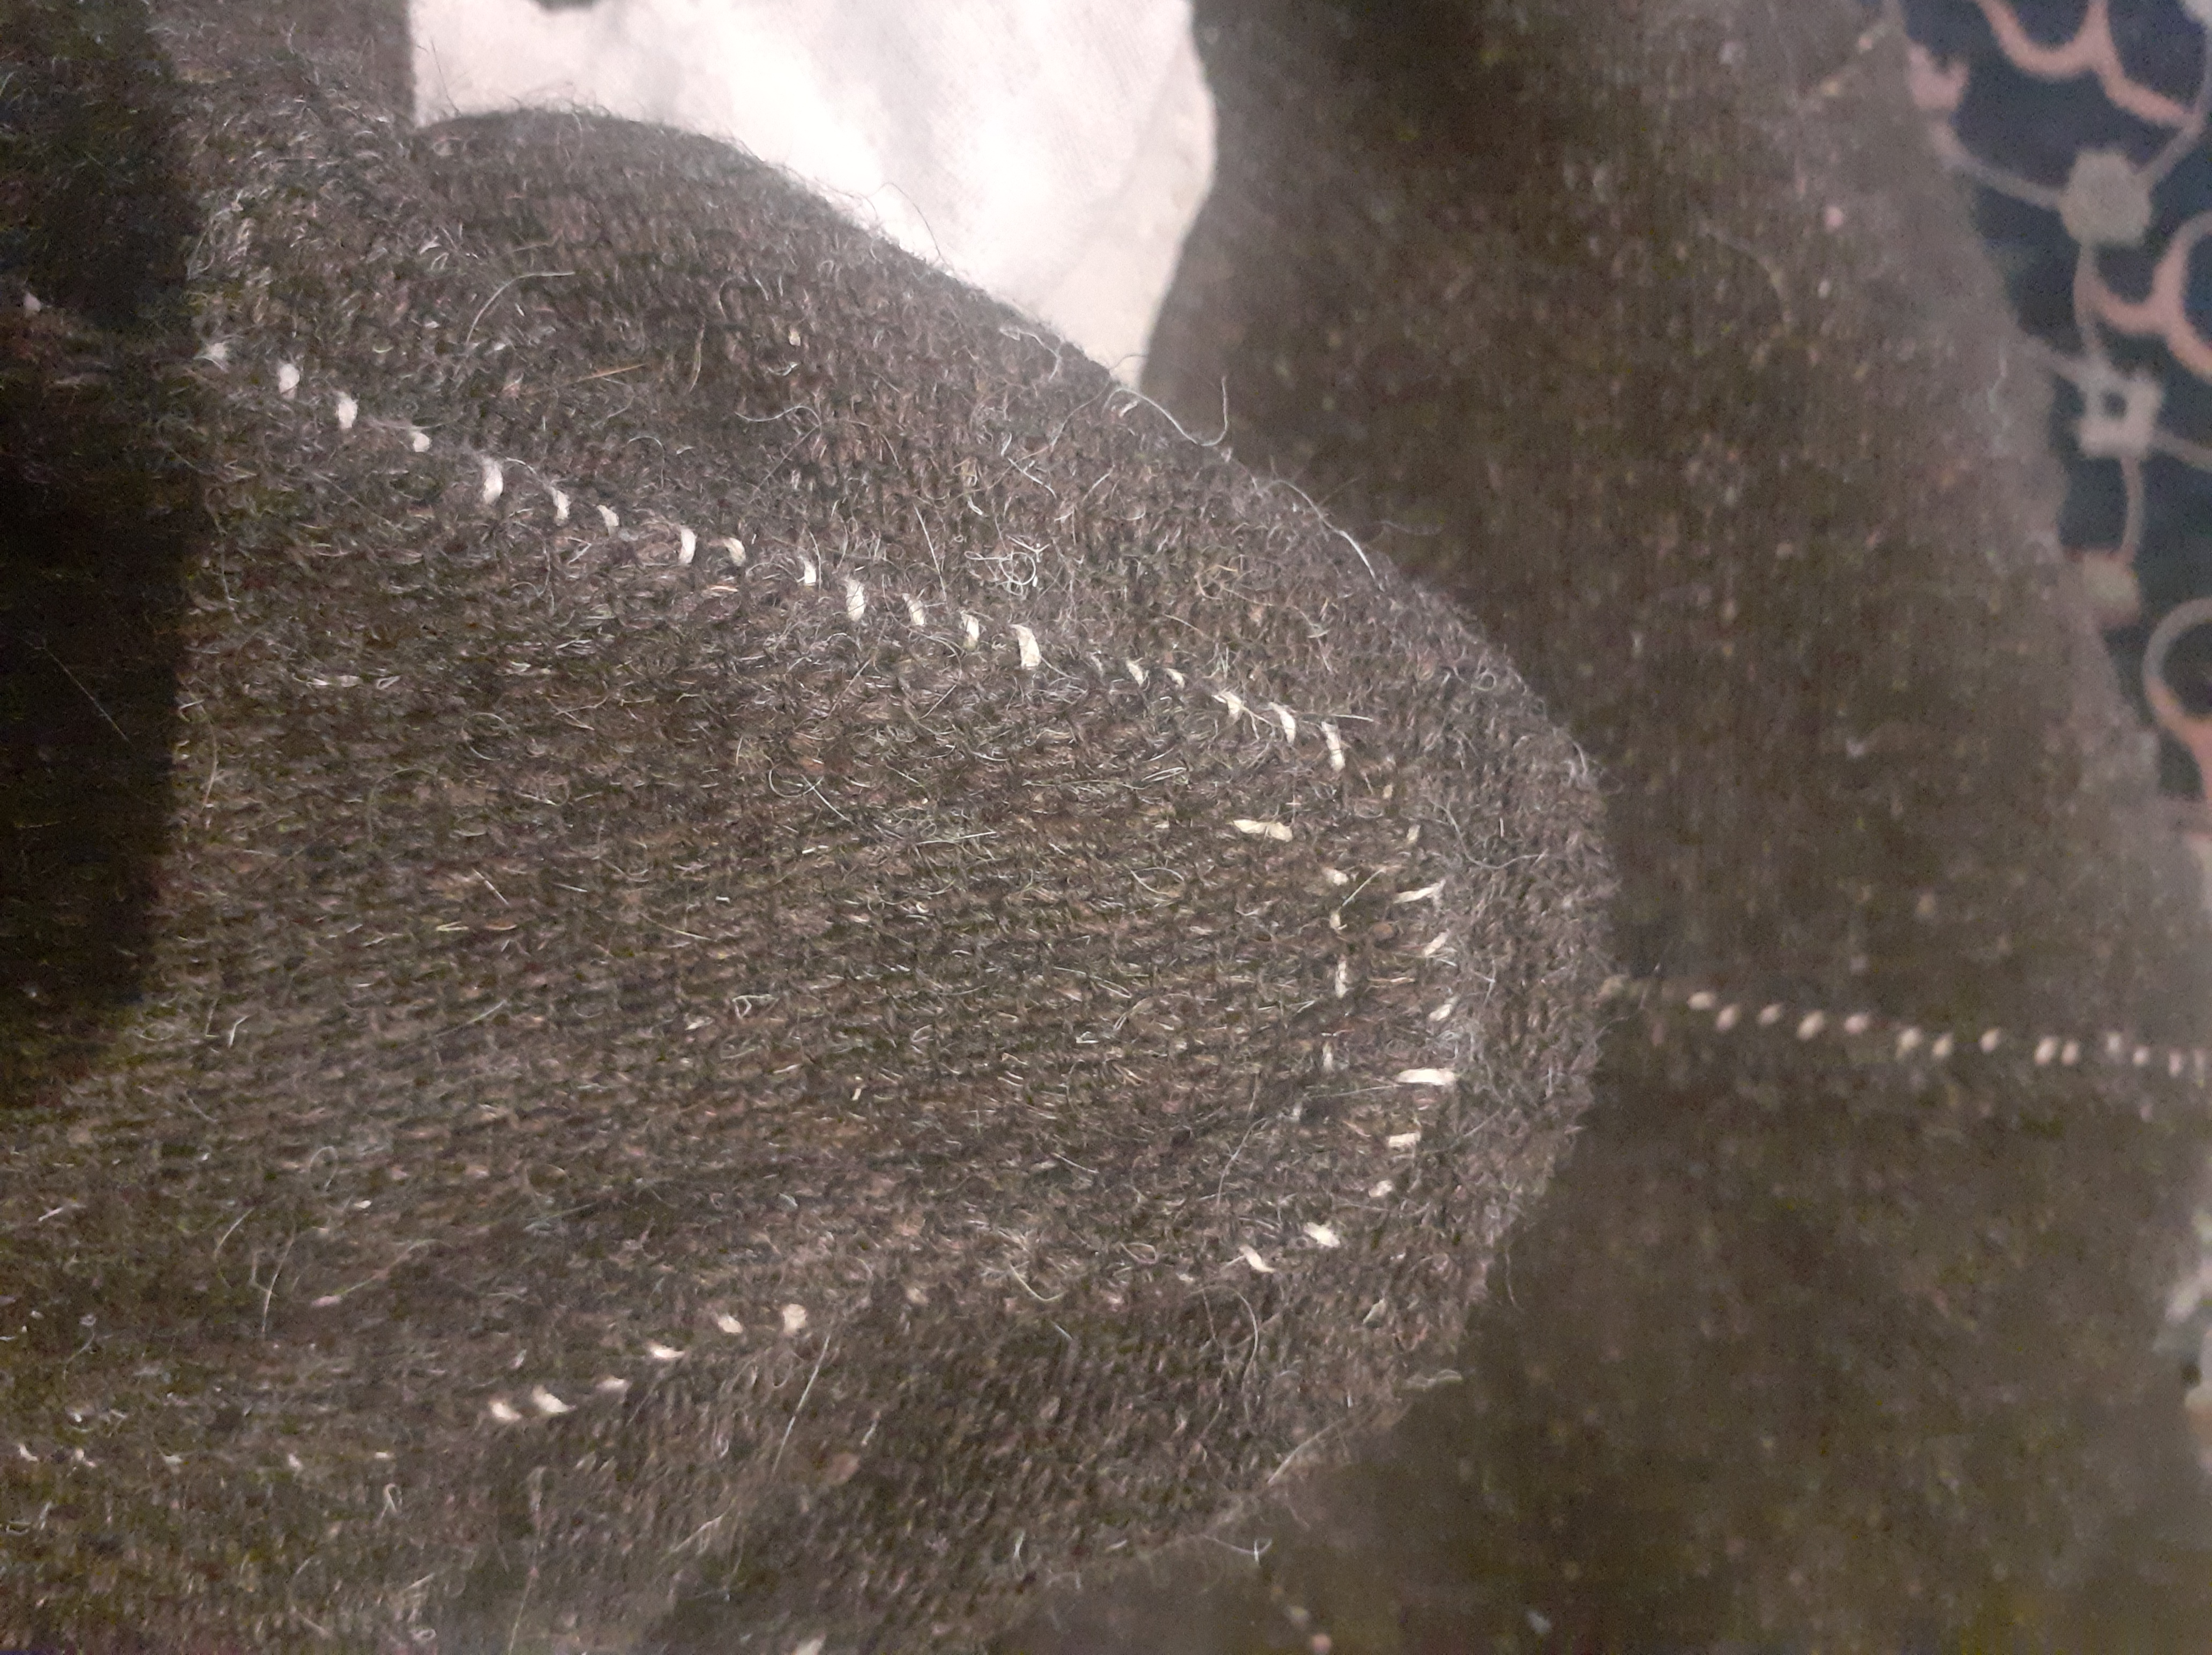
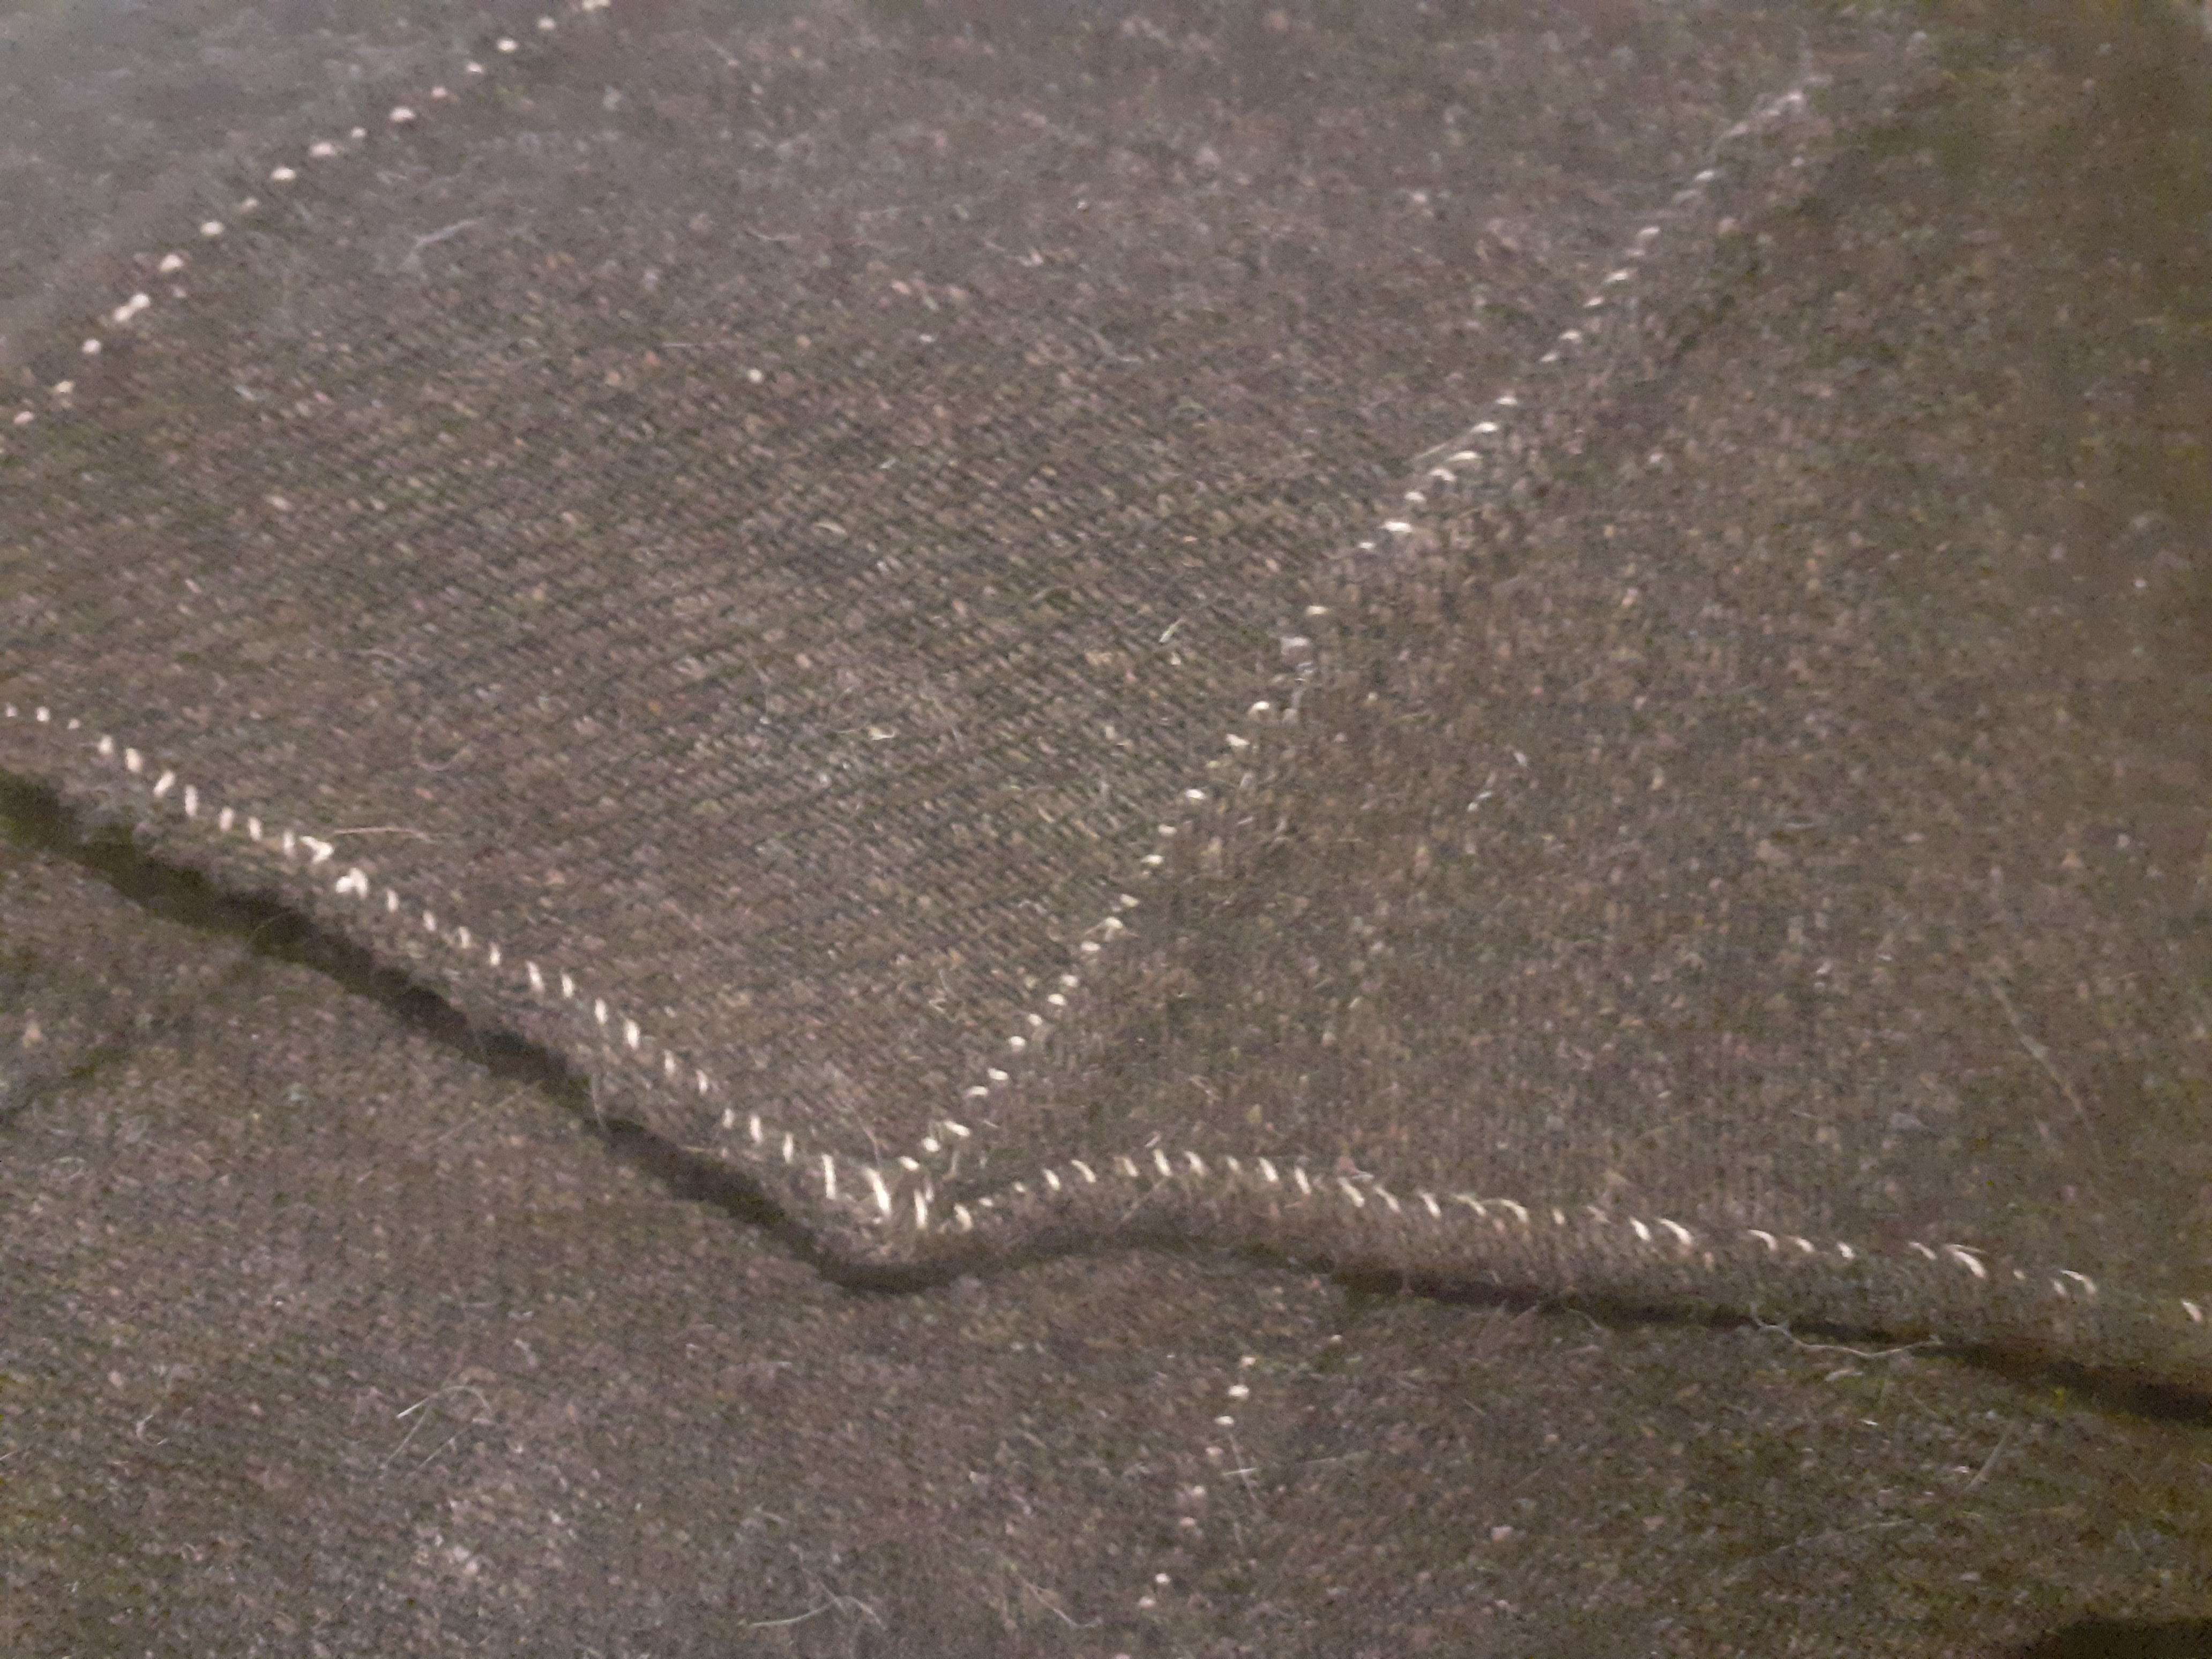
All surviving hoods were constructed of heavy woolen fabric which makes sense, wool is both warm and water resistant. In particular, the wool of my period seems to have been twill weaves. The Kragelund tunic (1045-1155), Moselund Gown (1050-1155), and all relevant Greenlandic textiles are 2/2 twills.(Østergård) The one 12th century fragment of wool fabric from London is a 2/1 twill (Crowfoot), as is the cope of St Francis at the church of San Francisco (and all of its patches), the mantle of St Clare(Coatsworth). In fact, through the fourteenth century the majority of wool fabrics are 2/1 or 2/2 twill. My weave was then easy to select, a 2/2 twill. For this project I decided to buy a hand woven fabric, though not custom woven. I found a coarse natural brown wool with an unbalanced weave of 12 warps per cm and 9 wefts per cm, within the range of low status woolen garments. My concept with this choice is that the hood is a utilitarian item and not a fashion item. It would not be worn constantly, and when worn it would be outside of softer layers. I think it would be low on the priority list for dying and for the use of finer fabrics or worsted stuff.
The standard stitches used during the period were running stitches, running backstitches, backstitches, hem stitches, and stab stitches. The hand woven wool happily frayed, so flat felled seams and double folded hems were appropriate to preserve the edges. The main exception was the face which was folded once and given two rows of stab stitching.(Østergård 97-100) All stitching was done with my standard 16/2 linen thread in 2-3mm stitches.
7.0 Execution
My first task in making the actual hood was to lay out my pattern. Some of my measurements needed to be tweaked slightly to tessellate, but the whole garment was easily arranged onto my available fabric. The peaks of the side godets were placed around jaw level. I placed the rear godet higher on the neck. Both of these fitment adaptations were accordance with the Greenlandic hoods. In contrast, the face did not receive any shaping and liripipe was its own piece rather than having a tongue attached to the body. I also split the body piece in two along the crown of the head as were all Greenlandic hoods. I was comfortable including this feature because it seemed like an echo of tunics with shoulder seams, the standard of tunics from my period. It allowed for an easier arrangement of pieces on the fabric, and possibly less wastage. The only pieces of waste when laying out the pattern were small rectangles cut off the front half of each body piece, narrow strips which needed to be removed for the side godets, and a small triangle adjacent to the liripipe. The pattern required minimal piecing, only the front godet and a small section of the liripipe had to be combined before the garment was assembled.


The main construction rule I needed to follow was to assemble each pieced section into complete panels before combining these panels into the greater garment. Inserting a godet into a split section of fabric and creating a clean seam takes a little practice. It’s important to remove enough fabric and to cut the top of the split in a rounded shape. If the cutout is the right size, any wrinkling should be absorbed by the ease of the fabric (except for the masochists who work with silk). Because the wool was decently coarse I applied a linen lining to the head section of the hood, saving my neck and face from irritation. I didn’t keep track of my time sewing, but the whole thing seemed to take about two thirds as long as a tunic.


7.1 Resulting Garment
Now that I can look at the finished product of all that research, planning, and sewing I am happy with the result. I have enough fullness in the garment to extend my arms to roughly 45°. The front is short enough that I will be able to complete most tasks without hindrance. The back of the cape is long enough that it completely covers me when bending over, but it is not so long that it will get in the way when sitting. The silhouette matches the artistic sources fairly closely. The bottom hem which gave me trouble during patterning is made softer by the drape of the garment around my body. There was an un-planned byproduct caused by the weight of the wool and the stiffness of the seam attaching the liripipe to the hood. Instead of flopping down or to the side, it stands out straight from the head without any special encouragement. This is especially encouraging because it exactly what we see in iconography.
8.0 Summary
I have now answered the question of foul weather accommodations for my own historical portrayal. I started by evaluating available artistic and literary sources to decide on a garment to recreate, a hooded tunic, mantle, or hood. Once I decided on the hood, I had to trace the patterning lineage of the garment through surviving clothing of the period, both hoods and mantles. I then used that information, patterning techniques of the period, and some extrapolation of artistic depictions to create a hypothetical pattern. With all of that done, the easy part was sewing the garment together with materials and sewing techniques typical of the period.
I have put more thought and research into this project than most of my others. Now I am looking back at other pieces of clothing or equipment that should be given the same amount of attention. That process keeps me engaged with this hobby, the constant iteration and improvement, getting better than my past self. I hope some of you find the information interesting as well. If you have anything I seem to have skipped or if you come to different conclusions from the same information I’m always eager to compare notes!
8.1 Bibliography
Flury, D. Mechthild. “Saint Clareâs Patches on St. Francisâ Habit.” San Francesco – Rivista Della Basilica Di San Francesco Di Assisi, San Fransesco, 2 Feb. 1989, http://www.sanfrancescopatronoditalia.it/notizie/francescanesimo/Saint-Clare%E2%80%99s-patches-on-St-Francis%E2%80%99-habit-46687.
Gjessing, Gutorm 1938: Skjoldehamndrakten. En senmiddelaldersk nordnorsk mannsdrakt, I: Viking. A. W. Brøgger og E. S. Engelstad (red), Oslo: Norks arkeologisk selskap.
Halsall, Paul, and Francesco d’Assisi. “Internet History Sourcebooks Project.” Sourcebooks.fordham.edu, 22 Sept. 1999, sourcebooks.fordham.edu/source/stfran-rule.asp.
Hungarian National Museum. “The Coronation Mantle.” Hungarian National Museum, 9 Feb. 2015, mnm.hu/en/exhibitions/allando/coronation-mantle. Accessed 2 Jan. 2022.
Løvlid, Dan Halvard 2009: Nye tanker om Skjoldehamnfunnet. Masteroppgave i arkeologi ved Universitetet i Bergen.
Østergård Else. Woven into the Earth: Textiles from Norse Greenland. Aarhus Univ. Press, 2009.
Simon-Cahn, Annabelle. “The Fermo Chasuble of St. Thomas Becket and Hispano-Mauresque Cosmological Silks: Some Speculations on the Adaptive Reuse of Textiles.” Muqarnas, vol. 10, Brill, 1993, pp. 1–5, https://doi.org/10.2307/1523166.
Thurston, Herbert. “Cope.” The Catholic Encyclopedia. Vol. 4. New York: Robert Appleton Company, 1908. 17 Dec. 2021 <http://www.newadvent.org/cathen/04351a.htm>.
Verheyen, Rev. Boniface, and Benedetto da Norcia. “Work Info: Holy Rule of St. Benedict – Christian Classics Ethereal Library.” Christian Classics Etherial Library, 1949, ccel.org/ccel/benedict/rule/rule. Accessed 2 Jan. 2022.
Digital Manuscript Repositories Accessed
https://digital.bodleian.ox.ac.uk/
https://www.digitale-sammlungen.de/en
https://www.e-codices.unifr.ch/de
http://initiale.irht.cnrs.fr/en/
https://bvmm.irht.cnrs.fr/
http://mss.bmlonline.it/
https://www.wga.hu/index.html
https://cudl.lib.cam.ac.uk/
https://www.library.upenn.edu/
https://digital.blb-karlsruhe.de/
https://www.kb.nl/en
https://www.europeana.eu/en
http://www.bl.uk/catalogues/illuminatedmanuscripts/welcome.htm
Quill Pen and Beginning Calligraphy
This post will be somewhat different from the others I have made to this point. All of the information is available elsewhere and from more experienced teachers. It will only serve as a bit of an update to one activity I have been spending my time on.

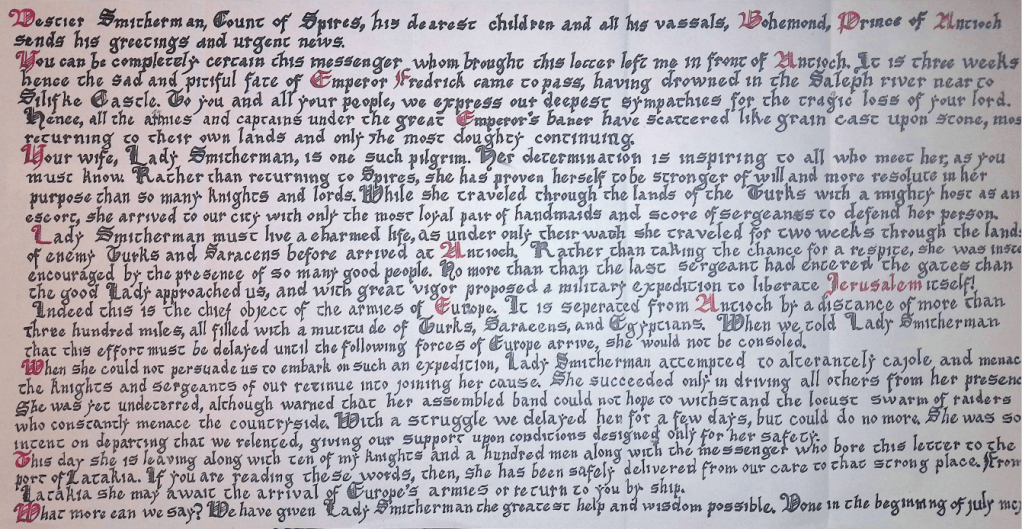
I first got the writing bug from a letter exchange group, where hand written letters based on a monthly prompt were sent to a randomly assigned member of the group. I naturally wrote the narrative in the context of my study, the 1190’s Levant. It also followed that the formatting and writing of the letter should be appropriate as well, so I consulted Letters From the East, which is a collection of extant letters between the Levant and Europe in the 12th and 13th centuries as translated by Malcom Barber and Keith Bate. I also took it upon myself to learn how to do calligraphy.
Over the span of a weekend I went from the most basic and large letters in Early Gothic script learned from The Art of Calligraphy by David Harris to the letter below (Figure 2). Like with many other things, I was not satisfied with this first attempt at the artform and set myself a very ambitious goal.
I naturally decided that my next calligraphy project would be to transcribe an entire book in medieval Latin, a language I do not know at the best of times and is heavily abbreviated in writing. My subject would be a version of Historia Karoli Magni et Rotholandi, or The History of Charlemagne and Roland; a sort of 12th century fan fiction and superhero team-up between two of the most popular characters of the time. Charlemagne and Roland were both heroes in their own chanson de geste, sorts of epic poems which were spoken or sung by traveling musicians. While I do not understand the language I would be writing, in practice it is irrelevant. To take the role of the medieval scribe I would only need to transcribe every mark from a source to a new page, which seems feasible.
The manuscript I settled on was Add MS 39646 from the British Museum. It is a late 12th century French example consisting of some 300 folios with writing on both sides of each, excluding some later additions. The pages are written on both sides of each page in a space of about 255mm by 155mm. The lines are spaced approximately 7mm apart and the text is in two columns. The British Library MS Viewer (bl.uk)
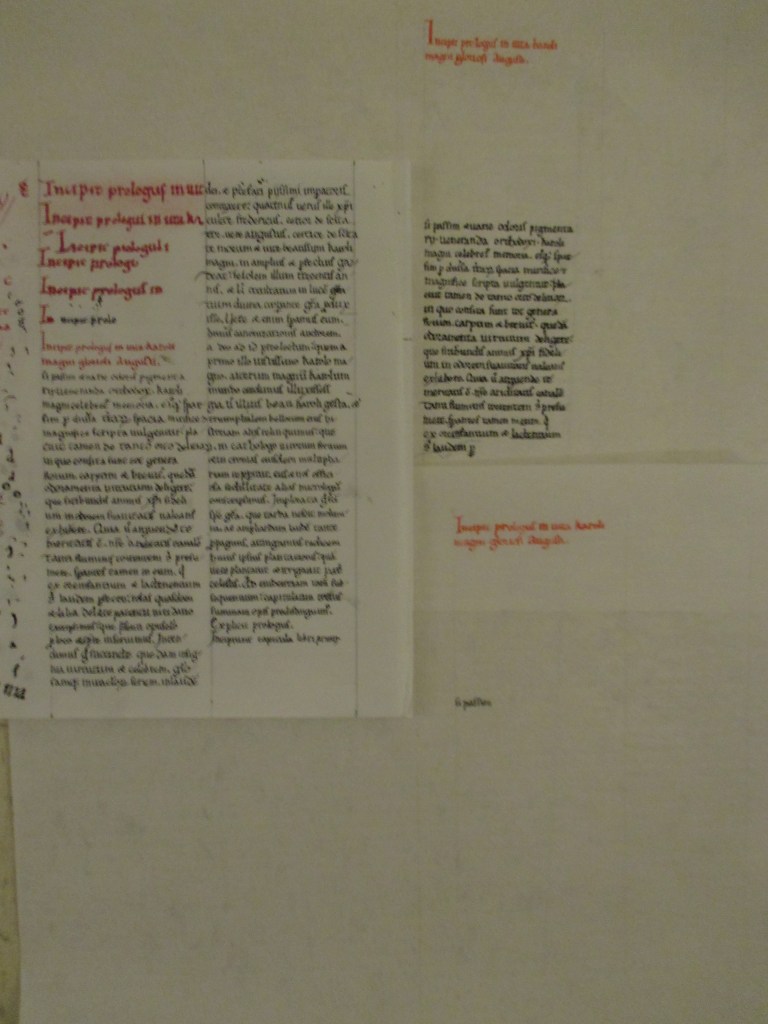
I started the first page on some locally acquired paper and quickly settled on it being a practice run. The more appropriate medium would be Pergamano Vellum, a synthetic vellum substitute. I acquired several sheets and began again, however this time the ink ran into the lines I marked on the page, an issue I couldn’t live with. I also noticed the the Pergamano Vellum I had bought was thin enough that it was translucent, potentially an issue with stacked pages and writing on both sides. I also had several issues with my pens.
I am left handed, and the shape of pen strokes for a right hander is designed to pull the pen across the page. In order for my pen to move in the same way, I needed to push my pen. This can cause the pen’s tip to skip across any texture, causing splattering and uneven lines.
In the following weeks I have put the book project on pause to reassess its needs. Heavier Pergamano Vellum is a possibility to solve the translucency problem, and thicker ink could solve the issue of running into the ruled lines. The more serious issue was with my technique and tool.
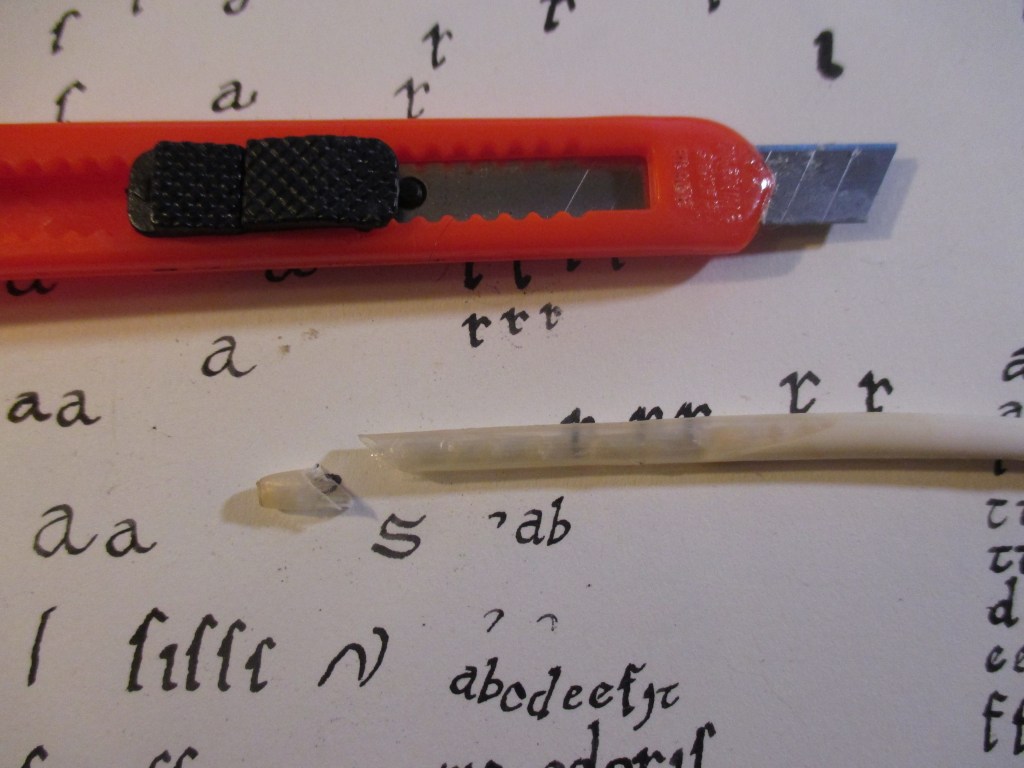
In quick succession I went from markets, to office supply store fountain pens, to Pilot parallel pens, to metal nib quill pens, to the place I should have started to begin with; a feather quill pen.
I acquired a quarter pound of goose flight feathers online for less than a cheap fountain pen and proceeded to make quill pens, following the instructions written by Anca at Making a Feather Quill Pen | Medieval Journey. Her instructions were very clear and anyone who is interested should give them a look.
The first step was to temper, or harden the ends of the feathers. This is done by soaking them in water overnight and then sticking them into a container of hot sand for a few minutes. This did seem to create a significant difference in the quill. After this, the vanes of the feather were all stripped away from the shaft, a style which I have noticed in illuminations of my period (Figure 1). The first cut to make the nib was done from the top at roughly a forty degree angle. I then used a needle to remove the pith from inside the feather’s shaft. It is not strictly necessary to clean these bits out to any depth, since the ink will not go very far into the feather. The first cut was met by a second from below at a much more acute angle. This gives the tip two “ears”. I gave the nib its split by pinching these ears together. This creates the necessary gap, but without the risk of making it too large with the parting action of a knife. After that, there was only some minor shaping to form the nib to the correct width and the pen was finished.


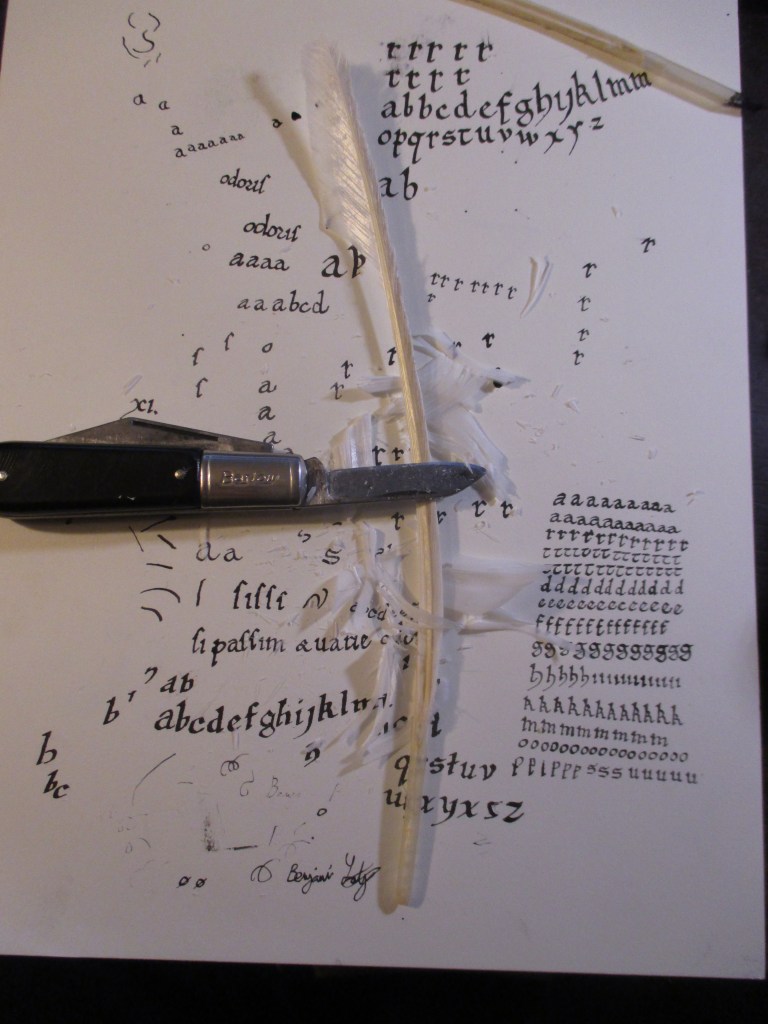

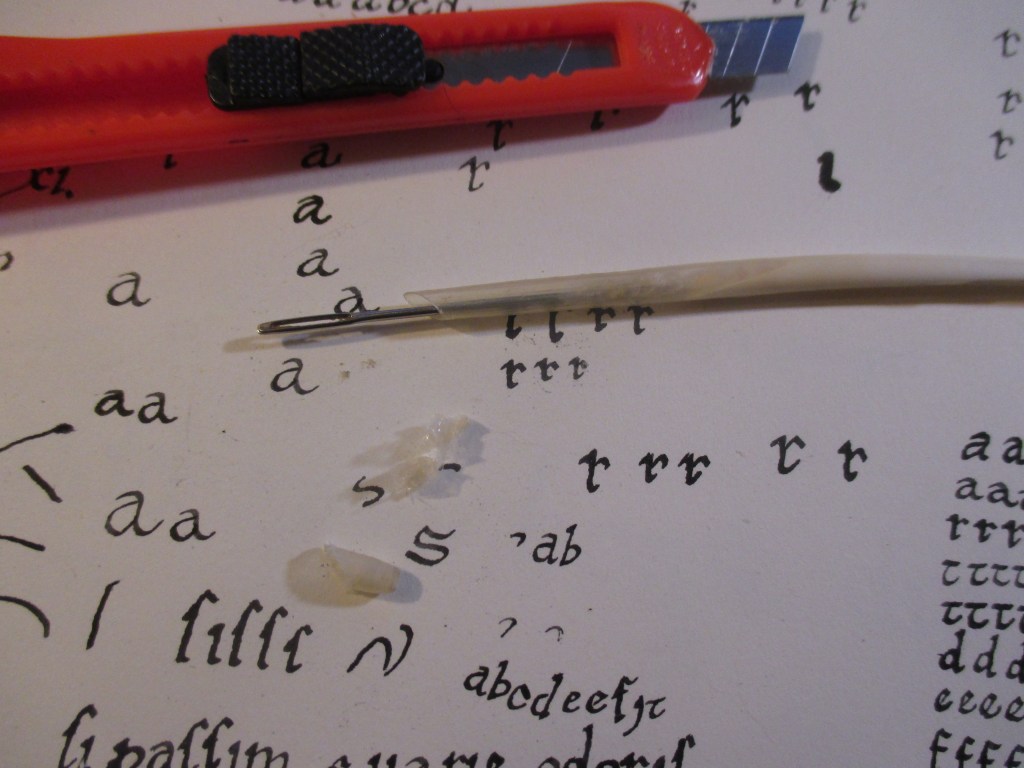


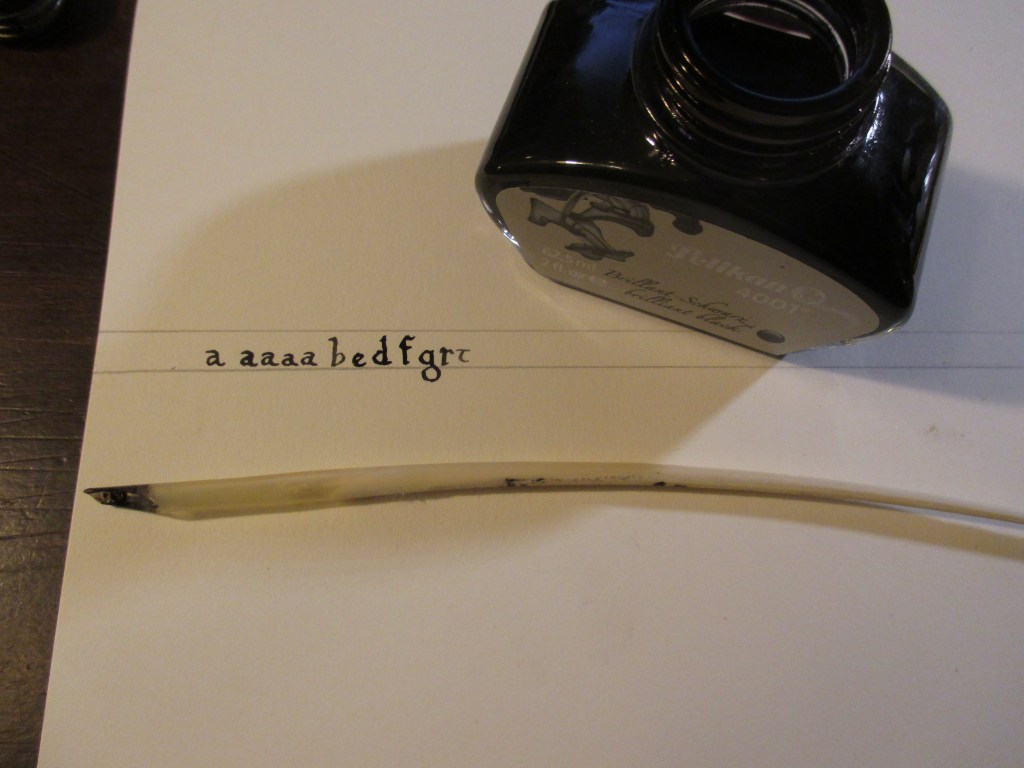
This pen will be a nice step toward improving my calligraphy and making it more authentic. The flexibility of the tip is different from the metal nibs I have used and I can shape it however I please. In reading further about calligraphy done by left handed artists, I found that a position where the left elbow is kept tucked to the person’s center and paper is slightly angled should work. I practiced this technique briefly to write the letters in the last photo of the gallery.
Transcribing an entire book is an enormous task. If I were to write a page of the book every day for two years I would hardly finish. If I ever do finish it will more likely take something like a decade of work off and on. Having my very own hand calligraphed copy of Historia Karoli Magni et Rotholandi isn’t the only point though. I am hoping that working on this project will help me internalize the medieval world slightly better as well as being fantastic practice for future letters or documents I wish to write.
-Getulio
High Medieval Coin Purse
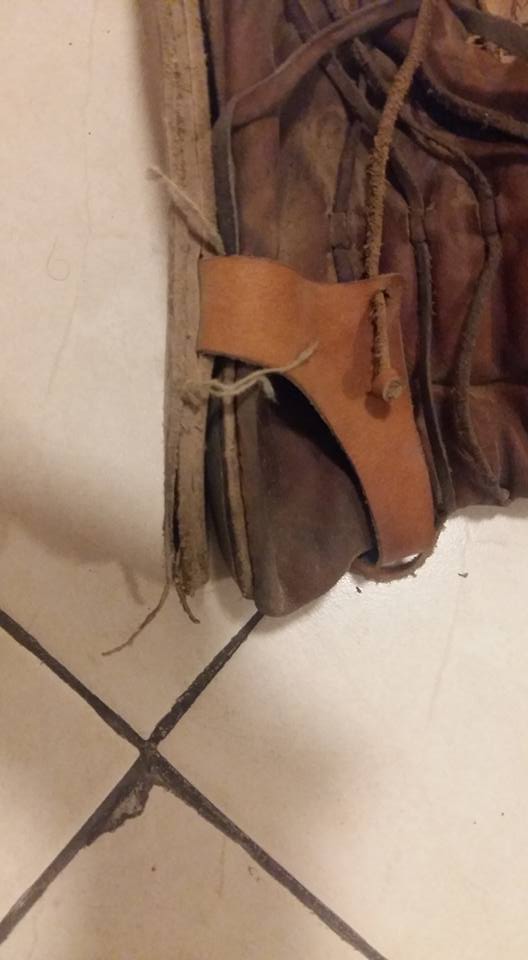
Before this project, I always carried coins in a small goat skin pouch suspended from my neck. I did not do any particular research on that pouch; it was small, hidden under my clothing and made with materials and techniques which were around in the high middle ages. This is not a best practice, but one that is sometimes useful to use because the research phase of a project is the part that takes the longest and large items have precedence over details. Now, however, I have been able to assemble some evidence for the construction and wear of a coin purse in the high middle ages.

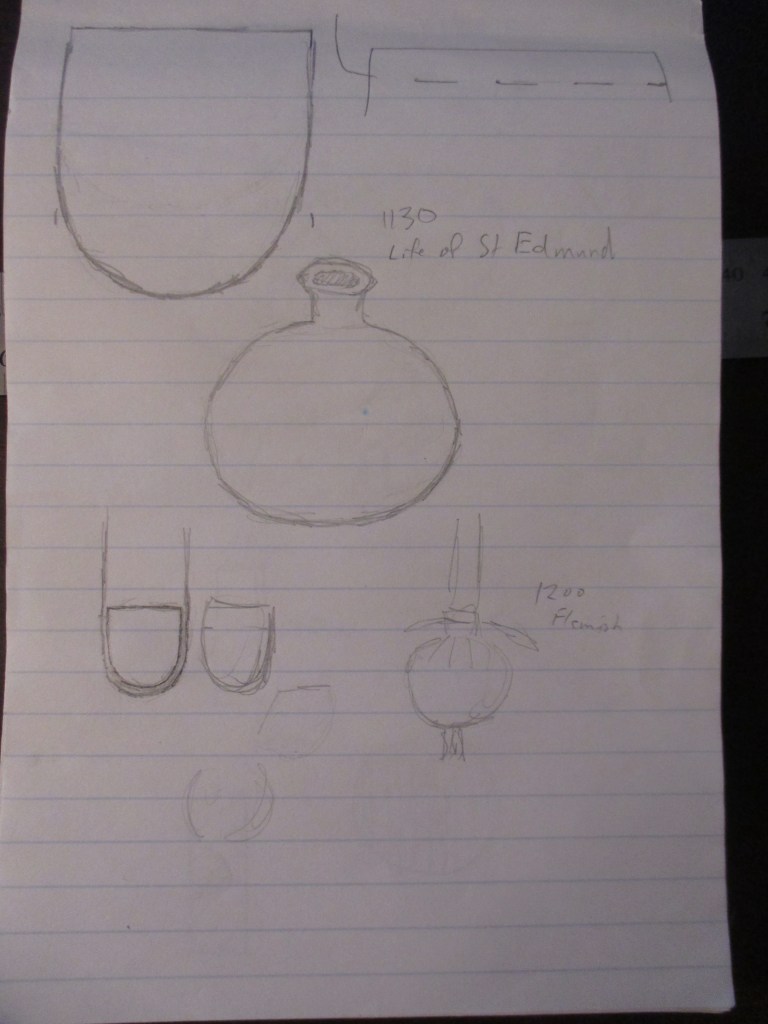
The construction of this project began in a hurry- a group of friends were having a sewing session with short notice and short duration. I didn’t have anything planned ahead of time, so I quickly checked my to-do list. I was planning to make a coin purse, but it was in the preliminary stages of research with just a couple pieces of information at my disposal. I had found the image of St Martin of Tours cutting his cloak for a beggar (Figure 1). Unfortunately it is from Flanders, somewhat removed from my portrayal of an Italian in the Levant in the 1190’s, but I have not found any more relevant images.

I also had found some useful information from archeological reports in Israel. Coins were found in rolls or “rouleau” and wrapped in textile fragments. One example from Tell Jemmeh dated 1160s–1170s CE(Kool) was wrapped in white cotton, while another from Bet She’an dated 953–975 CE(Tepper) was wrapped in a white linen bag.(Figure 2) Unfortunately the finds were in a fragmentary state at best, and are not described in detail in the available reports. From these at least I had the materials to use and a rough size.
I knew that seven strand finger loop braids were found in a late 12th century context from previous work, so I quickly made a design and got to work.(Crowfoot 138) In Figure 3 you can see what I came up with, a U shaped pattern which was elongated enough to create the round body shape. The drawing in figure 1 shows some other features as well: a short tassel at the very bottom of the pouch, the ends of drawstrings on either side of the pleated mouth, and the seemingly complete suspension cord. The solution I came up with was for the suspension cord to be stitched to the bag between the two body pieces, and for the two ends of the suspension cord to become the tassel at the bottom. The construction was quickly finished, with all of the cords being square finger loop braids with seven loops. I chose some scraps of hand woven natural linen for the pouch body which included some selvedge for the pouch mouth. I decided that buttonholes weren’t necessary for the drawstrings.
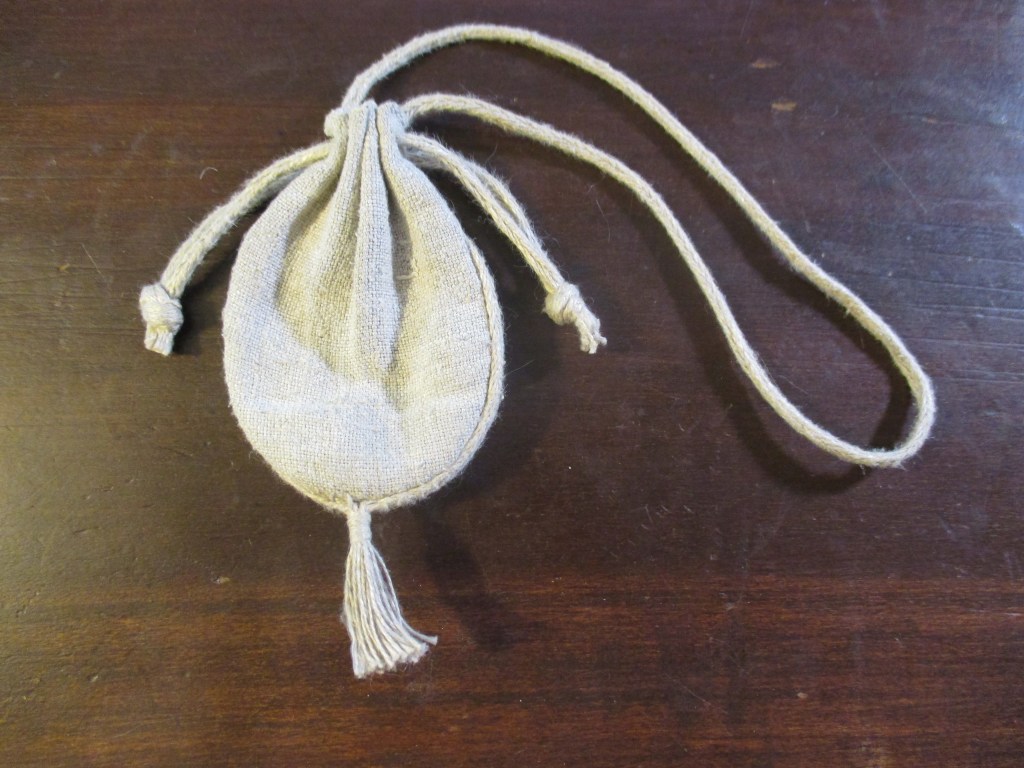
The resulting bag looks very close to what was drawn. The body of the pouch was a bit elongated, but the main design points were present: a rounded body, tassel, dangling drawstrings, looped suspension cord, and white linen construction. I was initially pleased with my creation, but some days after the sewing session I started to wonder about other sources. I typically like to do more research, and although the first bag resembled the one I wanted to recreate, the design involved a significant amount of conjecture. I decided to re-engage with the project to see what I could find.
After a bit of digging, I found a series of extant pouches from the thirteenth century which had several similarities to figure 1, although they were not apparently coin purses. They have a suspension loop which is solid, a pair of drawstrings on either side of the pouch body, and tassels hanging from the bottom. A curious thing about the pouches was that the suspension braid was forked at either end, becoming the drawstrings. The juncture of the two types of braids was tied into a knot on the extant examples, strengthening the transition point. While my construction method was possible, the construction of these extant examples is preferable because it is directly documentable. I decided to entirely remake the pouch.

While the available photographs were high quality, I am not familiar enough with medieval braiding types to identify what was used on these examples. I recruited someone much more experienced for help, Ann Asplund. Thanks to her, I was able to able to chip away a bit of the guesswork away from this project. Mrs. Asplund identified the braid as a five loop finger loop braids, where the forks were braided as a split and the suspension loop was braided flat.
My second pouch changed slightly from the first in other ways. I shortened the body by about 1cm to make it more circular when closed. The tassel at the bottom needed to be constructed in a different way as well. I copied the extant pouches for that, simply looping several strands of the same linen thread I used for the braiding and sewing through the pouch body and whipping them together into a small tassel. The chief difficulty in the second pouch was the suspension cord and drawstring.
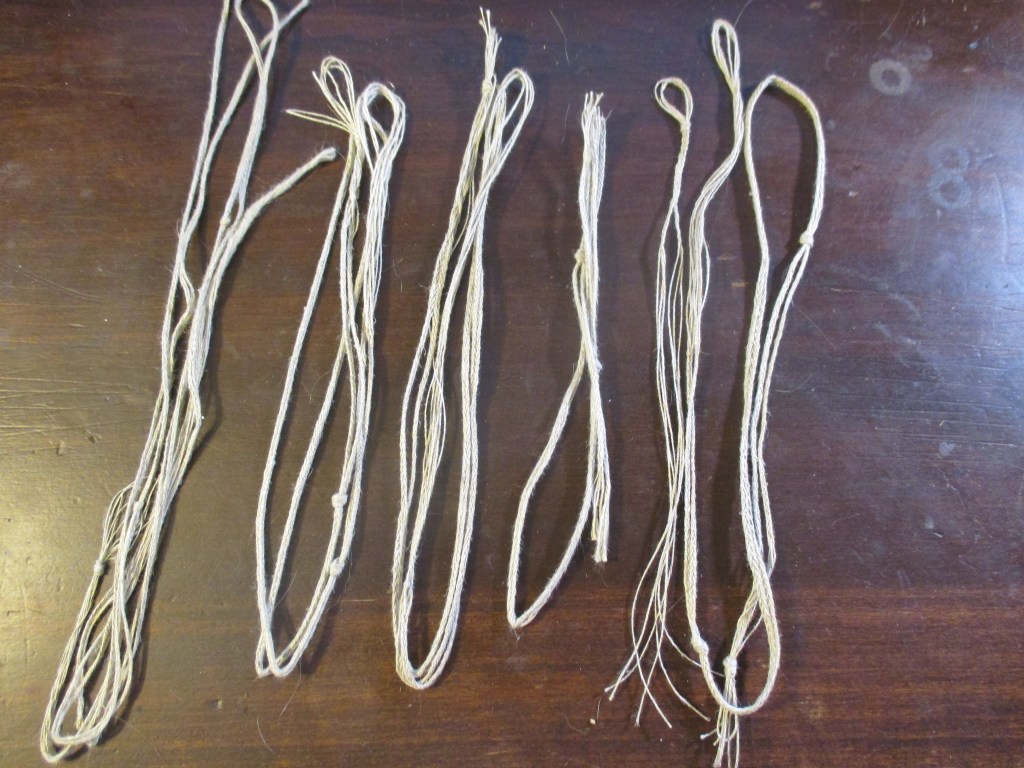
Before this project, I had never attempted a flat braid of the finger loop technique before. In all of the various types of braid I have done, it is usually desirable to keep the braid very tight. This is not the case for flat finger loop braids, but after several failures I managed to produce a braid which behaved properly. My first attempt used single ply thread, but I quickly opted for the typical two ply. The sixth iteration was finally successful, but when I put it on the pouch I decided that I wanted the suspension cord to be a few centimeters longer.
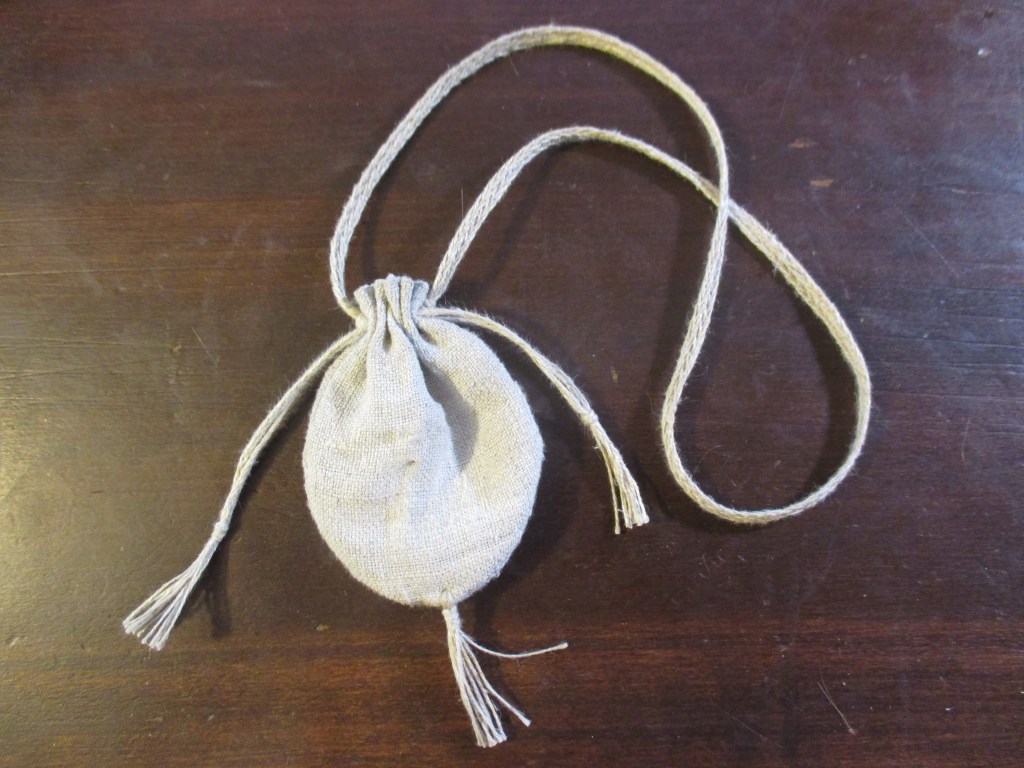
I am much happier with the resulting pouch than the first one. It closely resembles the illustration in figure 1, it uses materials matching archeological evidence, and is assembled with techniques used on similar pouches of the period.
A concept I had in mind when I wore the goatskin coin pouch on my neck was that an individual in a high medieval town would want their money to be protected from view and theft. The place I hid my coins seems to have been wrong according to the available evidence, but the concept holds true. Figure 1 shows the beggar in his braes with a drawstring showing, and the coin pouch hanging from the front of his left hip. If the beggar was wearing a tunic of the high medieval style, the skirts would cover the coin pouch. As readers of my braes document will know, the front of the hip is where hosen are tie to the braes. This makes sense to me, as the gap in the braes will allow the user to easily attach and detatch the pouch. In previous interpretations I have only made a small buttonhole on the braes, only large enough for the hosen ties to pass through. To hang this purse though, the wearer must be able to push the suspension cord under the drawstring with a finger so it can loop back over itself. I went ahead and modified my braes to account for this.
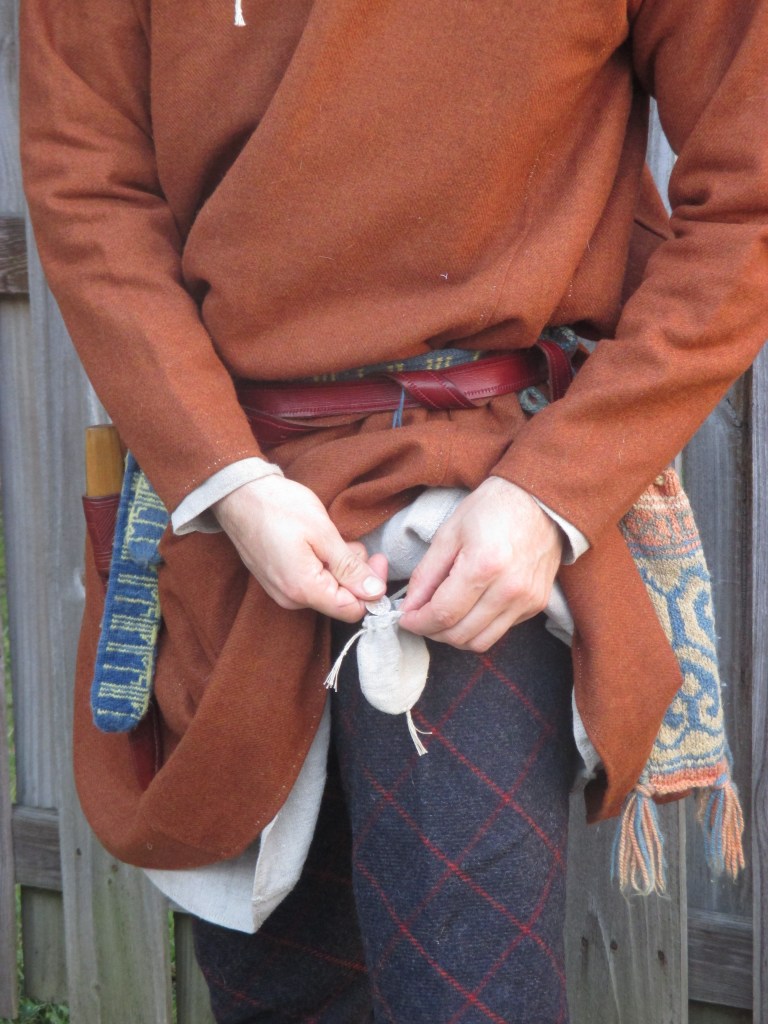
The result is attractive and functional, much easier to access than a coin purse on my neck. The construction is durable enough to last for many years, except that the binding which attached the drawstrings together on the other side of the knots could come loose. As always I am happy to adjust my portrayal in light of new evidence, but for now I think that this addition is perfectly adequate.
Bibliography
Crowfoot, E., Pritchard, F., Staniland, K., Baker, E., & Unwin, C. (2012). Textiles and clothing c.1150-c.1450. Woodbridge: Boydell Press.
Declercq, J. (Ed.). (1994). BALaT Object: 10069287. Retrieved October 12, 2020, from http://balat.kikirpa.be/object/10069287
Ingridcc. (2011, June 5). START HERE! 5-loop braids [Web log post]. Retrieved October 12, 2020, from https://loopbraider.com/2011/06/05/5-loop-v-fell-fingerloop-braids-cobbled-together-tutorial-video/?fbclid=IwAR1R42EY2c5bpqmSjx4z-AGY3PZQV_L2djHhGe-qKTZYHyjHXMox3j1o1oQ
Kool, R. (2014). The Smithsonian Institution Excavation at Tell Jemmeh, Israel, 1970-1990 (980484435 759566594 D. Ben-Shlomo & 980484436 759566594 G. W. Beek, Eds.). Smithsonian Contributions to Anthropology, (50), 1-1087. doi:10.5479/si.19436661.50
Tepper, Y. (2009, September 07). Hadashot Arkheologiyot Excavations and Surveys in Israel (Publication No. Volume 121 Year 2009). Retrieved October 12, 2020, from Israel Antiquities Authority website: http://www.hadashot-esi.org.il/report_detail_eng.aspx?id=1191&mag_id=115
U. (Ed.). (1984). BALaT Object: 10128624. Retrieved October 12, 2020, from http://balat.kikirpa.be/object/10128624
U. (n.d.). Bede, De Locis Sanctis, Interpretatio Nominum Graecorum, Interpretatio Nominum Hebraeorum (p. F. 12r). British Library. Retrieved October 12, 2020, from http://www.bl.uk/manuscripts/FullDisplay.aspx?ref=Add_MS_15219
Protected: High Medieval Tunic: Bell Type
High Medieval Turnshoes
Shoes in the middle ages is a massive subject. There are dozens of patterning types, great variety in decoration techniques and styles, and many different closures that were used across the centuries. I feel that this subject is one of the most underappreciated aspects of medieval reenactment.
“For European leather shoes, a total of 17 primary cutting patterns were used, six integral soled patterns with two sub-patterns, four hybrid patterns, including the examples from the Byzantine, and seven separate soled primary cutting patterns, with 33 sub-patterns…” (Volken p73)

The factors that play into the specific shoe that will be most appropriate for a given portrayal are the place and time of the portrayal, the type of person they are, and the social status of the person. The first question I will address is the primary cutting pattern. The person that I portray is in 1190, originally from Norman Sicily but re-settled in Antioch. The “Crusader States” refer to the Kingdom of Jerusalem, Principality of Antioch, County of Tripoli, and County of Edessa which were formed during and immediately after the First Crusade (1096-1099). I will also refer to these states as the Latin East or Frankish States, and the entire region as Outremer or the Near East. The term “Crusader” in this context specifically refers to a Christian pilgrim under arms who has taken an oath to visit or capture religious sites in the Near East. Europeans who settled in these lands after Jerusalem was taken and the Crusade ended were known as Franks or Franj. They ceased to be crusaders or pilgrims when their vows were fulfilled.
“…At the present moment they are actively besieging Tyre, attacking day and night, and their numbers are so great that they are like a swarm of ants covering the whole face of the earth from Tyre to Jerusalem, even as far as Gaza. Find it in yourselves to come with all haste to our aid and that of Eastern Christendom which is, at present, totally lost, so that through God and with the support of your eminent brotherhood we may save the cities that remain. Farewell.” Excerpt of a letter from Terricus, Grand Preceptor of the Temple, to all preceptors and brethren of the Temple, Between 10 July and 6 August, 1187. (Barber p78-79)

The Crusader States were constantly short of manpower, dozens of such letters from the Frankish states survive to this day. They constantly beg for support from Europe in the form of immigration, arms, and funds. There were several incentives for pilgrims and settlers of the Latin East including absolution of sins, individual masses being said on the death of the participant, promises of a place in heaven upon the death of the participant, as well as a change in social status. If a peasant wished to join the crusade, their feudal lords could not legally prevent them. On completing their pilgrimage and settling in the Frankish states, foot-soldiers and peasantry became free men and were classified as burgesses, city dwellers. Feudal requirements of being bound to their land and mandatory service to their lord were never established in the Latin East. Some burgesses rose to be extremely wealthy, and the class had substantial political power. There were still public duties they required to undertake, such as participation in the levée en masse, where all able bodied men were called to arms for the defense of their city or kingdom. There was also an opportunity to voluntarily serve the kingdom for stipulated pay as a serviens, or serjant. This is the social class that I portray: a professional shoemaker in Antioch originally from Norman Sicily, therefore a burgess, who also works as a serjant.(Prawer p76-85)

This social status and occupation have a great effect on what shoes I should be making. There were particular fashions worn by high ecclesiastic figures(Figure 1), lower clergy, fashions worn by peasantry and laborers(Figure 2), fashions for nobility, soldiers, and more. For this project, I focused on individuals depicted as craftsmen and serjants. The native governments which have reigned over Outremer after wresting cities and castles back from the Franks saw little or no value in the artwork they created, so very little domestically produced artwork remains. It therefore becomes difficult to know how the Franks saw themselves, apart from referring back to the lands they emigrated from.
I conducted a survey of over three hundred surviving depictions of individuals in French and Italian manuscripts and carvings dating from 1140-1240, fifty years in either direction of my target year. I recorded the footwear shown on individuals of different social statuses.(Table 1) These statuses are at times difficult to determine, so I will explain my rationale. I determined an individual is a knight if they are wearing a helmet, mail hauberk, and mail chausses (leggings); if they are wearing at least a helmet, mail hauberk, and are riding a horse; if they are wearing at least a helmet, mail hauberk, and they are carrying a lance; if they are wearing at least a helmet, mail hauberk, and are carrying a banner. I determined an individual was a serjant if they were wearing at maximum a helmet and mail hauberk and did not meet the listed criteria for a knight; if they are wearing civilian dress and are armed with shield and spear. I determined an individual was a craftsman if they are depicted practicing their craft, i.e. a carpenter, smith, etc. I determined an individual was a commoner if they are depicted working in an agricultural setting, in a laborer setting, and if they wear civilian dress with no adornment. I did not consider depictions of individuals wearing civilian dress and armed with swords, as these could be either serjants or knights. I also did not consider depictions of individuals wearing clothing or armor outside of the norm, intended to portray historical or culturally separate individuals.
| Shoes | Ankle boots | High boots | |
| Knight | 15 | 7 | 0 |
| Serjant | 7 | 45 | 0 |
| Craftsman | 0 | 5 | 0 |
| Commoner | 12 | 43 | 1 |
I did not record the footwear of nobility, but all examples were of low shoes. Low status individuals are also commonly depicted as being barefoot, wearing soled hose as footwear, or no shoes being depicted simply due to a lack of detail in the artwork. These options were not seen on craftsmen or serjants, so I did not record that data. My criteria is not flawless and the survey was not comprehensive, but I think it gave me a reasonable idea of what different social groups wore.
Knights were most often depicted wearing full mail chausses, but when they wore shoes they seemed to most often gravitate toward the low shoes that nobility wore. Serjants, who may have been expected to travel by foot more often, were most commonly depicted wearing ankle boots. Craftsmen were a rarity in the survey, and most often wore ankle boots. Commoners also most commonly wore ankle boots but had more variety than serjants. Based on this survey, I decided that the most appropriate height of shoes for my project should be an ankle boot. The fidelity of the artwork is typically too low to guess at a pattern, but luckily there are numerous examples of extant shoes and shoe parts to look at.
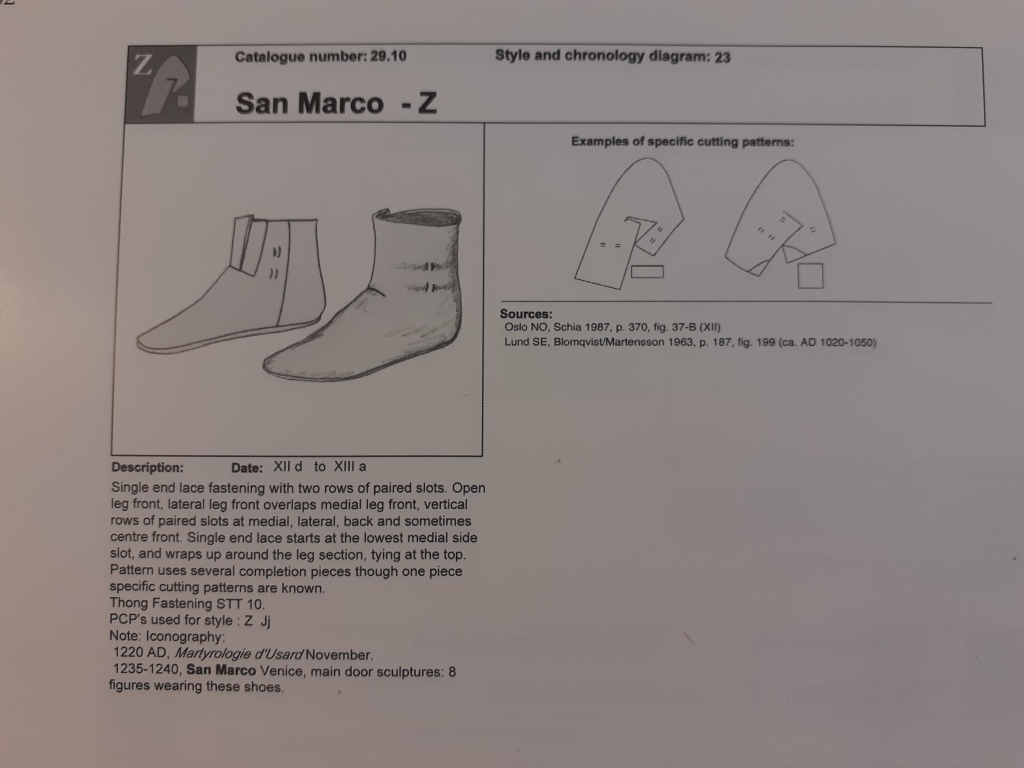
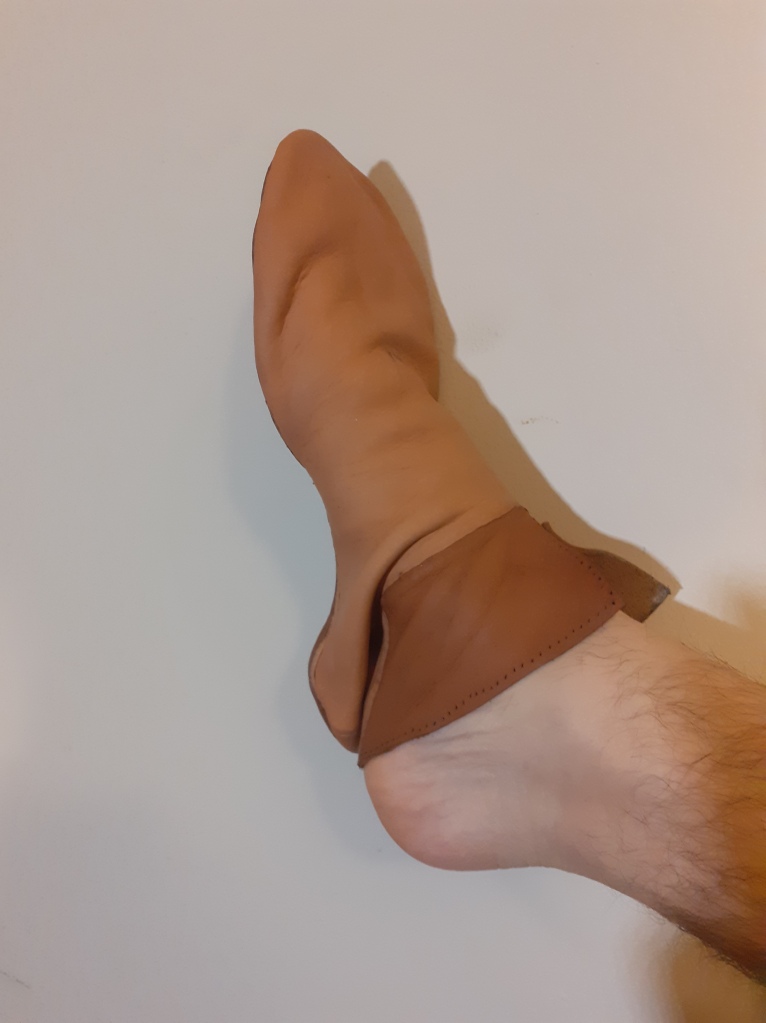
The method of marking and cutting a shoe pattern in period has two possibilities. The pattern may be laid out according to measurements taken from the client, and then cut freehand, or a pattern may be used, which is then modified to fit the client.(Grew p46-47) In the past, I have copied old worn out shoes and used them as patterns for a new pair. In this instance I wanted to make a new pattern, so I was forced to use the method of measurement and iteration. Armed with the requirement of an ankle boot, I searched for a shoe pattern which appeared closest to my place and time and was different from previous shoes I had made. The type I arrived at is the San Marco – Z type, according to the typology of Marquita Volken in Archological Footwear.(Figure 4) This shoe type is described for the fourth quarter of the twelfth century and first quarter of the thirteenth century.
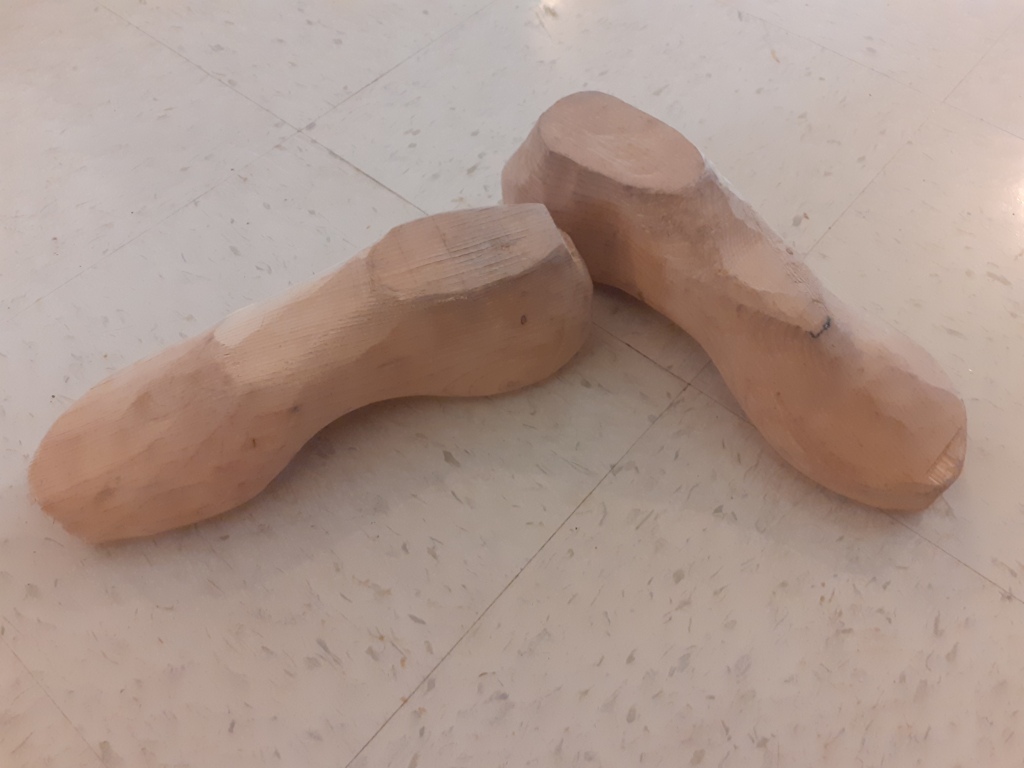
This type of shoe made in the twelfth century is called a turn shoe. Is it so called because the shoe is initially stitched together inside out, and then it is turned right-side out. This process protects the seams from wear. These shoes were also lasted, meaning they were sewn over a wooden form called a last. The last may either be made to match the measurements of the client’s foot, or can be used simply as an internal support when assembling the shoe, with the same last being used for multiple sizes of shoe.(Goubitz p103-106) For this project, I used a pair of lasts I had previously made to my measurements.(Figure 5)

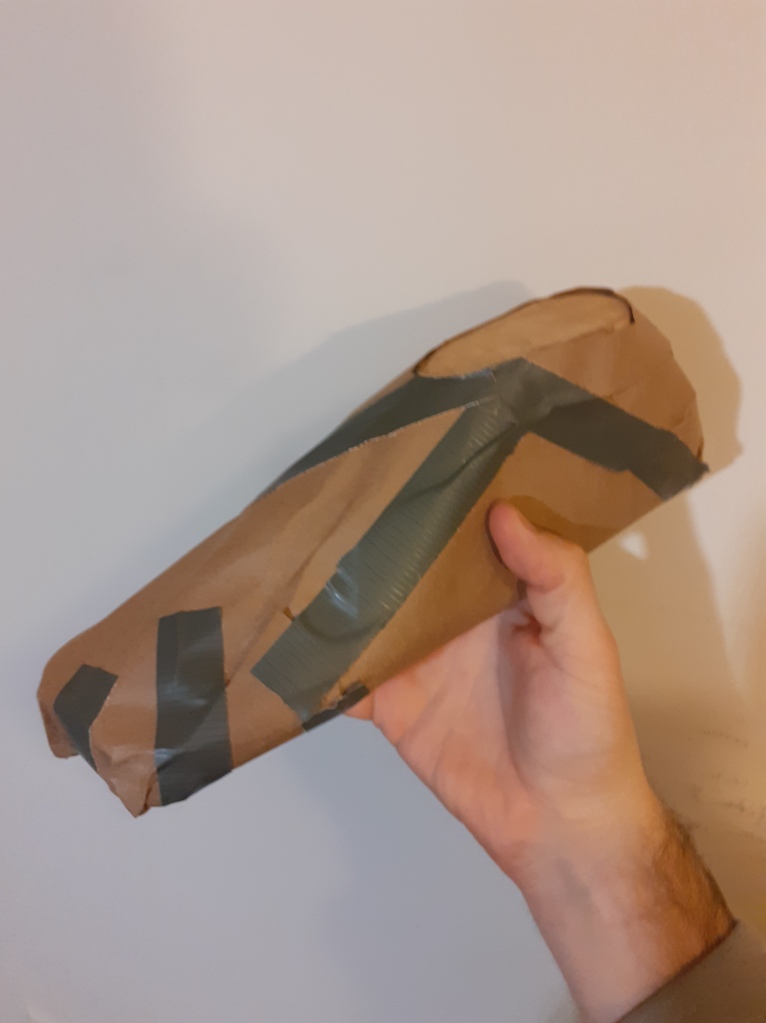
The primary measurements which are important when designing a shoe are the outline of the foot, the circumference of the foot at the ball, the circumference of the foot at the narrowest part, the circumference of the ankle and instep, and the circumference of the ankle. With these measurements and enough institutional knowledge, a skilled shoe maker should be able to make a pair of fitting shoes. Unfortunately, I am not that skilled yet and took a somewhat different approach. Because I had well carved lasts, I decided to wrap one in a layer of paper, mark it where the seams should be, and cut it off to be used as the beginning of my pattern.
This flattened pattern gave me a starting point, but several iterations were required to get a workable pattern. The ninth turned out to be good enough to attempt with leather.

The leather that I chose for the upper is a 5oz vegetable tanned cow leather. This relatively thin cowhide is intended to stand in for the calf which is often found in a late 12th century context, when the type of hide is given. Other types of leather used at the time were sheep or goat.(Grew p44) The sole of the shoe is always thicker than the upper, and so I used a 12oz vegetable tanned leather for that component.(Goubitz p75) A third component which became common in the late twelfth century was a rand. This was a thick piece of cattle leather cut to a triangular section and fitted between the sole and upper. Contrary to the sometimes quoted purpose of water resistance, (Grew p10) this piece serves to bridge the gap between those two pieces of leather, preventing the stitches from becoming exposed.(Goubitz p78) This piece does not appear to initially follow the entire seam between the upper and sole, but only the highest strain areas, the heel and sides of the shoe, but this may also be the result of incomplete artifacts.(Grew p49) I decided to follow the possible trend with this project.

A technique to further protect the seam that I used is to cut the sole oversized by a few millimeters, and then bevel it back on the flesh side. This angled surface covers and protects the stitches.(Goubitz p78)
Once the pattern was finalized, I cut out the pattern using a lunette knife, a traditional shoemaker’s tool. Variations have been found through the medieval and Roman eras, but I have not found good sources close to my specific context.(Grew p44)

Stitching of shoes is a simple process. The only seam type needed with this pattern was a saddle stitch,(Figure 9) though there are a couple variations. The soles of shoes were attached with an edge to flesh seam, where the thread passes through the rough side of the sole and exits the edge of the piece, thereby preventing the user from walking on the stitches. The thread then passes through the rand, and straight through the upper near to the edge. These holes would all be prepared using a triangular section awl. With a saddle stitch, the artisan uses two threads in concert, working them opposite directions and pulling them against one another to create a strong and tight seam. Rather than using needles, boar bristles seem to be used, with the thread tied and glued to the bristle with pitch, known as waxed ends. This creates a thinner overall profile than a threaded needle, as the thread doesn’t need to double over itself. Information about this technique is scant because the used bristles were treated as waste and decompose, but for instance a 4th century satirist wrote a piglet’s will, saying “And from my body I shall give and contribute to the cobblers my bristles”(Lockyer)
The earliest surviving shoes I have found where the thread joining the upper and sole survives and is described are dated to the 14th century. This thread is are a plied linen.(Grew p48) I used the same in my reconstruction, two strands of 16/2 linen thread which were plied again, and then coated in beeswax. The same stitch was used for the construction of the upper, except in that case the thread was only a regular 16/2 linen thread and both pieces of leather were butted edge to edge. The two ends passed through the back side and edge of each piece, concealing and protecting the stitches from the outside.

I initially was working on this project with a strict time constraint, and was forced to try simulating boar bristle waxed ends with pieces of heavy fishing line. A combination of my inexperience with the technique and the slippery fishing line made the technique fail. Given my time constraints, I pressed ahead using a pair of steel needles, pulling them through the awl holes with a pair of pliers.
The shoes went together quickly, first joining the upper into a loop and then fitting it onto the sole. The sole was attached to the last with small nails to prevent it from moving, though wooden pegs were also used historically.(Goubitz p105) To hole the work in place, I used a leather strap looped over the shoe and under my own foot. This enabled me to use both hands to work as I pulled the shoe against my thigh with my foot..(Figure 11) This device shows up in late medieval artwork and may be older, though I have not done extensive research in the subject.(Goubitz p107)
Once I stitched both shoes together, I had the difficult task of removing them from the lasts. After much tugging and tapping, I managed to free them. Unfortunately, the reason for the difficulty was an error on my part.(Figure 12) In my haste, I had forgotten to make sure the throat of the shoe was cut properly. This measurement cannot be smaller than the distance around the wearer’s heel and instep.
At the same time this happened, the deadline I was making this pair of shoes for was relaxed, so I could both reassess the pattern and wait for the boar bristles to arrive.
The only error with the pattern was placement of the shoe’s throat. With some careful measurements and a final iteration of my pattern, I soon had a second pair of shoes cut out and on the last.

The second pair of shoes went together as quickly as the first once the boar bristles arrived. The technique certainly is an improvement over fighting a needle, and I look forward to improving it. The pair of shoes took approximately one day of work to finish.(Figure 13)

Once the upper and the sole are joined, the excess material is trimmed away and the upper is completed with a small insert according to the cutting pattern.(Figure 4) This concluded the construction of the shoe, the last steps were the fastener and oiling.
According to the description in the shoe pattern typology (Figure 4), the proper fastening technique was two laces, one over the other which are secured by two pairs of loops cut into the upper, and sometimes a third pair in the back. I opted to go with the typical two pairs of loops. The laces were cut with my lunette knife out of the same leather as the upper. There is some scant evidence of the use of braided textile laces, but because there are copious examples of surviving leather laces, I decided they were a safer option.

The shoes were finished with a coating of tallow and considered finished. A possibility of edge treatment on the top edge of the boot exist. This could simply be a thread whip stitched over the edge or one of several leather edge finishing techniques, such as a top band.(Grew 13-14) Treatment like this are not ubiquitous, and because I usually add a top band, I decided to not apply one this time.
The second pair of shoes fit very well, I believe they show measurable improvement over my previous pairs in both technique and in research. Future projects will include more complicated fastening systems and various techniques of embellishment.
Bibligraphy
Barber, M., & Bate, K. (2016). Letters from the East: Crusaders, Pilgrims and Settlers in the 12th-13th Centuries. London: Taylor and Francis.
Grew, F., & Neergaard, M. D. (2006). Shoes and pattens. Woodbridge: Boydell Press.
Goubitz, O., Driel-Murray, C. V., & Waateringe, W. G. (2011). Stepping through time: Archaeological footwear from prehistoric times until 1800. Zwolle: SPA Uitgevers.
Kornbluth, G. (2020, May 31). Historical Archive: Liturgical Vestments said to have been worn by Thomas Becket. Retrieved June 22, 2020, from http://www.kornbluthphoto.com/VestmentsBecket.html
Lockyer,Terrance. “Testamentum Porcelli; a Little Pig’s Will.” A Phrontistery. (2012) Web. 29 June 2020.<https://tlockyer.wordpress.com/2012/04/20/testamen tum-porcelli-a-little-pigs-will/ >.
Manuscript Miniatures. (n.d.). Retrieved June 22, 2020, from http://manuscriptminiatures.com/
Prawer, J., The Cr. (1972). The Crusader Kingdom. New York, NY: Praeger.
Shoe. (2020, May 28). Retrieved June 22, 2020, from https://collections.museumoflondon.org.uk/online/object/32681.html
Volken, M. (2014). Archaeological Footwear. Assen: SPA Uitgevers.
Lessons Learned: Battle of Hattin 2017
I have been making and using reproductions of medieval for several years. This involves a continual process of iteration, failure, and improvement. One event I participated in which included several learning opportunities was The Battle of Hattin reenactment in 2017, hosted by Regnum Hierosolymitanum in Israel. This event took place on the location where the Army of Jerusalem mustered, the road it marched upon, and the site of the battle on the closest weekend to the 830th anniversary of the battle.
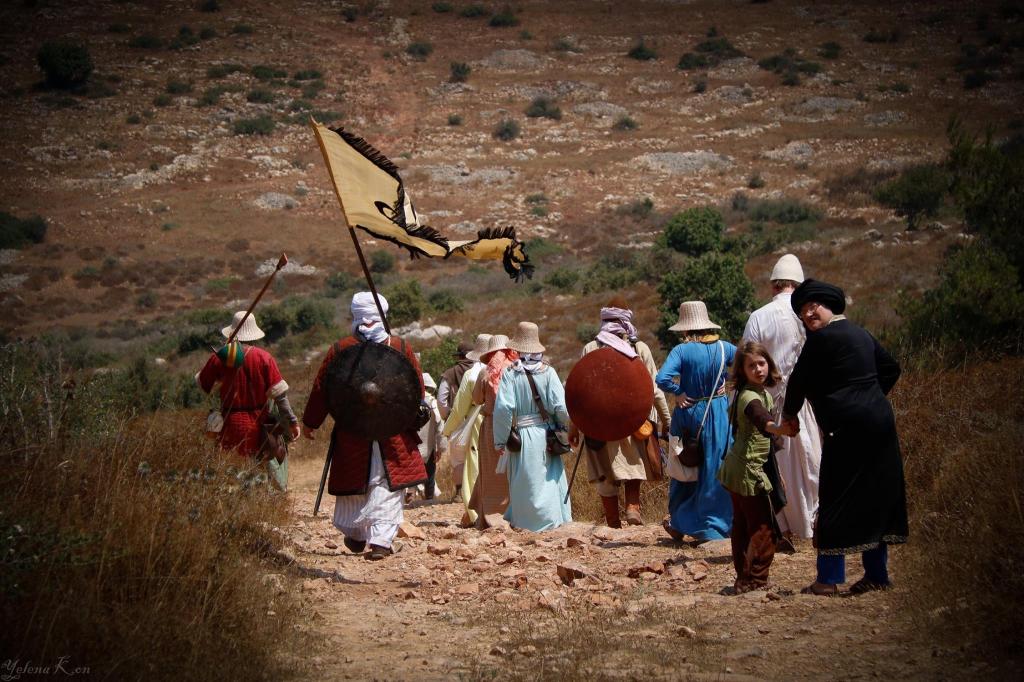
The event took place over three days in the height of the Israeli summer, 30June-02July. The daily high temperature was approximately 46°C (115°F) in the shade, and the distance covered was approximately 35km (22mi) over two the three days. The first day was simply for mustering, the second for marching and a skirmish, and the third for the final march and the battle at the Horns of Hattin.


The first challenge I had to address was appropriate footwear for a hike over rugged terrain while carrying a load. I have been making my own footwear for reenactment purposes for several years. I decided it would be interesting to try to gauge the level of wear this sort of trek puts on them by beginning with a brand new pair. I didn’t know exactly what the terrain was going to be like before leaving, but the organizers emphasized the necessity for pattens. Pattens are a sort of sandal made of wood or stacked leather which are worn over the shoe. They add significant rigidity to the bottom of the shoes and are much easier to repair than the shoe. The problem with pattens for my specific context is that evidence of their use in the 12th century that I have been able to find is limited to a single toe strap found in London. The number of finds increases through the thirteenth century, and the largest groupings of pattens is assigned to the second half of the 14th century.(Grew p91-93) This increase in finds coincides with the development of road infrastructure, and pattens begin to decline as multi-soled shoes become popular.(Goubitz p253)

The justification from the event organizers for the use of pattens by the field armies of the 12th century was the existence of iron calks excavated at local sites These were essentially small iron cleats which would be affixed to the bottom of footwear at the heel, preventing excessive wear while minimally impacting traction. These were said to be in an unpublished archaeological report. The type of pattens recommended by the event coordinators was made of stacked leather, essentially multiple soles which were stitched together at the edges with a toe and heel strap. Being new to the event, I complied with their recommendations, and made the pattens pictured below.
Since the 2017 event, Regnum Hierosolymitanum has changed their position on the use of stacked leather pattens being used in a late 12th century Outremer context. The earliest extant pattens in this style I have been able to find date to the 14th century.(Grew p100)

During the hike, I ran into a number of problems with my pattens. On the second day, I found them to be excessively loose, collecting dirt, rocks, and sand between the sole of my shoe and the patten. I determined both the toe strap and the ankle strap needed to be tightened. During a skirmish with the Ayyubid forces, one of the pattens came off my toe and dangled behind my foot by the ankle strap, exasperating the problem. I made an impromptu repair, lashing the patten to my foot with a braided piece of palm fiber, but when we stopped for the evening I had a chance to properly repair them.

There were two changes I needed to make. First, I decided to make the toe strap adjustable. I cut the toe straps in half and pierced a series of holes in the leather, through which I passed braided palm fibers and secured with knots. The more severe issue was the fit of the ankle strap. The problem was that the part of the strap passing around the back of my heel was too high. It is necessary for this strap to fit over the lower part of the Achilles tendon where it can ride on the widest part of your heel, rather like a belt at the waist. Between legs of the march, I completed both of these repairs. The following day I both marched and fought while wearing my pattens and had no further issues.
When the march was over I took the photograph to the left. The pattens had sustained some significant wear over the three days of marching over hard packed dirt and sharp volcanic rocks. The stitches at the rear of the patten had worn away completely, making the layers partially separate, and about half of the first layer of leather had been worn through. Calks would prevent this wear, but I have not personally seen any evidence of their use in a context acceptably close to mine. Three years later, these pattens are still in working condition. I have replaced the braided palm cord with hemp, replaced the leather thongs at the instep, reinforced the holes in the ankle strap, and replaced the tread sole, but all of these repairs are very simple in comparison with maintenance on the actual shoes.
The boots I wore came over the ankle and secured with a single lace which wound up the leg in four loops. I had always assumed this to simply be a matter of fashion, but I stumbled onto a possible functional reason for this system. During the march, I observed multiple people who wore low shoes stopping to pick stones out of their shoes. They complained of the problem frequently, but I never experienced so much as sand inside of my boots. When I took the boots off for the day, I found that the top edge of my boots had acted as a funnel, capturing many stones and pieces of sand, but no outside debris fell past the second loop of the leather lace.

In the future, I plan on making a pair of wooden pattens in the earliest style I can find. Single soled turnshoes are not designed for walking on asphalt or gravel, surfaces that are often found at event sites. I feel that it is better to wear something may have been unusual in my period than it would be to modify them in a way that we do not have evidence for at all.
The second issue I faced during the Battle of Hattin was heat. The military forces on the march were required to wear their armor, expecting to be attacked at any time. My armor consisted of a gambeson made of thirty-five layers of linen and a steel helmet. The principle problems I needed to address was wicking moisture and protecting myself from the sun. I tried out a theory with my woolen tunic. The first day I wore a wool layer between my gambeson and undertunic to determine if there was any benefit of moisture wicking, and the second I wore only my linen undertunic. It was very hot. I honestly wasn’t able to tell any difference between wearing the wool or not.
In order to protect my face and neck, I wore a wide brimmed hat. The only issue I had with it was under high winds, something easily fixed by adding a braided palm chinstrap. Covering the skin in a climate like this is very important, and if you do not drink enough water it can be very dangerous. We had numerous people bow out of the trek, get treated by the embedded medic, or go to the hospital for heat related injuries and severe sunburns, but I didn’t experience any serious issues. During the march I drank approximately a liter of water per hour, something that would not have been easy to sustain in the twelfth century without an extensive system of logistics.
I don’t think that there is anything else I could do to mitigate heat. My new gambeson is lighter in color and has long sleeves, so I am curious what difference there will be in that climate. I have found primary literary sources describing Byzantine troops wearing gambesons with slit armpits that can be worn behind the back, but I am wary applying this to Frankish forces.(De velitatione bellica, Emperor Nikephoros II Phokas, ca. 975)
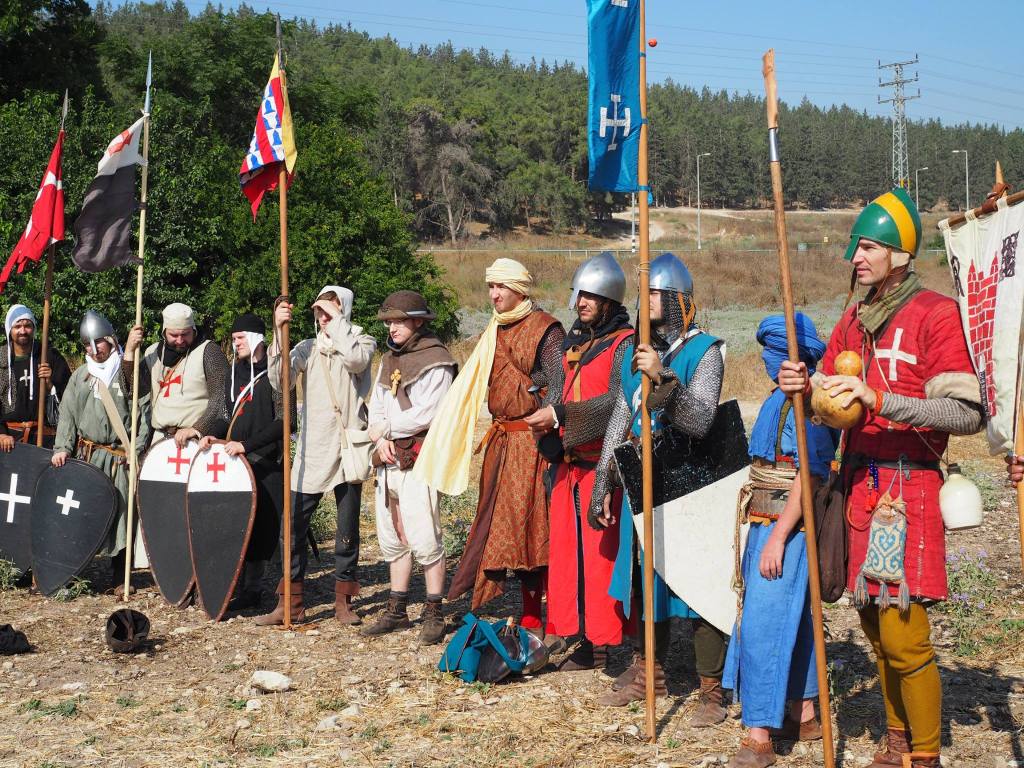
The final main issue I faced during the 2017 Hattin event was water. There were three water carrying systems that I could justify with primary sources for this trek. A gourd, a ceramic bottle, and a leather flask or costrel. I began the event with all three. The ceramic and leather were not constructed specifically for my context, but were off the shelf items.


The leather costrel ran into a couple problems. It was constructed with superior craftsmanship, but when it was impregnated with waterproof materials, the leather became very dark. This exasperated the issue of the lining softening and sticking to the stopper. When the costrel was full of water, it kept the lining somewhat cool, but when it was empty the lining did not stand up very well. The vendor sold the costrel as being lined with brewer’s pitch. Since the event, I have bought brewer’s pitch for myself, and it stays hard up to nearly boiling temperatures, so there was some flaw in effect there. In any case, I do not think it is ideal for the water to be keeping a bottle cool instead of the other way around. My costrel met its end on the second day of the event when the horse carrying our water barrels stepped on it.
I also carried a ceramic jug on campaign. It performed well, keeping the water inside relatively cool because of its light exterior, it did not change shape or consistency, it did not impart any flavor to the water, an almost ideal system until it was smashed. It is possible that a ceramic bottle could be covered by a sort of basket, but even so this would be a danger of relying on pottery.
The final system I used to carry water was a gourd. There are occasional pictorial references to pilgrims carrying water gourds in my period, and it is my favorite option. The light exterior absorbs little heat and the pithy walls of the gourd act as insulation. A dried gourd is lightweight and strong, usually lasting me two or three years before breaking. To illustrate this, I have given one to a puppy to use as a toy and thirty minutes of chewing did little damage to it. After cleaning a gourd must be lined with some waterproof material. I most often use beeswax, but brewer’s pitch could also be used. If the gourd is not lined, the effect will be similar to making tea, but with the entirely unpalatable flavor of gourd husk. (Edit: I have since heard that an un-lined gourd can be filled with water, soaked, and dried many times to extract this flavor from the bottle.)

In the future, I intend to make a leather flask myself made with true brewer’s pitch. Even with this change, I feel like this option is best used in more temperate zones. In Israel, I would carry multiple gourds and perhaps a fourth possibility; a traditional goat skin bag called a “ghirbe” was used for carrying water by Bedouin tribes. Unfortunately, I have not been able to trace this back to times of Franish occupation yet. Similar bags are traditional in other arid regions of the world, such as the South Asian “mashk”, the Basque “zahato”, and Spanish “bota”. Water skins are known from depictions by the Assyrians as early as 3000BC. I have not begun research in earnest, but this seems like a promising option.
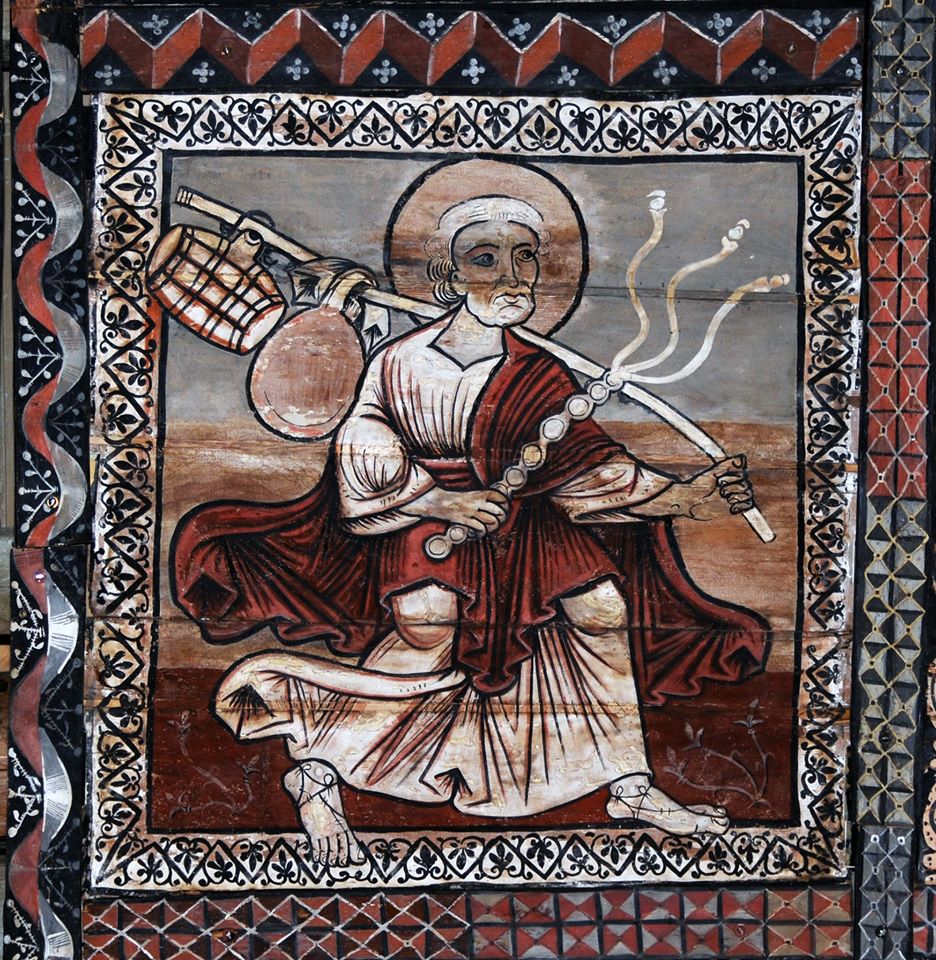
A further option is to use a coopered bottle or canteen. So far I have only seen a single pictorial example of this type of water carrying system but it certainly would have be very durable. I expect the downsides of this type would be greater expense than pottery or a gourd, but I do not have any hard figures to support that idea.
I intend to return to the annual Battle of Hattin reenactment. It stands out as the most authentic reenactment that I have been to. There is simply no competing with a group of people passionate enough to their hobby to brave the Israeli summer and march across rock covered hills to fight a battle. The next time I go, I intend on showing up a bit more prepared.
If The Battle of Hattin sounds like a good time to you, let me know! It happens every year and I would love to see more people at this fantastic event.
Learn more at: https://www.horns-hattin.com/

Bibliography
Avissar, M., & Stern, E. J. (2005). Pottery of the Crusader, Ayyubid, and Mamluk periods in Israel. Jerusalem: Israel Antiquities Authority.
Grew, F., & Neergaard, M. D. (2006). Shoes and pattens. Woodbridge: Boydell Press.
Goubitz, O., Driel-Murray, C. V., & Waateringe, W. G. (2001). Stepping through time: Archaeological footwear from prehistoric times until 1800. Zwolle: Stichting Promotie Archeologie.
NTLS. (2011, October 08). Ghirbe, zimzimiya and plastic. Retrieved June 21, 2020, from http://discoversinai.net/english/ghirbe-zimzimiya-and-plastic/4560
Hosen in a late 12th century Western European style
My objective for this project is to create a set of hosen based on known evidence for their pattern, execution, and overall appearance. For references, I have used extant garments and period illuminations from as close as my target year as available, 1190CE. I used this information to create a pattern that represents my best guess for a typical pattern of the time and choose a wool which adheres to the appearance which may have been used. Once executed, the hosen were constructed using stitches found in period with linen thread.
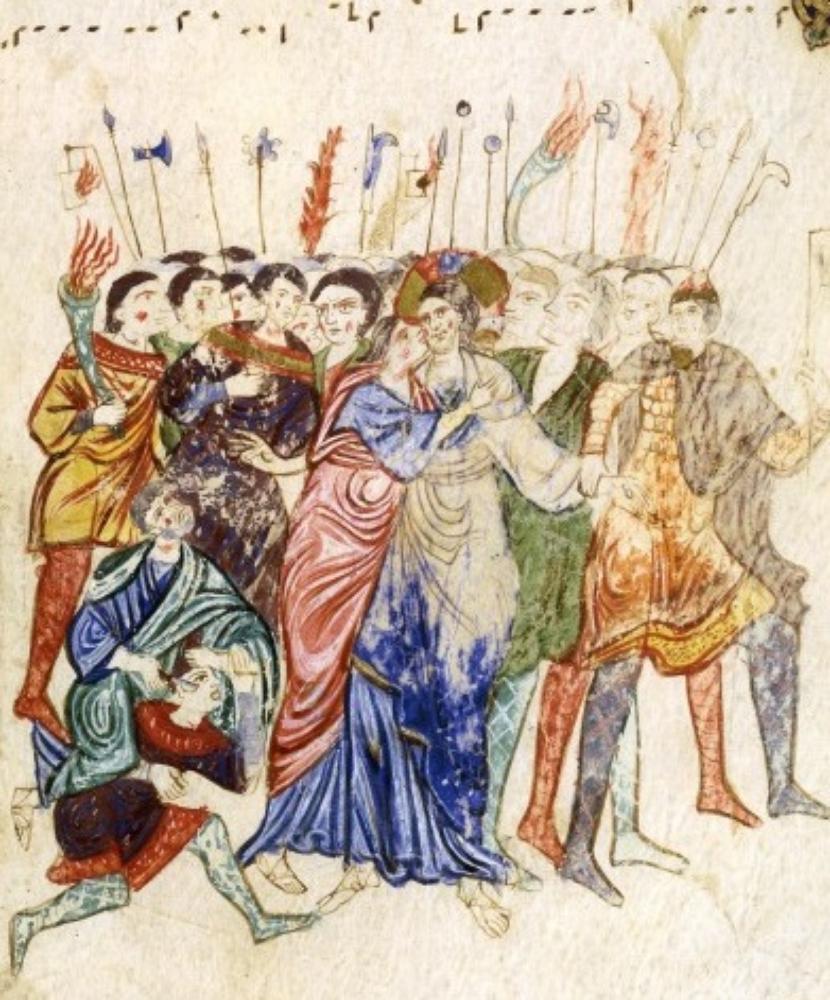
Unfortunately, the state of preservation of most textiles of the 12th century and early 13th century is poor, the number available is low, the distribution is less than ideal, and there is little information about the garments that actually survive. Garments I am aware still exist, but quite often the available information for these is very basic. This usually includes one or two low quality pictures and a brief description, rather than a detailed page long analysis. I have included the limited analysis I am able to make with the small amount of information available.

Hosen can be easily divided into two types. The style I will refer to as Type 1(Figure 3) covers the entire leg from foot or ankle to hip, is attached to a supporting garment at the waist, and is depicted in conforming to the body of the wearer. Type 1 is often made of wool and cut on the bias to allow for greater elasticity. The style I will refer to as Type 2 (Figure 2) comes up to just above or below the knee, are usually made of silk, and do not appear to be well fitted to the body. These are also sometimes known as buskins. All of the surviving examples of Type 2 hosen are either ecclesiastic garments or royal regalia. Because of the exceptionally fine and prestigious nature of Type 2 hosen, there are several examples from around the time I am looking at which survive in excellent condition. This project is meant to create examples of Type 1 hosen. Despite the differences in fit, materials, and length between Type 2 and Type 1 hosen, Type 2’s can still inform us of some decisions historical individuals made when faced with the same problems as appear in Type 1 hosen.

Margareta. Bockstenmannen, Och Hans
Dräkt. Halmstad och Varberg: Stiftelsen
Hallands länsmuseer, 1985.
The Bocksten Bog man excavated in Sweden is one of few well documented examples of Type 1 hosen. These hose were made from a wool twill and cut on the bias. The hosen each have two selvage edges, the top left and bottom right edge of each leg. This is indicated by bold lines in Figure 3. The date of the find is contested, with the conservation process and state of preservation from the bog potentially making radiocarbon dating of 1290-1430 AD erroneous. The pattern of the hose is angular in design, with straight cuts from thigh to ankle rather than shaped to fit the leg. The top edges of the garment terminate in a right angle at the front of the hip. The leg piece has a triangular portion which extends over the upper foot from the instep portion. The lower foot consists of one piece which is semicircular in form and the back of the foot and heel are formed from the leg piece. The heel is formed from two oblique angles.(Figure 3) This design and that of other garments bears a closer resemblance to examples which are dated toward the early end of the 1290-1430 range, rather than later examples such at the London hose.(Crawfoot p189) The Bocksten man hose also have an assembly of cords which partially wrap around the upper leg, seemingly to add tension to the material and make it fit closer to the body. There are several possible reconstructions of this system and I have decided to not delve into that subject. The suspension system of this example is unclear. There is no indication of eyelets or laces attached to the top of the garment.
The Bremen No.19 hose are Type 1 hosen dated to the 1200s and were excavated from a grave in Germany. The foot assembly is patterned similar to the Bocksten find and was also made of wool. Bremen No.19 also has a triangular piece which extends from the leg piece over the upper foot, has a heel formed by oblique angles, and a semicircular lower foot. The total height of the hose were approximately 178cm from the instep to the top point of the garment. These hose include some piecing at the top of the garment, possibly to add greater height because of a restriction of loom width, like the Bocksten Man examples. Unfortunately I have not been able to determine if any of the edges contain a selvage, which would support that idea. The suspension system of this example is also unclear, with a lack of eyelets, buttons, or attached laces as with the Bocksten Man finds.
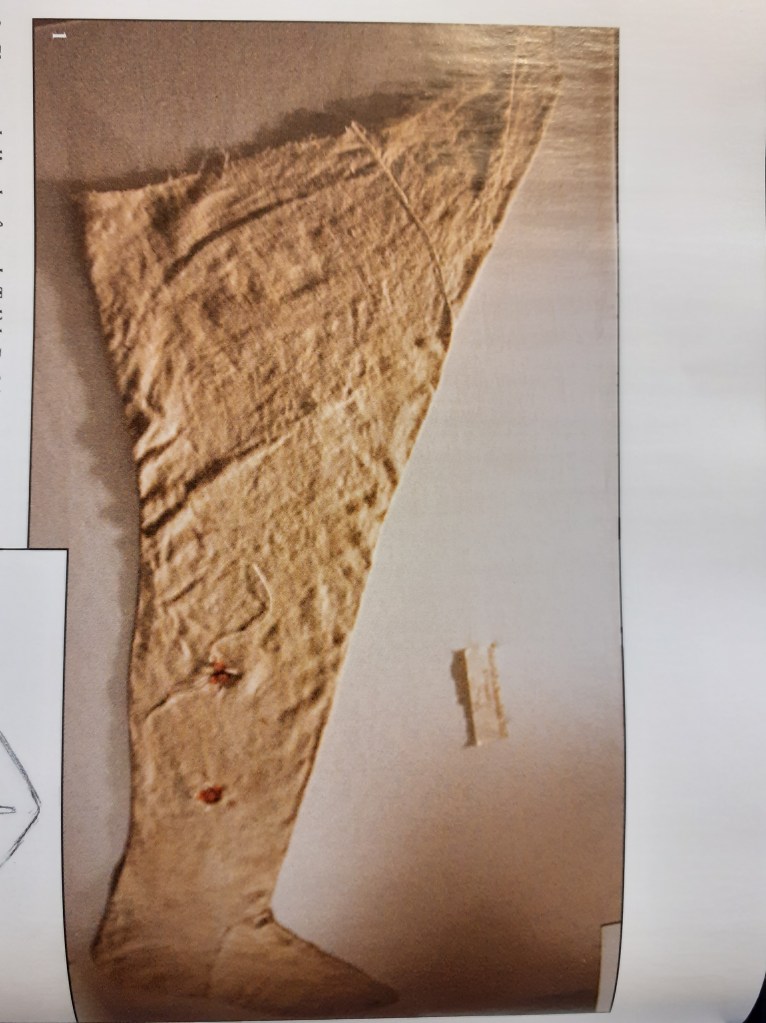
Another Type 1 pair of hosen are attributed to Saint Francis d’Assise from the beginning of the 13th century and reside in the convent of Sainte-Claire, Assise.(Figure 5) They are made of linen and cut on the bias. They closely resemble the other Type 1 hosen with the right angle top of the garment and an ankle pattern similar to the Bocksten and Bremen examples, except without the triangular piece extending from the leg piece over the top of the foot. We can see the seam between the foot and leg cutting across the width of the foot before going down. The foot piece is also fairly organic in shape. A godet was added to the top of the garment, but it is unclear what the shape is when only observing the garment from one side. Curiously, this garment has fairly wide woven ties sewn to the top, but not at the apex of the point. (Anderlini p140)

The hose of emperor Heinrich III is from 1053 or earlier.(Figure 6) They are Type 1 hosen, but made of silk. It is unclear from photographs and information I have found if it is a brocade or not, but based on the station of the individual they are attributed to, I imagine they would be. At the junction of the leg and foot pieces, the leg piece continues straight down at the instep instead of cutting across the width of the foot. The entire foot piece is much more angular in design than the Francis hose. Rather than cutting the leg portion on the bias or with flaring sides, a godet was added at the back of the leg, providing the necessary width to fit the thigh. There is an associated band with cords attached which is not described. These cords seem too thin to be cut from strips of cloth, but rather a sort of braid or leather thongs. It seems likely that this is some sort of belt or waistband to suspend the garment, or the waistband of the undergarment itself and the actual undergarment has decomposed. There is no obvious attachment method on the actual hose.
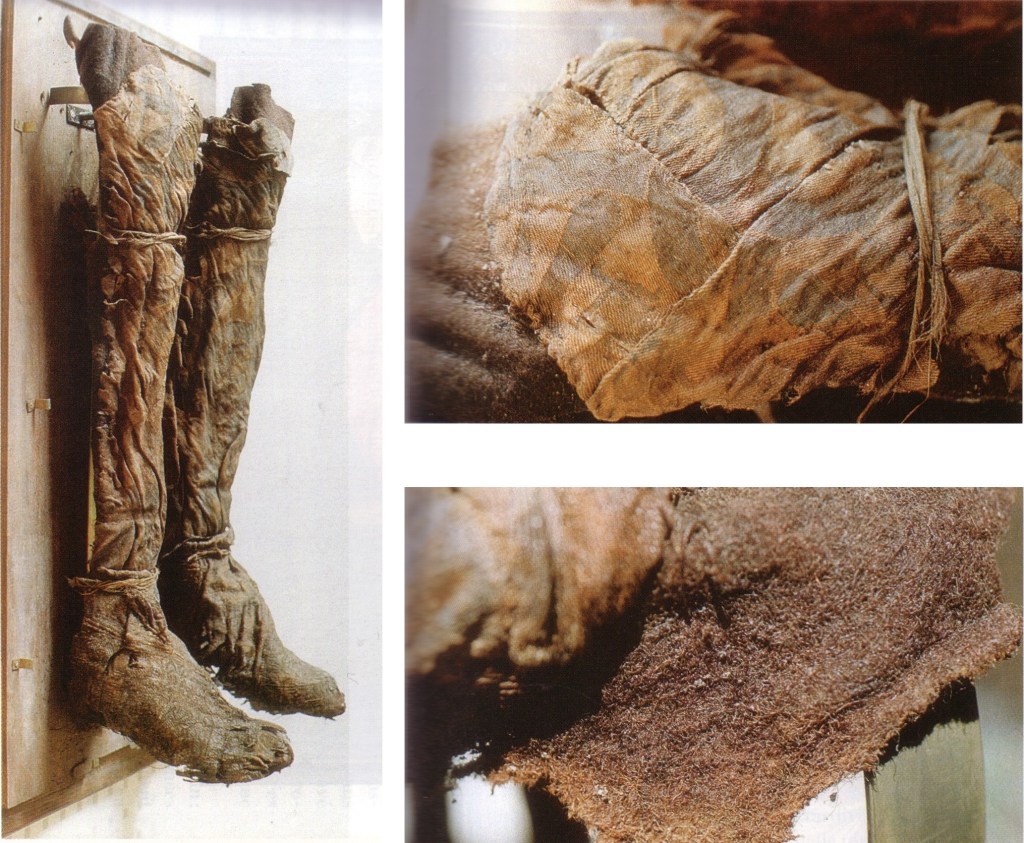
The hose of Robert I de Courtenay is another excellent example of a Type 1 hose, this time from the late thirteenth century.(Figure 7) I have not been able to find dimensions of the garment, but we can find the approximate fit by using body proportions. The distance between the instep and the top of the garment is about two and a half foot lengths, placing the top of the garment at about mid-thigh. I have not found a description of the fiber content, but it is clearly a brocade. The cloth appears to be cut on the bias in the available closeup. Fiber possibilities include silk or fine wool. The pattern seems to follow the Bocksten and Bremen examples with a triangular portion of the leg piece extending over the top of the foot. I can discern no information about the suspension system, but the garments are held onto their form with garters both below the knee and at the ankle. It is unclear if these are contemporary to the rest of the item.

Convent Santa Maria de Huerta
Rodrigo Zimenez was another individual buried with their hose, this time in 1247 in Spain when he was archbishop of Tolède. His Type 1 hose were made of fine wool cut on the bias. The back of the upper hose have considerable piecing, seemingly to bring the top of the garment to be horizontal, instead of the typical angled Type 1 profile. A leather band is associated with the garment, similar to the hose of Heinrich III. This band has cords which are attached to the hosen near the top of the front by means of an eyelet which has been reinforced by a piece of parchment. It is unclear if the current arrangement of cords is contemporary to the garment.(Anderlini p140)
Examples of Type 1 hosen were also found in Greenland.(Figure 9) Norland No. 88 was sewn from a 2/2 twill which was almost black except for some white warp threads. The hosen were cut so that one of the top edges was a selvage. The total height of the garment was 75cm from instep to top, or over three foot lengths. This puts the height of the garment at around the wearer’s hip. Rather than a single semi-circular foot piece, the foot of Norland No.88 is made up of six pieces. Fransen et al in Medieval Garments Reconstructed believed this to be a series of repairs, and I tend to agree. There is no apparent eyelet, button, or cords attached to the garment to facilitate suspension to the supporting garment.

Woven Into the Earth p223
The stocking of Hubert Walters (Figure 2), a late 12th century Type 2 hose, follows the same foot cutting pattern as the Francis example. It is made of a silk brocade with precious metals woven into the cloth. The distance between the instep and the top of the garment is approximately two foot lengths. This equates to a garment which stops just above the knee. There is a garter attached to the top point of the garment, allowing the wearer to secure the hose in place without using any supporting garments. These cords have a zigzag pattern on them, making me believe that they were woven specifically for the purpose.

Germanische National Museum, Nurmberg
The hose of St. Desiderius is another twelfth century Type 2 hose.(Figure 10) It is made of a silk brocade and has a series of horizontal red stripes or ribbons applied to the garment. It likewise does not come with adequate dimensions, but by proportions the leg is one and a half foot lengths high. This places the top of the garment just below the knee. The pattern appears to be similar to the Heinrich hosen, with the same angular foot piece. Since this garment seems to not go over the knee, it makes sense that it would not need to flare as much. This garment is also different in that the top is straight across rather than angled forward, and the attached garter is positioned on the side rather than the front.

The stocking of William II who was King of Sicily until his death in 1189 also survives.(Figure 11) It is a Type 2 hose which appears to be made of a brocaded silk. The height is about 1.8 foot lengths, which curiously puts the top of the garment at approximately knee height. A garter of cloth strips seem to be attached to the garment a few inches below the top, below a band circling the leg. These ties are about one and a half foot lengths above the instep, placing them below the knee. If that is the case, it is possible the embellished upper portion of the hose simply sat over the knee while being held up by the garter or was turned down over the garter and lower leg. The foot pattern appears to be consistent with the Walters hose, cutting across the foot width before going down and having a more rounded foot ball area.

A further example of Type 2 hosen is those of Clement II, who was pope until his death in 1047.(Figure 12) These hosen are made of a brocade and do not appear to have foot pieces divided from the leg piece. There may be some imperceptible seam, but the pattern of the brocade seems to match up. The top of the hosen are closed by ties or garters and they are just short of two foot lengths high, likely above-knee in height.

Hosen are visible in numerous illuminations, and are typically shown
fitted to the leg, especially to the calf. In the Psalter of Eleanor of Aquitaine
ca. 1185 on the December page,(Figure 14) an individual is shown picking grapes with his tunic pulled up over his belt and hosen showing. The image depicts the height of the hose to be mid-thigh to waist high at the front, descending from this point at an angle to the back of the leg. This is consistent with the extant examples of Type 1 hosen. In every depiction of hosen where the height of clearly shown, this mid to upper thigh is depicted without exception. Figures 12 and 13 display the range of hosen heights in artwork. Individuals who were likely wearing Type 2 hosen, Royalty and high ranking ecclesiastic figures, are only shown with their feet, toes, or nothing poking out from the bottom hem of their garments.
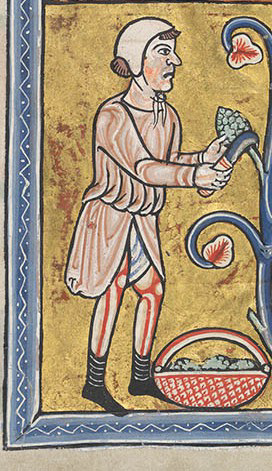
of Aquitaine. Detail, December
The type of fabric used is a subject that has sources in both the artistic depictions and extant examples. Of the garments listed above, five (possibly six) of the ten total garments have a brocade pattern woven into the material. Of the remaining examples, St. Francis is famous for adopting a life of poverty and naturally would not have chosen decorated clothing. If the Bocksten and Bremen hosen were ever woven with a pattern it has been degraded by their method of preservation. Patterns may be woven into cloth without even the expense of dying the material, such as by using different colors for the warp and weft for twills, checks, or stripes, so all but the poorest of persons may have been able to enhance the visual interest of their clothing.(Ostergard p72) This practice of hosen being made from cloth with simple weaving patterns is shown in a minority of artwork.
Figure 15.1
1187-1200. Epiphany, workshops of Vic, Episcopal Museum of Vic, Barcelona
Figure 15.2
Fresco de Santo Tomás Beckett martyr, second half XII, Church of Santa María, Tarrasa, Barcelona (detail)
Figure 15.3
1120-1140 France, Psautier avec la glose de Pierre Lombard, Bibliothèque de Saint-Omer Ms. 032-2, tome 2
Figure 15.4
1100-1150, England, Arundel MS 91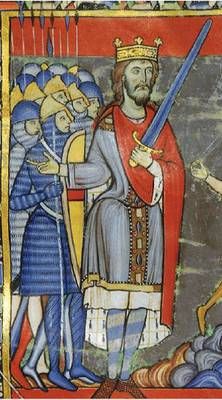
Figure 15.5
1160-1180, England, Morgan M.619 Winchester Bible
Figure 15.6
1180-1185, France, MS KW 76 F 13, Fecamp Psalter
Figure 15.7
Alençon BM MS. 96 How. in Epistulas Pauli 63v 1151-1200
Figure 15.8
Bibliothèque municipale, Dépôt, basilique Saint-Quentin 1100-1150 4
Figure 15.9
1160-1170 France, valenciennes, municipal library, 0500 (459 BIS) 3
Figure 15.10
1255-1260 London, England, Getty MS Ludwig III 1 Dyson Perrins Apocalypse, 022v
Figure 15.11
1175-1200 Ottobeuren, Germany. Yates Thompson 2 f62v
As we have seen in the extant examples earlier, the patterns woven into the hosen of the wealthy and very wealthy could be exceptionally ornate. For example the central individual in Figure 15.5 is King Henry II of England. The hosen he is wearing here has a very simple pattern of broad diagonal stripes. If this was done with real cloth on a loom, it would either be horizontal or vertical stripes that are turned to an angle when the pattern is cut on the bias. As we know from the extant examples, a king would be able to afford much more than this. We can then surmise that the patterns drawn by artists in period artwork do not necessarily equate to the patterns on the clothing they were depicting. The point of this artwork is to communicate the idea of the scene, not to show people how they were in life. There were and are restrictions on the medium, and the closest thing to a faithfully depicting a brocade is in Figure 15.11. All others are simplified designs which fit on the page and add some visual interest. I think that the patterns we see here likely were put on cloth and made into hosen, but in the context of this artwork, some individuals are downgraded to simpler designs that may have been worn by lower classes.
A further detail that I feel is important to the overall look of the hosen is garters. All of the surviving Type 2 hosen have garters attached to them, or used to. The hose of Robert I de Courtenay likewise has associated garters both above the calf and at the ankle. Type 1 hosen in all available artwork show the ideal to be as fitted a possible. A garter at the knee does a fantastic job of establishing this profile and a garter at the ankle would certainly help for an individual who was wearing low shoes. This is a detail that seldom shows up in artwork however. In fact the only times I have found definite depictions of them in an early thirteenth century context they are worn over mail chausses.(Figures 16,17) As civilian wear and armor tended to reflect one another, I feel that this lends some support to the wear of garters over woolen hosen, even though I have not found explicit examples a couple of decades earlier. I have decided that if garters were worn, no attention was really drawn to them, they would blend in or be utilitarian rather than ornamental. If they were seen as an opportunity to show off, I would expect to see them emphasized in artwork.
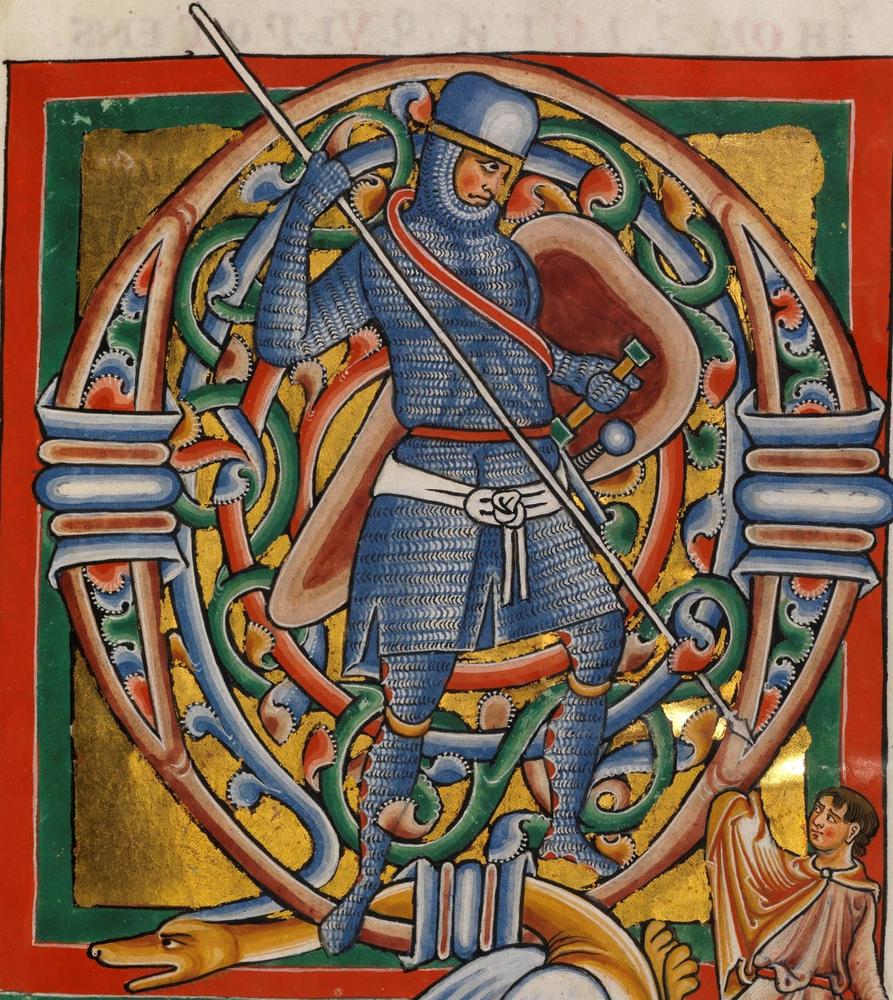
When it came to selecting the material I would use for this project, I looked at available period artwork for an example of a woven pattern that would be relatively simple to weave but still would imply the wearer had some financial means. I also needed something I could find being commercially woven. The image I arrived at was Figure 1. This is a blue-grey ground with a red windowpane check being worn by an individual who appears to be a foot sergeant. This image is rather early for me, dated to 1136 in Fondi, Italy, but on inspecting the fashion of the period I decided that there was no major change in the garments of lower classes over that span of time. The weaves of Type 1 wool examples when I have information is 2/2 twill. Furthermore, the majority of wool found in areas with high enough concentrations to analyze statistics are 2/2 twill.(Ostargard p62) This is concentration happens to be in Greenland in a very broad time frame. This is not ideal, but in lieu of better information, I must defer to the Greenlandic source.
With this description in hand, I hunted through numerous catalogs of wools and managed to find fabric which matched the depiction I described. It is a medium-light weight 2/2 twill with a blue-grey ground of a color that could be achieved by overdying a grey wool with indigo or woad and a red windowpane check of a hue achievable with madder.(Dean 120)(Figure 20)
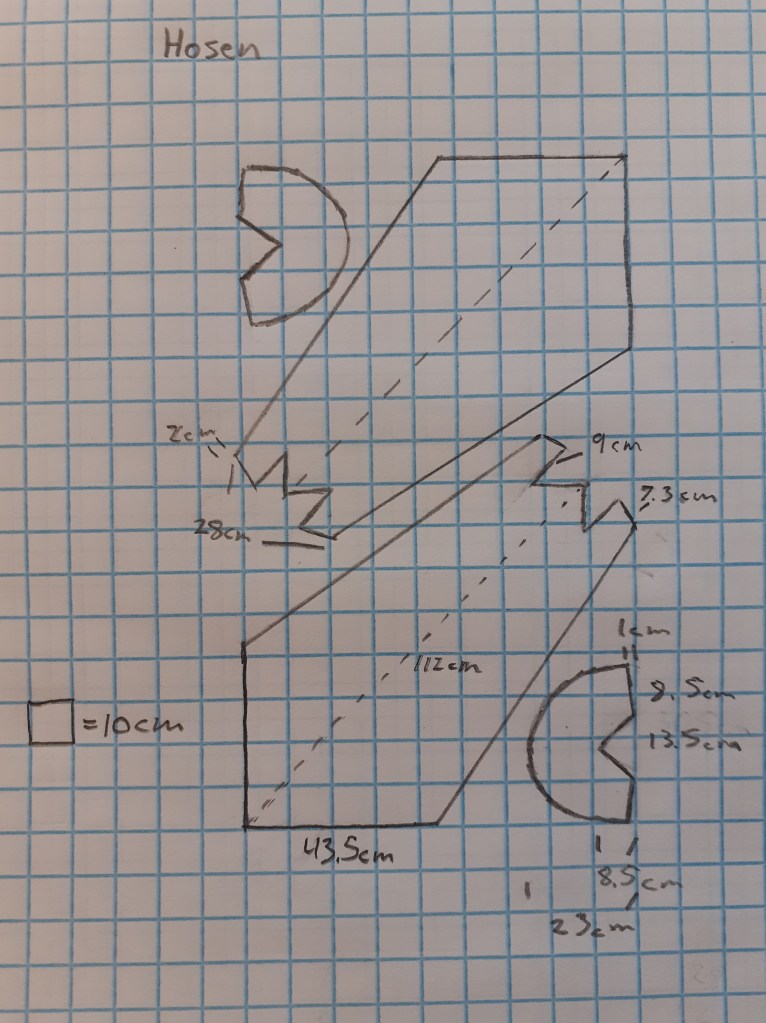
The pattern I arrived at is primarily inspired by the Bremen, Bocksten, Norlund, and Robert examples. These are all constructed of wool and I have relatively good information on them. I patterned the hosen on the bias like all of the extant Type 1 examples except for Heinrich III’s silk pair. I used a semicircular foot shape and the triangular leg portion which extends over the foot from the instep. This forms a stronger interface with the foot piece in a high strain area. I patterned the garment to extend up to my hip and did not create an artificial need for piecing. The profile of the garment was intended to have the angular top profile I see in artwork of my late 12th century Italian context rather than the occasionally seen flat top.
The length of the foot piece my foot measurement from the side of the foot where the foot and leg pieces meet to my big toe. The width of the foot piece is simply the circumference of my foot. The width of the leg piece at the ankle can be no smaller than the measurement from the heel around the front of the instep, since this is the widest part of the foot. The length of the leg piece is the measurement from my hip to the instep, plus the length of the triangular foot interfacing. All of these measurements were given an extra 7mm for each seam.

Almost all threads in extant articles from Medieval Europe have disintegrated, only leaving the holes and impressions where the thread passed on some textiles. The information about extant hosen above is the extent of what I have, there seems to be no detailed analysis of stitches and seams used, so I must look elsewhere. For this project I chose seam techniques that result in the thinnest seam possible in the interest of comfort. A number of textiles from the London finds (Crowfoot 153-157) have this evidence, which indicate that a majority of seams were held together by a running stitch or backstitch. In one technique the two edges were then folded outwards and stitched down using running or hem stitches (Figure 19 A). There are a number of hose foot fragments in this source dated to the 14th century that have a stitch which is exclusively used on hose. This is a method where the two sides of the seam are overlapped and edges stitched down, meaning the finished seam is only two fabric thicknesses.(Figure 19 B) The usual overlap of these seams is 4-7mm with stitches that are approximately 3mm long. In order to finish the hems on wool, a single fold seems to have been considered adequate, this being secured with a hem stitch and stab stitch in high wear areas. The stab stitch is similar to a running stitch, except that the needle enters the folded cloth angled backwards, resulting in stitches that are very tight together and provide significant strength and abrasion resistance.(Figure 19 C) I use an unbleached 16/2 linen thread for this project. My reasoning for not matching threads with the material is that the size of stitches is very small, leaving very little visible on the outside, linen does not remain colorfast with natural dyes well, and it would be an expense I do not think is reasonable for my chosen context.
For a fastening technique, I decided to use an eyelet at the apex of each hose reinforced with a small piece of thin rawhide as is described in the Rodrigo hose. Other solutions include cords attached to the top of the garment as on the Francis hose, or the use of a temporary button. This would be done by placing a small object on the back of the hose and tying the suspension cords around the object over the wool. This would not leave a lasting sign, as we see in several of the Type 1 hosen.
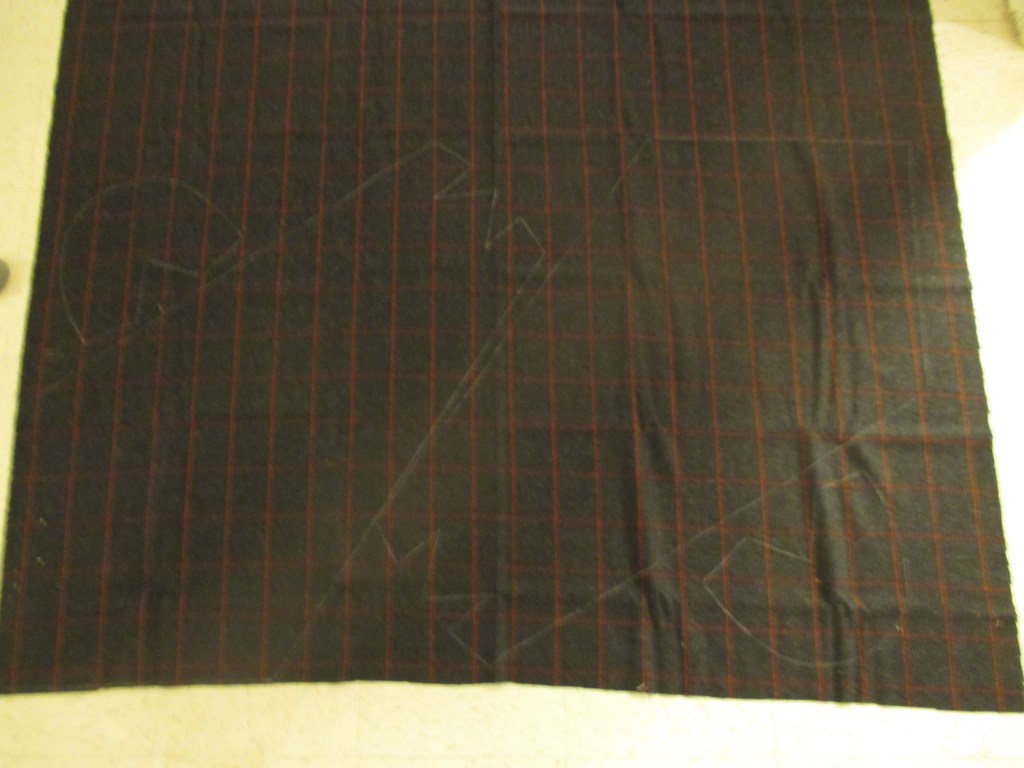
My final decision was the use of a garter. After some deliberation and considering of the garters on surviving Type 2 hosen, I decided to use grain cut strips of fulled wool which was wastage of a different project. This is consistent with the woven cloth strips in several Type 2 examples, would not impart any significant cost, and the dark blue pieces blend in with the hosen.
I avoided the selvages of the material as most modern wool has some strands of synthetic fiber at the edges to help automated looms grip the wool. The specific selvage pattern used by automated looms is also not seen in period textiles.(Crowfoot 46) Once cut out, the bottom of the foot and back of the leg should be completed first, creating a stable base for pinning and stitching the foot on.(Figure 21-22) This was done using a running stitch approximately 3-4mm in length with each edge folded outwards 7mm. (Figure 19 A)
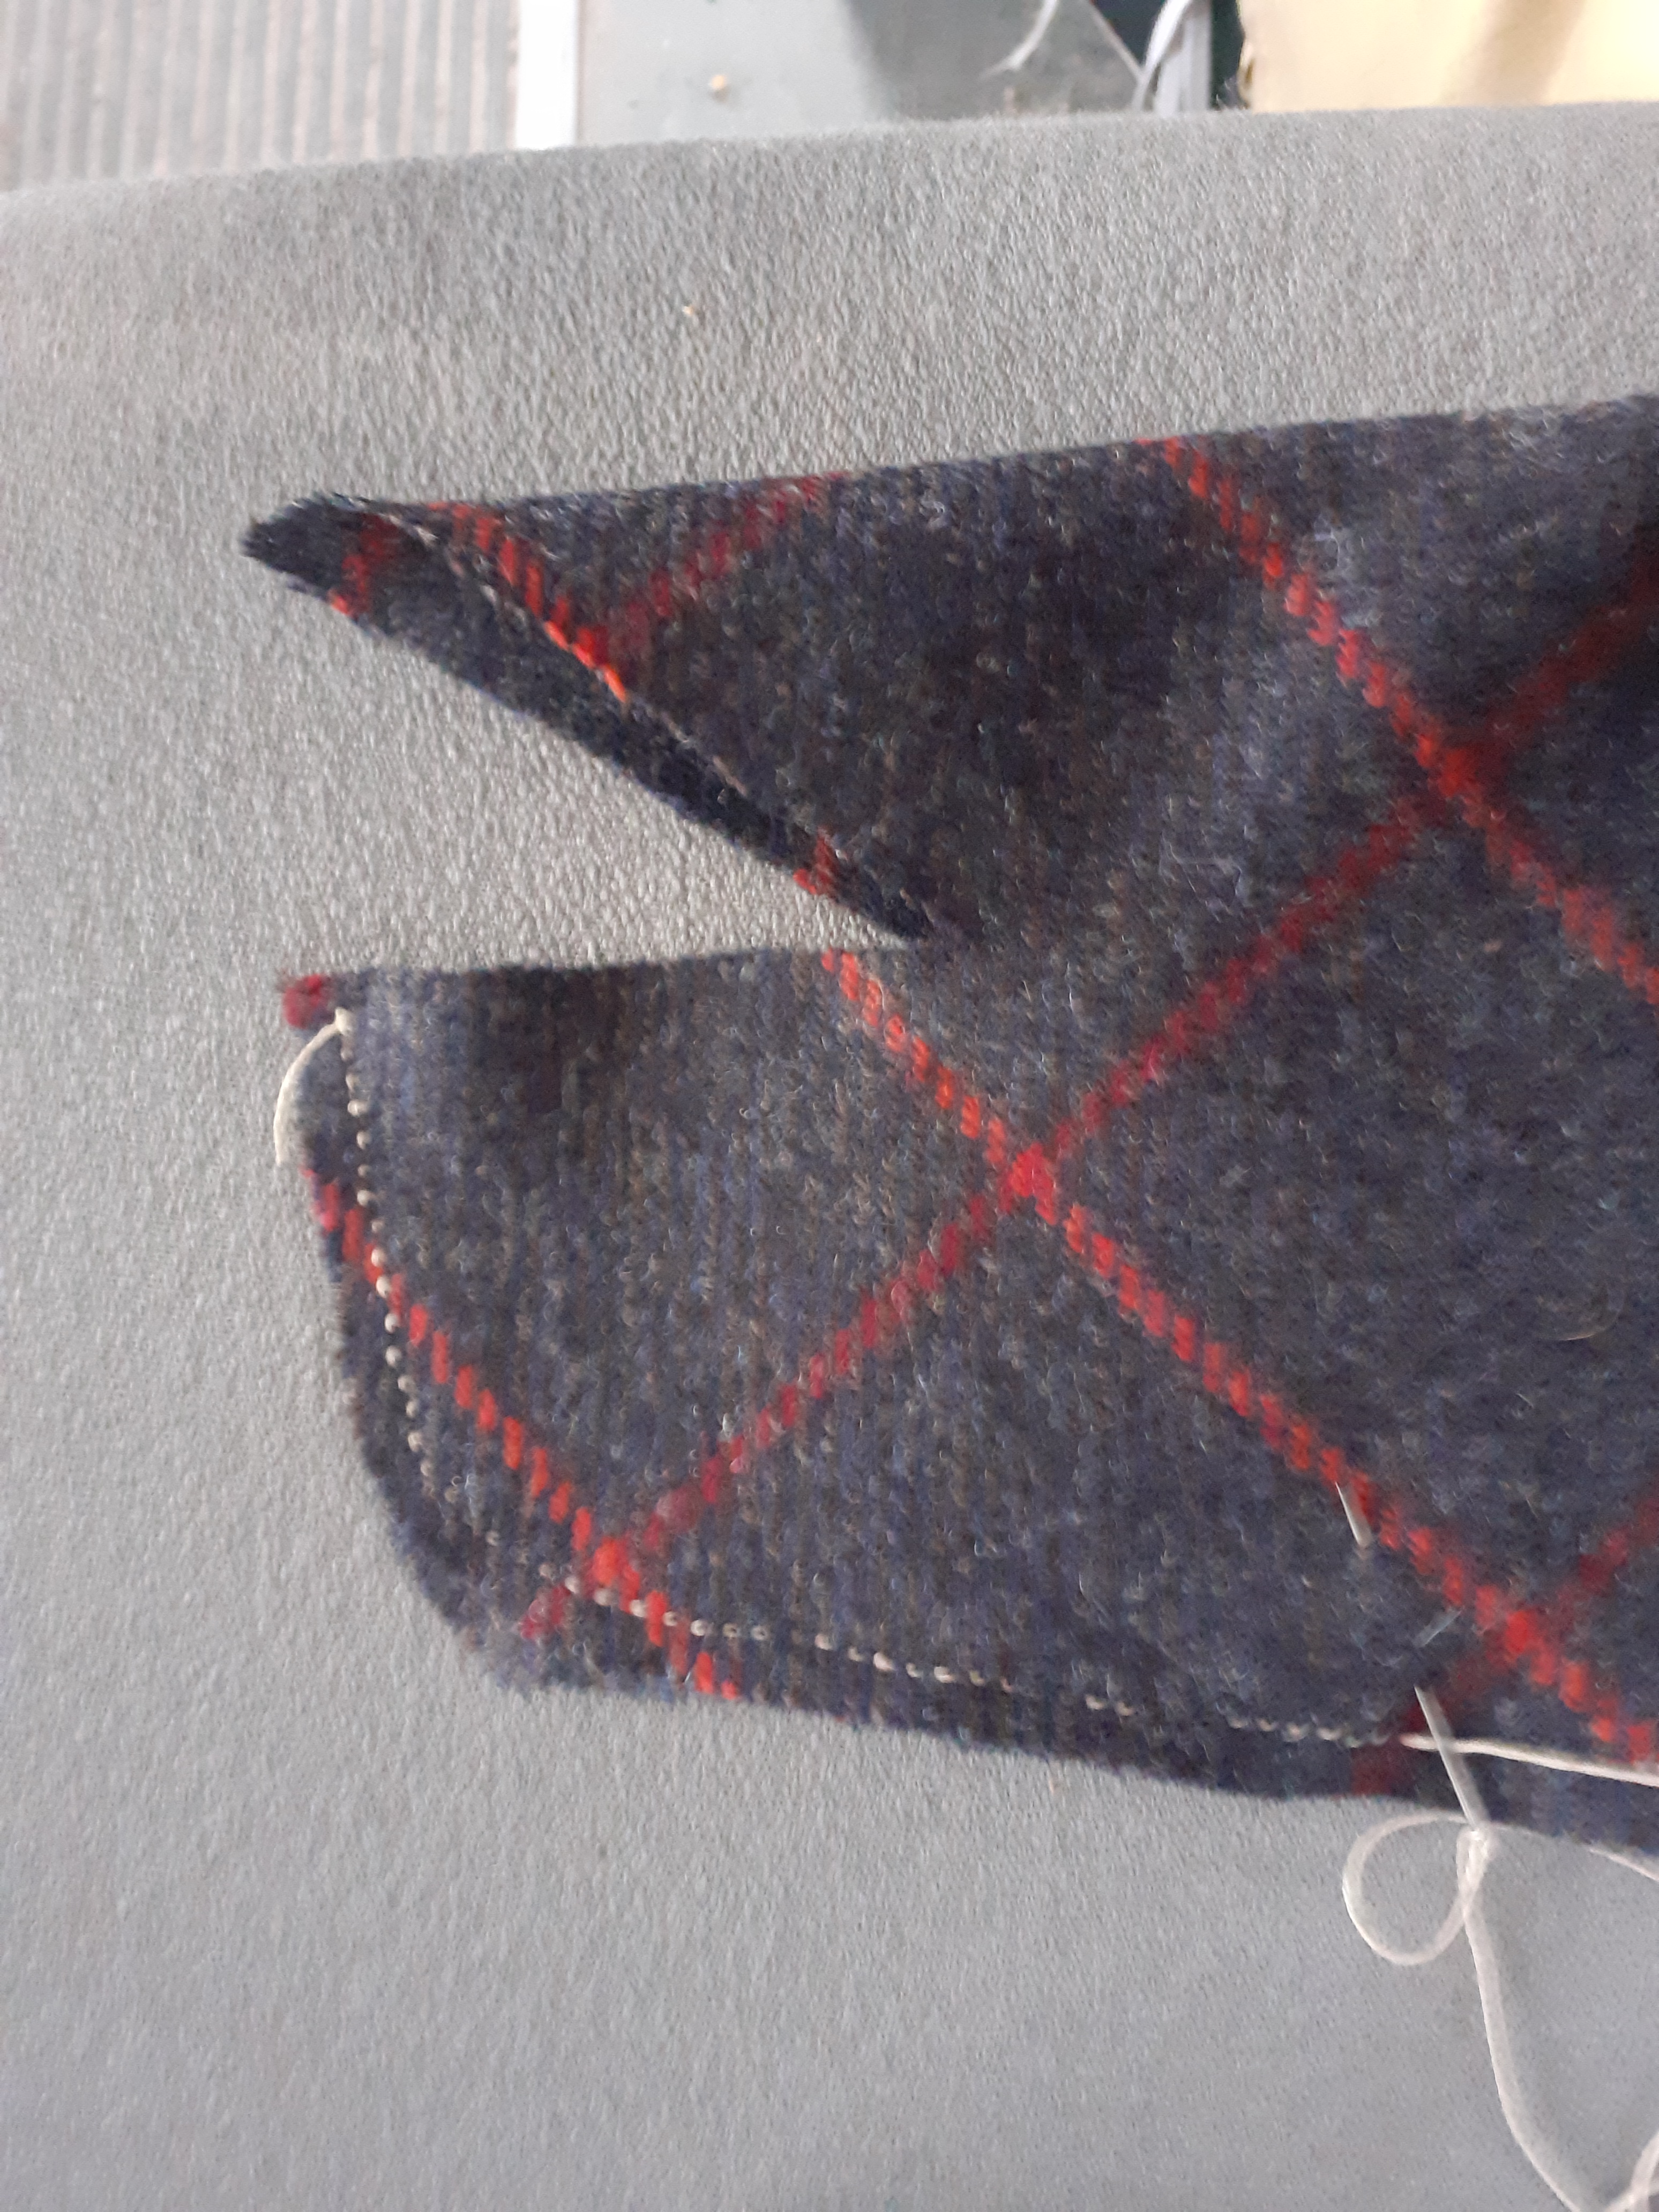

The foot was then attached using the stitch found on fragmentary hosen out of London.(Figure 19 B)
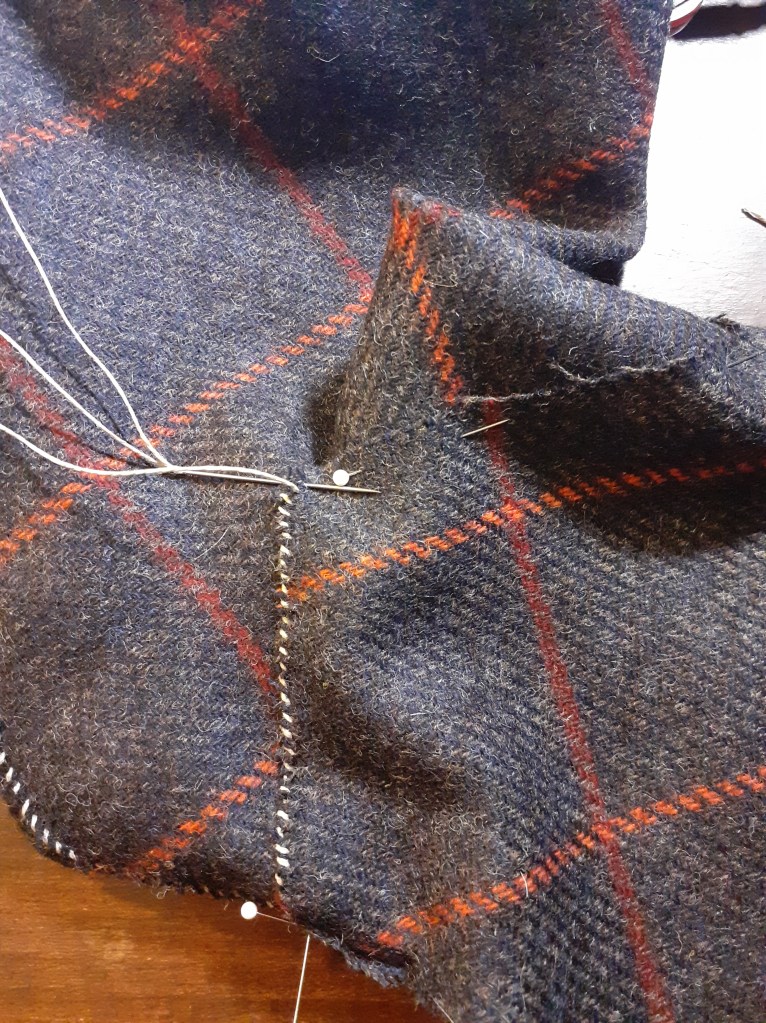
When first assembled, the toe had about half an inch of excess material, so I trimmed it back and reassembled the foot. Before and after trimming can be seen below. I adjusted the second hose before assembling it.
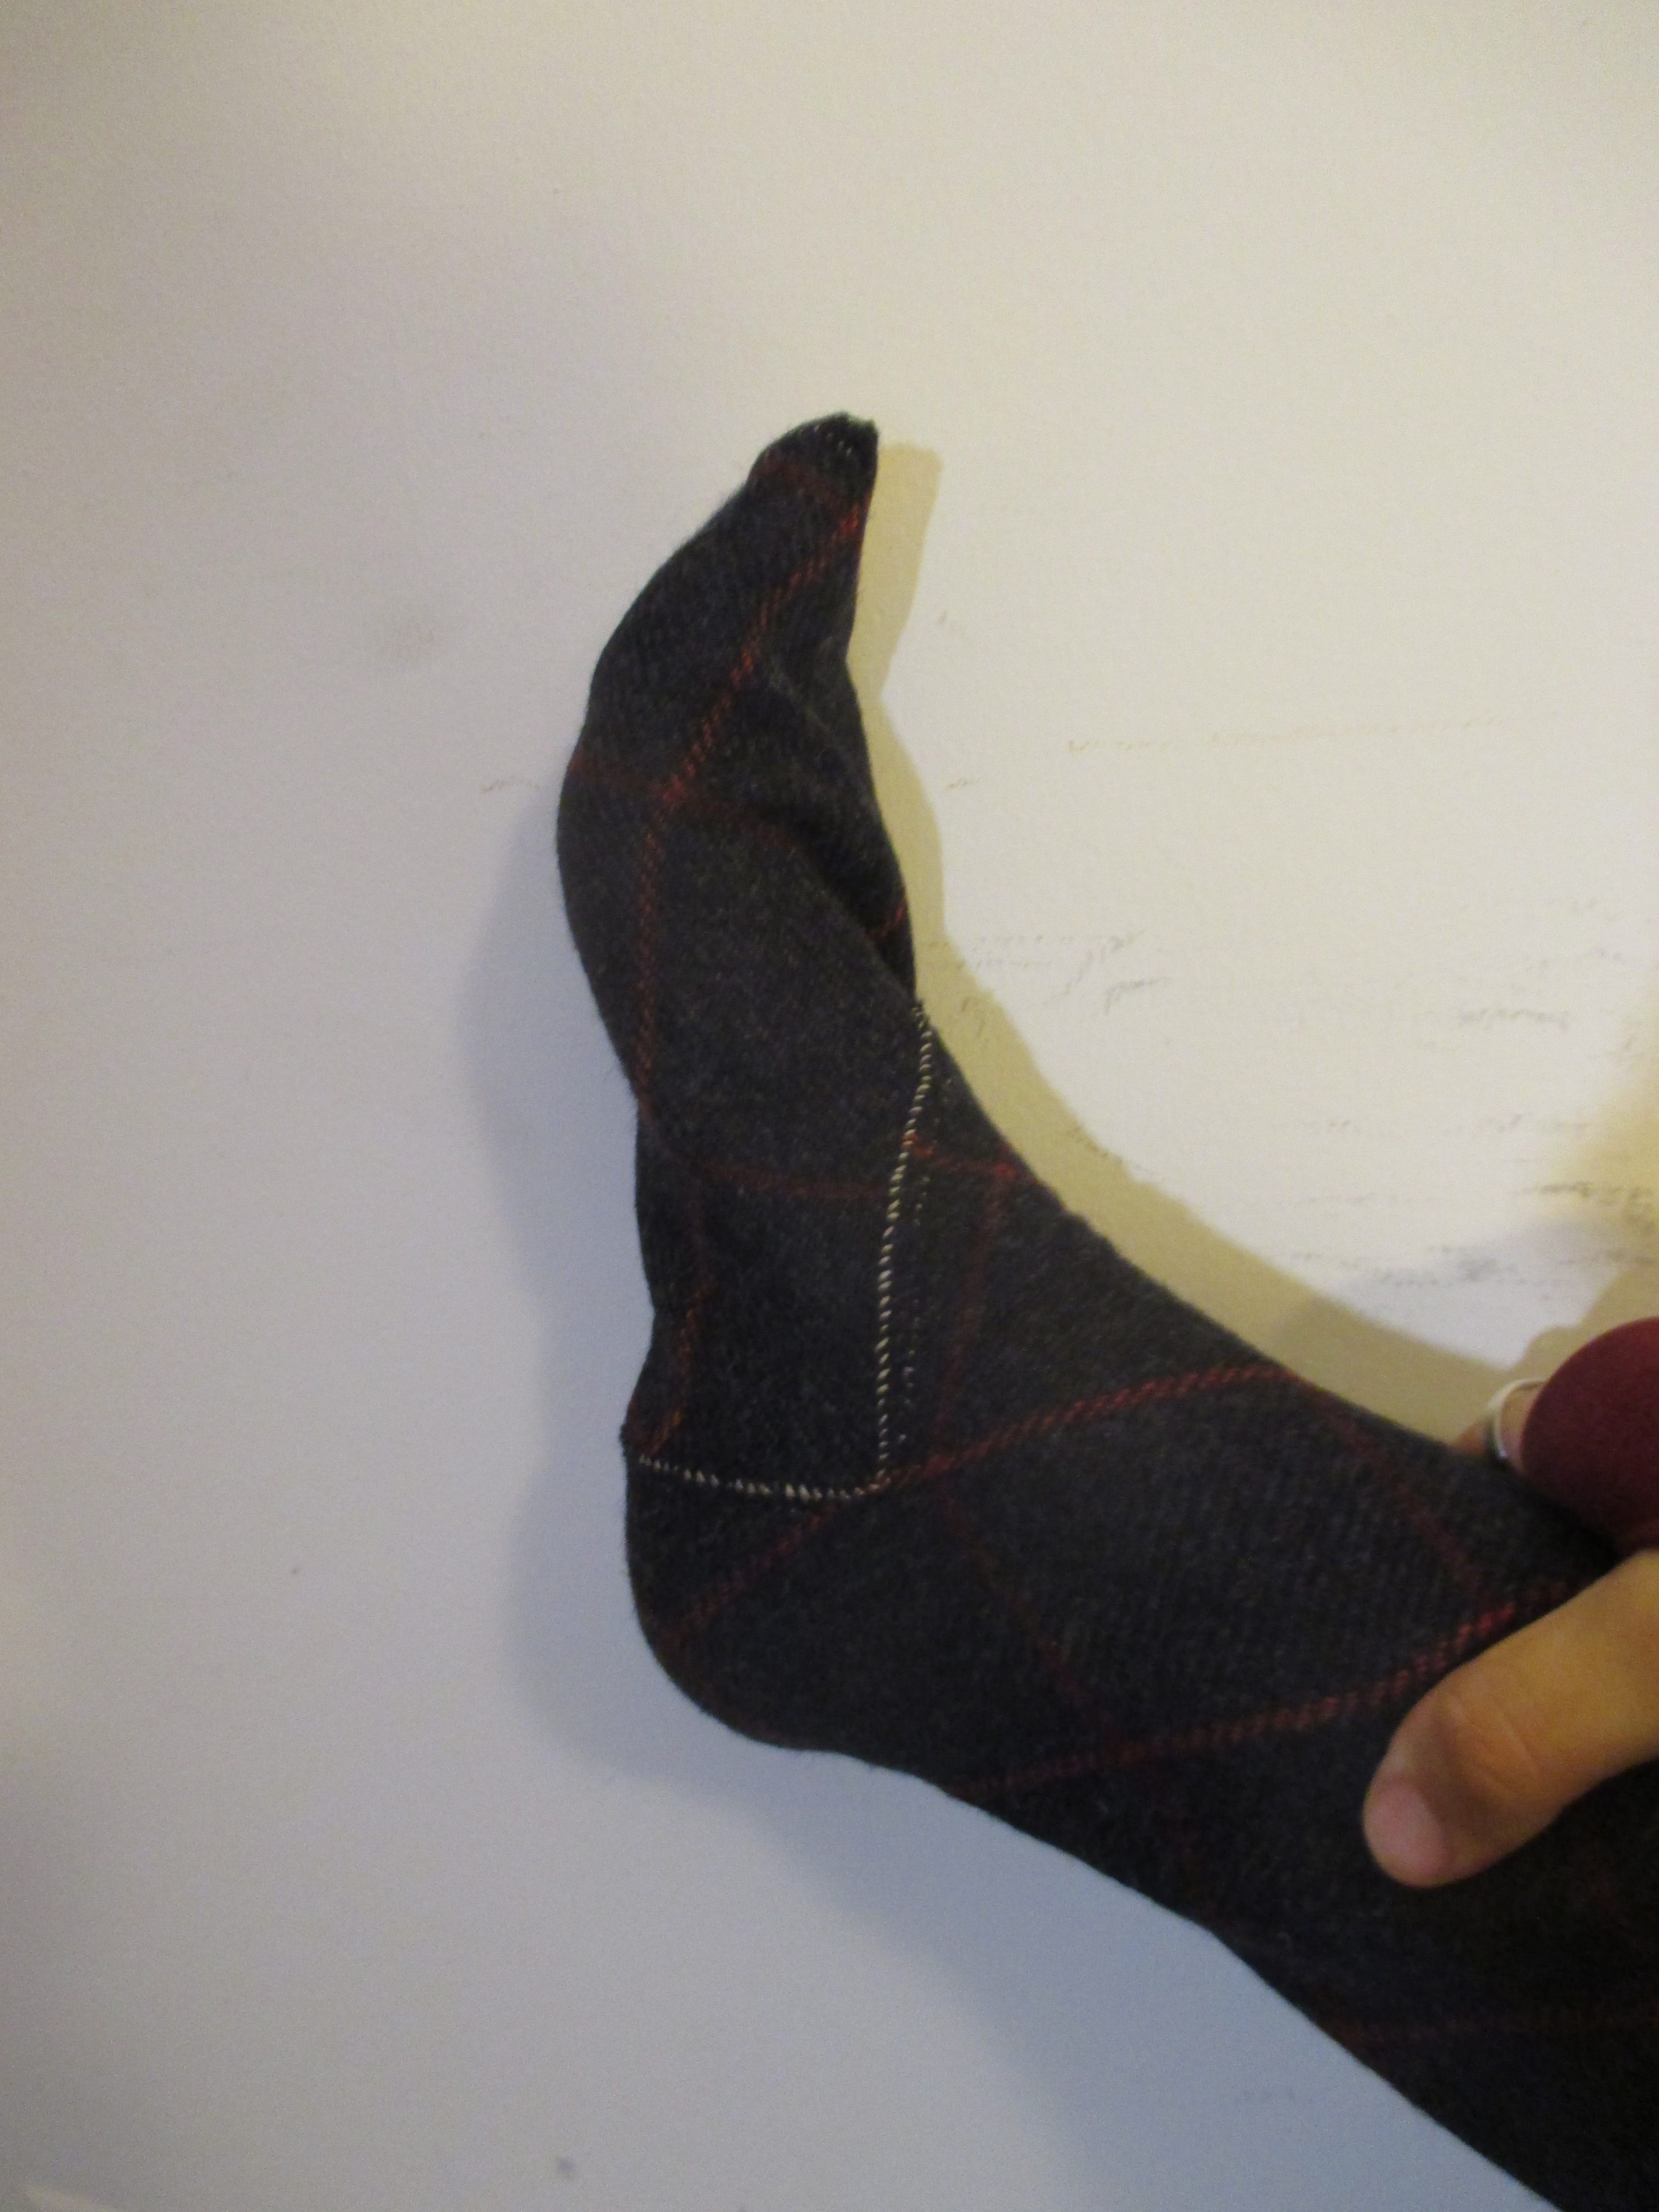
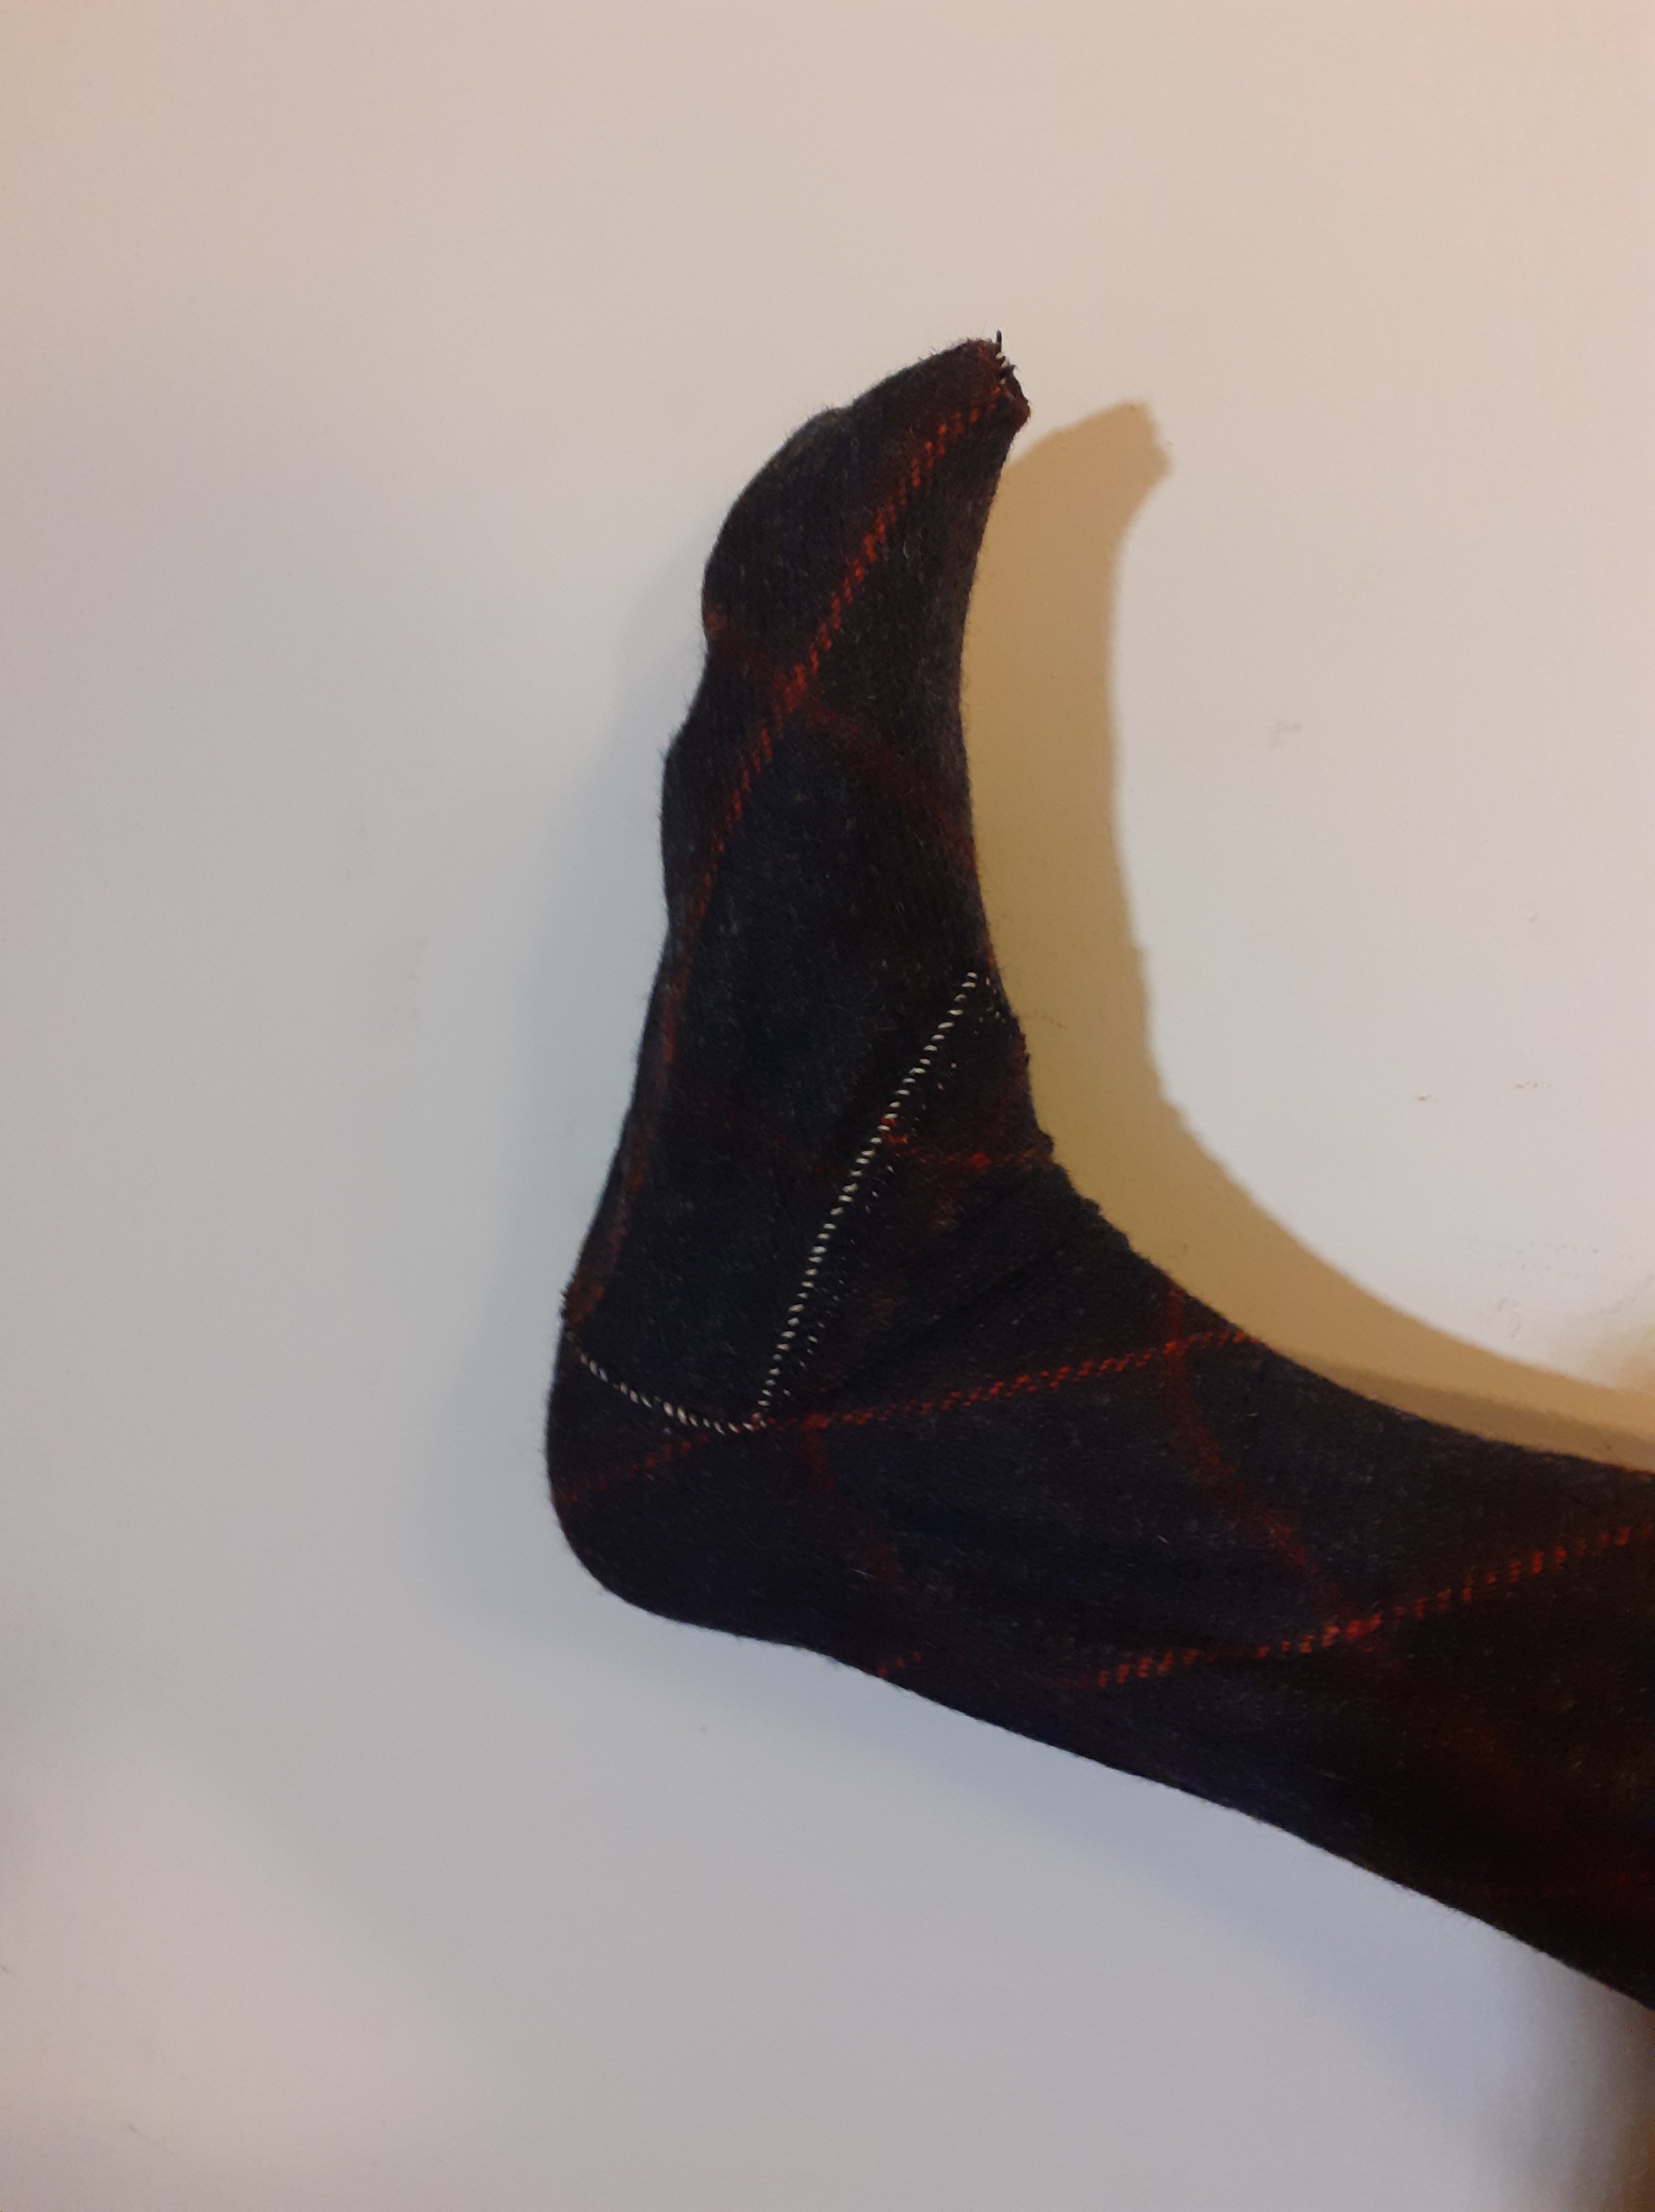
With the foot together, the biggest part remaining was the top hem. As I had trimmed the modern selvage away, I had two edges to hem and reinforce with a stab stitch.
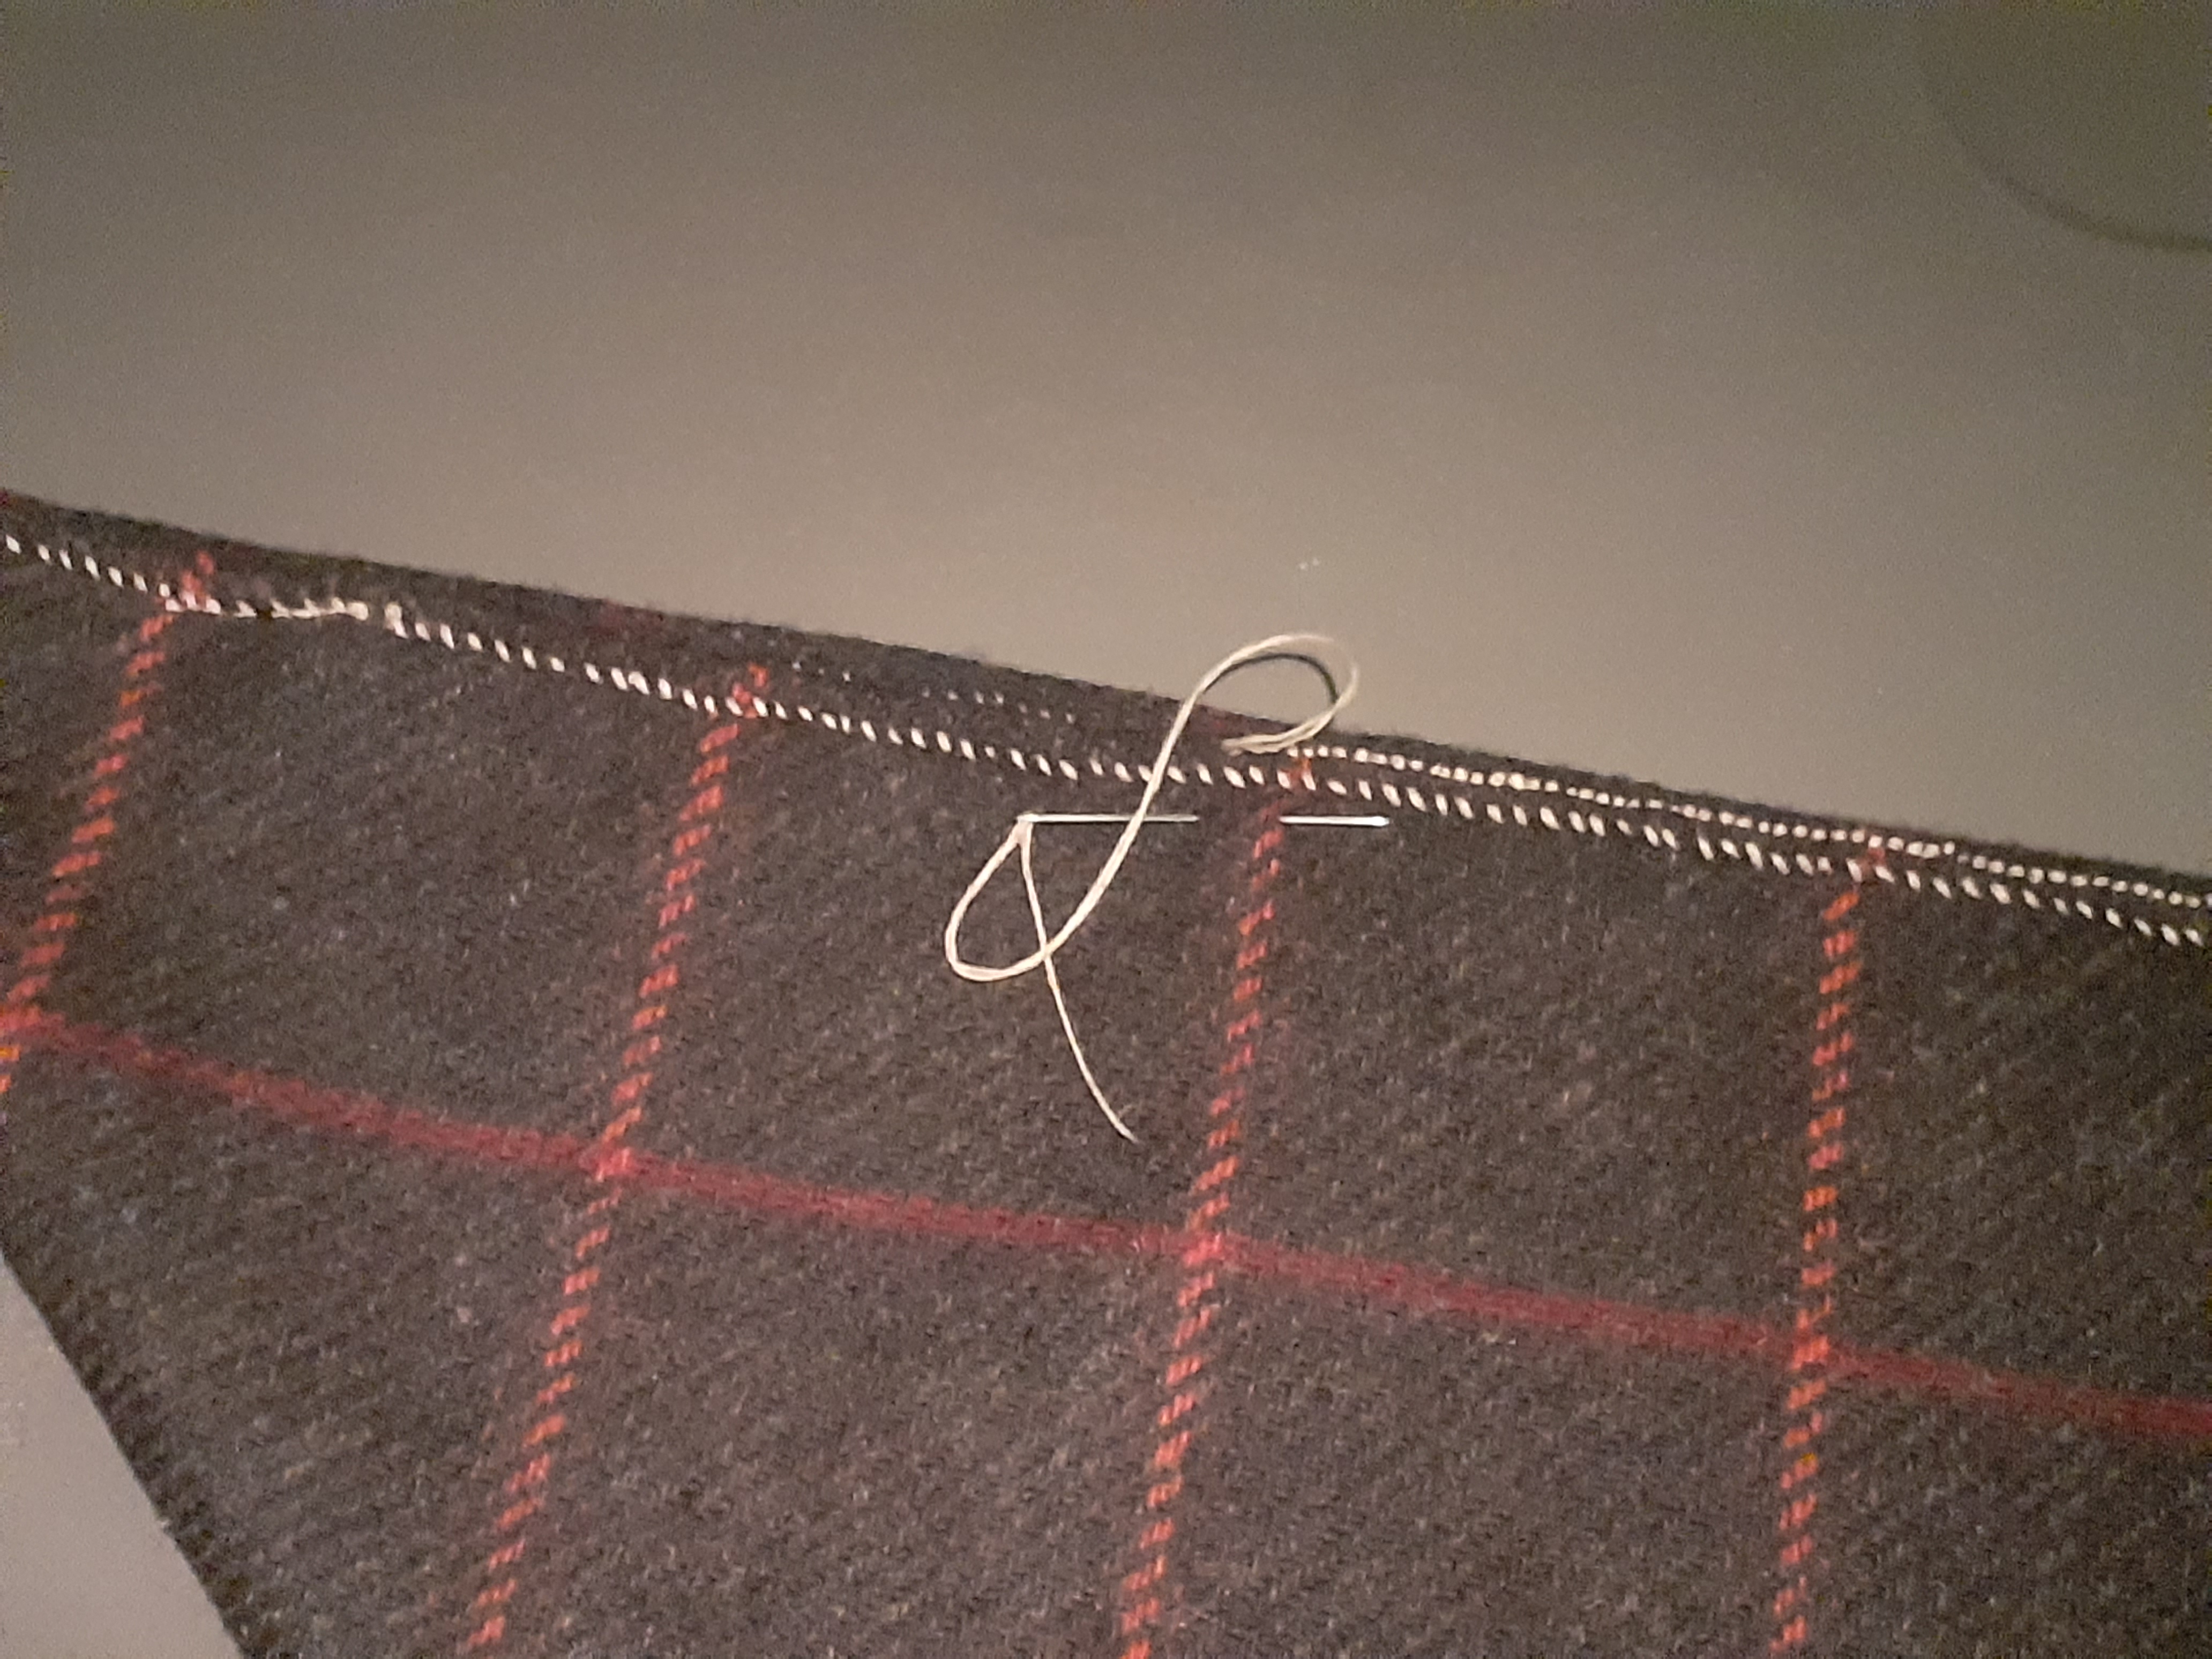

The description of Rodrigo’s hosen only states “Les cordons qui les relient au braidel de cuir passent par des œillet renforcés au revers par du parchemin.”(Anderlini p140) Or “The cords linking them to the leather band are going through eyelets that have been reinforced with parchment.” There is no description of the shape or attachment method of the reinforcement. I therefore guessed the use of a square piece of rawhide backing up the wool and attached with the same button hole stitch that creates the eyelet.
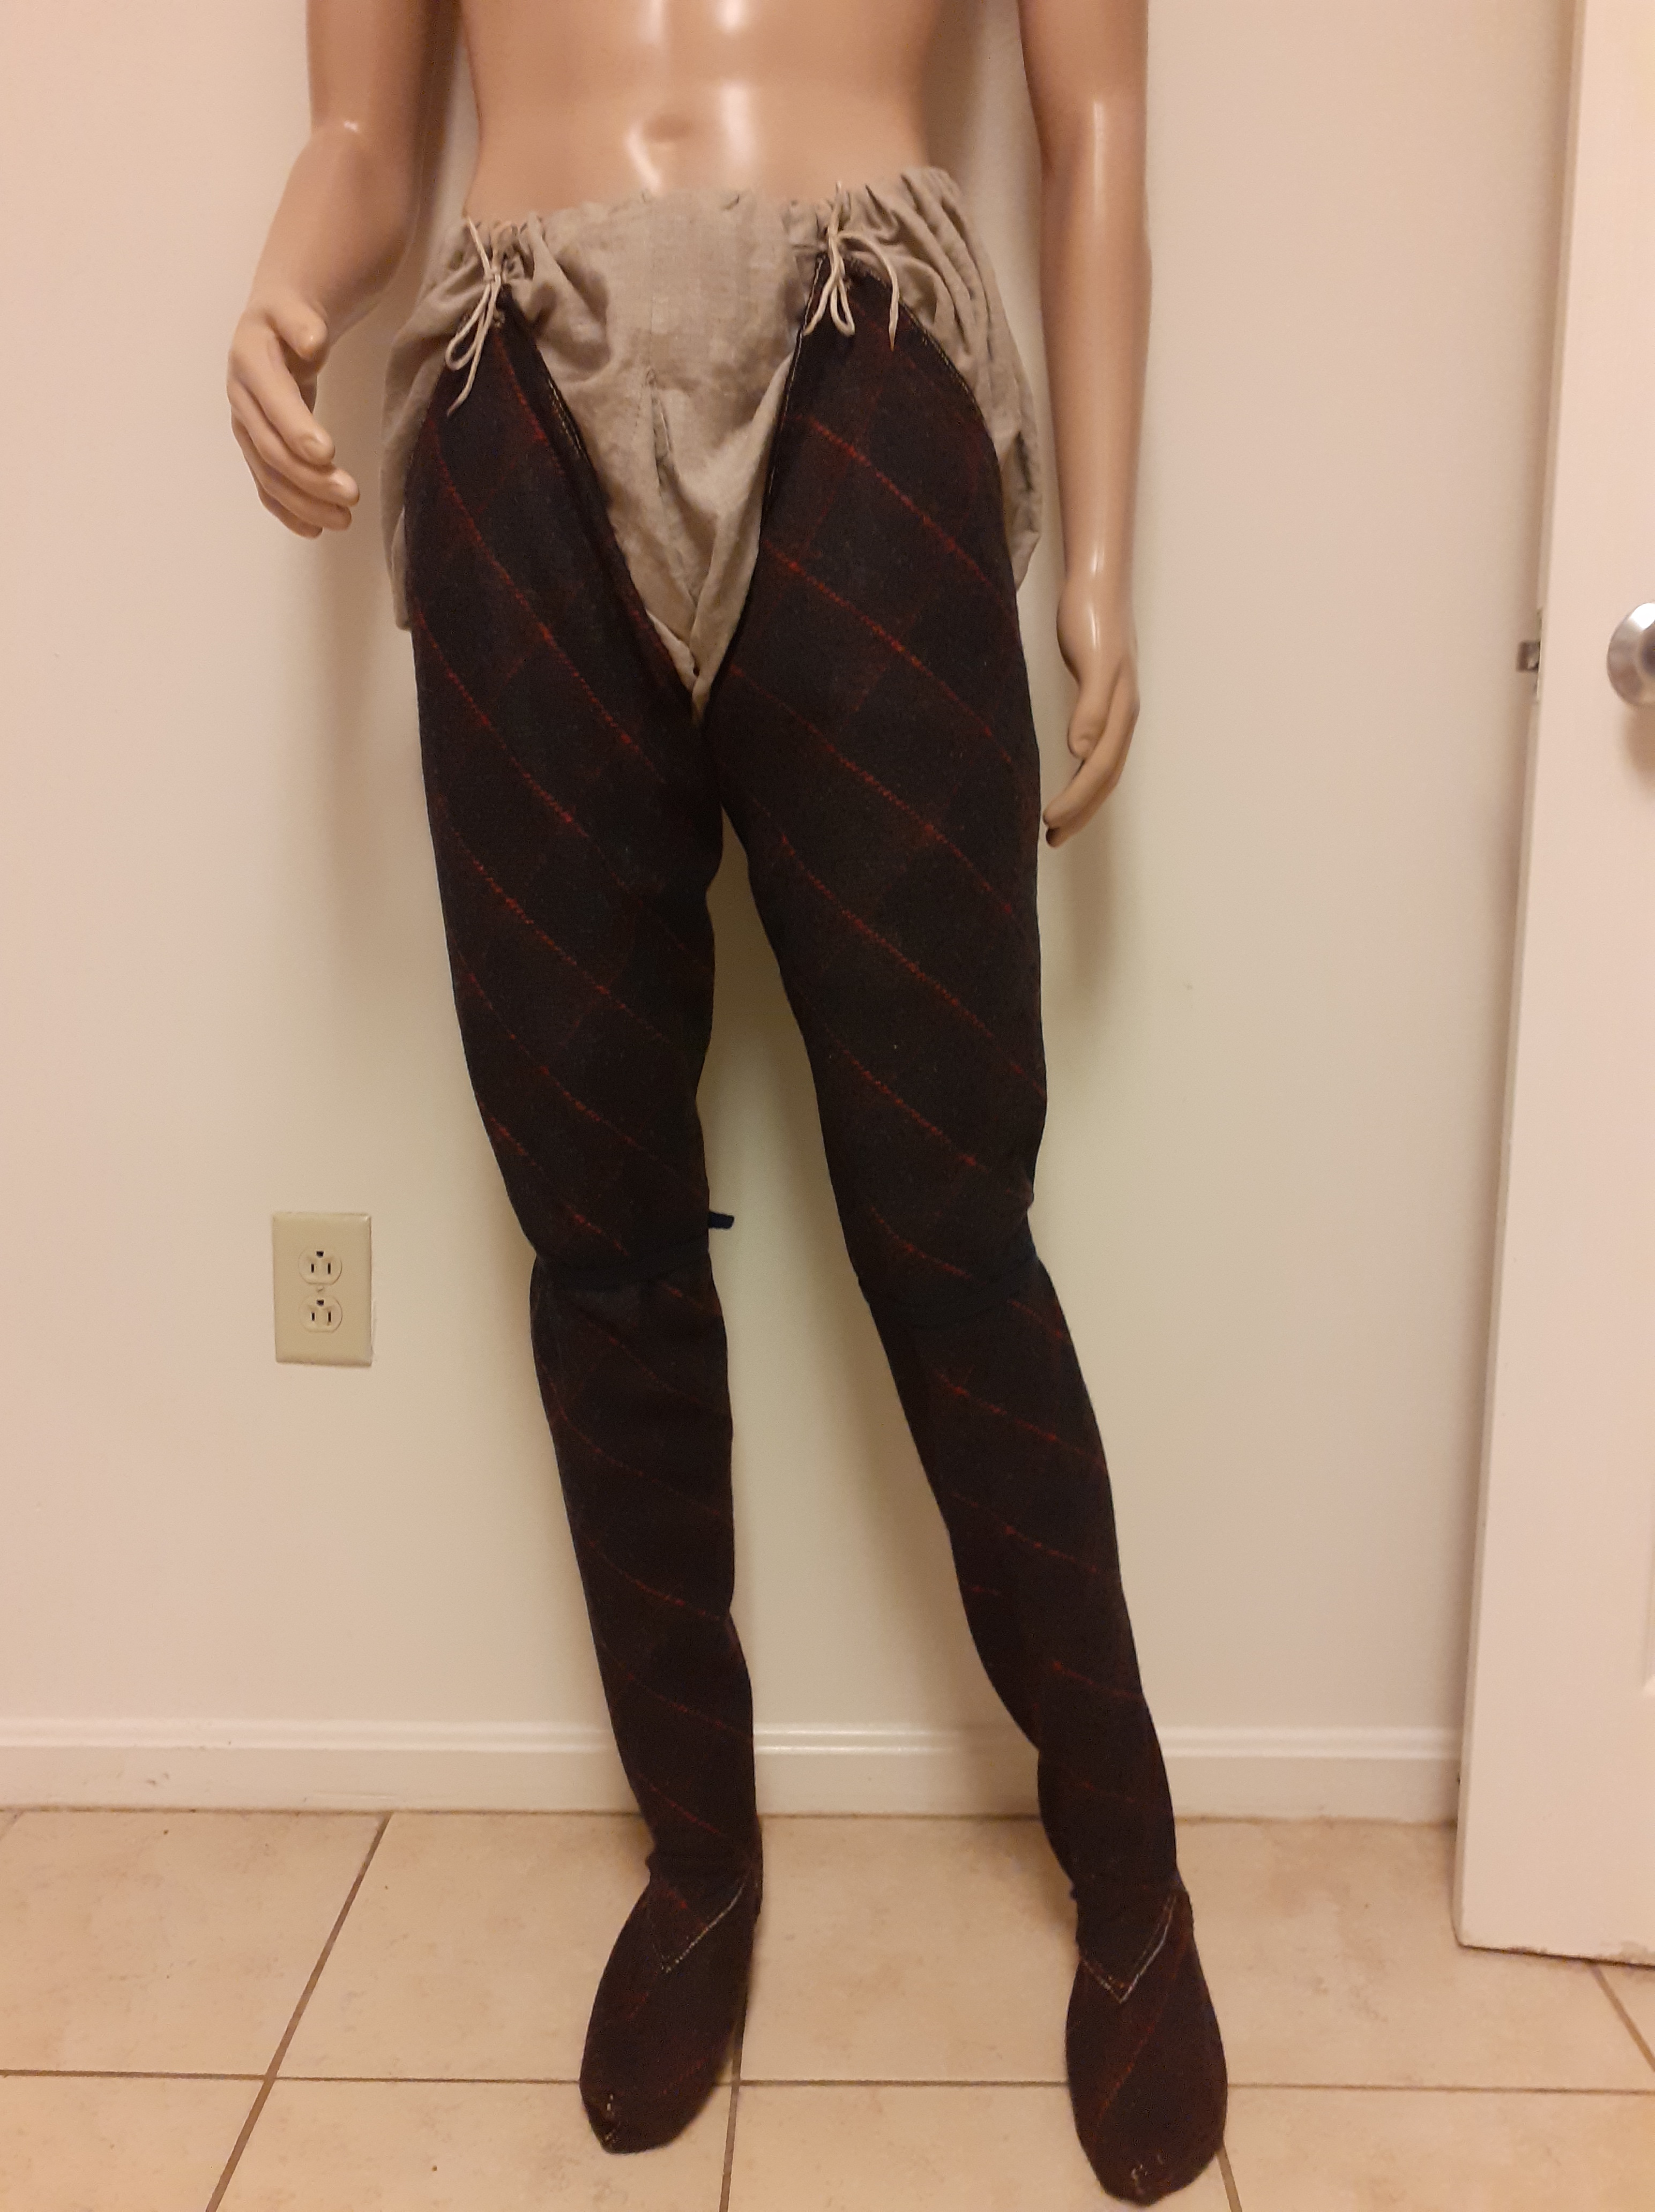


This is the product I have arrived at. I am pleased with the execution, materials used, and believe I have given reasonable support for decisions I have made. My interpretation of history may change as I discover more information about extant garments, but I do not expect the main points of this garment to change very much.
Bibliography
Anderlini, Tina, and Beryl-Alexandra Brard. Le Costume médiéval Au XIIIe siècle: (1180-1320). Heimdal, 2014.
Carlson, I. Marc. “Some Clothing of the Middle Ages.” Some Clothing of the Middle Ages, 1999, http://www.personal.utulsa.edu/~marc-carlson/cloth/sites.html.
Crowfoot, Elisabeth, et al. Textiles and Clothing C.1150-C.1450. Boydell Press, 2012.
Dean, Jenny. A Heritage of Colour: Natural Dyes Past and Present. Search Press, 2014.
Fransen, Lilli, et al. Medieval Garments Reconstructed: Norse Clothing Patterns. Aarhus University Press, 2011.
Høibovi, Martin. “European Medieval.” Extant Originals – European Medieval, Part 1, 2006, http://www.kostym.cz/Anglicky/I_01_01.htm.
“Mitre, Buskins, Slippers, Stole and Crozier of Archbishop Hubert Walter.” The British Library, The British Library, 10 Oct. 2014, http://www.bl.uk/collection-items/mitre-buskins-slippers-stole-and-crozier-of-archbishop-hubert-walter.
Østergård Else. Woven into the Earth: Textiles from Norse Greenland. Aarhus University Press, 2009.
Undergarments 2: Braes
The purpose of this project is to create an example of an undergarment for the lower body, called braes, which is reasonably appropriate in terms of patterning, cut, materials, and assembly techniques for the late twelfth century. There are numerous challenges in this effort, principally the fact that there are no surviving examples which I am aware of until the fifteenth century. In lieu of that type of direct source, I have used artistic representations and surviving items from the late twelfth century to design and construct a garment which fits the appearance and function of the original garments.

The best information I am aware of about braes of twelfth century comes from illustrations. The item depicted is invariably colored white or taupe in color, is baggy around the legs and groin, and has a considerable amount of gathering around the waist. The legs come down to the knees or just below the knees and in several examples appear to be loose at the bottom, creating two flaps at the lower thigh.(Figure 1) This feature seems to be replaced by a different style as the 13th century goes on, with the outsides of the thighs being pulled upwards, seemingly by a different pattern and sometimes by cords attached at the waist. (Figures 2, 4, 5)
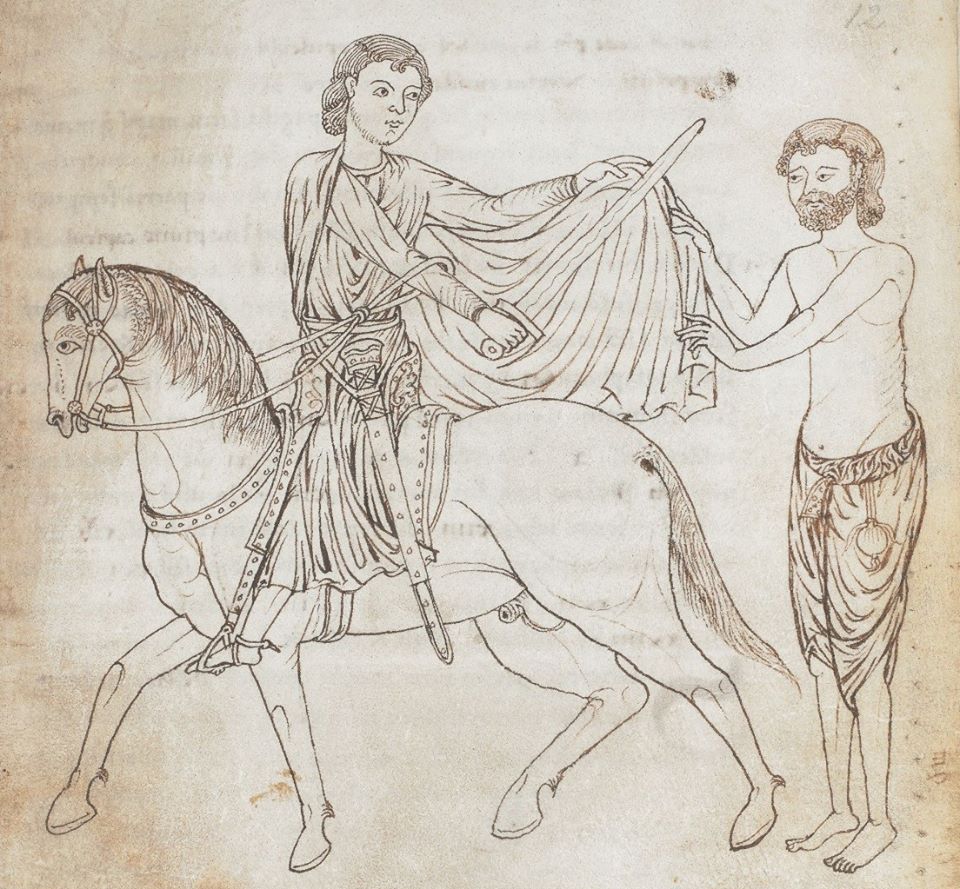
The groin is almost always shown with many folds and wrinkles radiating upwards and linking with the numerous folds caused by the gathering of the waist. In a single period illustration from the turn of the 13th century Flanders I have found a representation of a drawstring coming out from the front of a pair of braes.(Figure 2). Another image from the middle of the 12th century in Germany shows a pair of hosen with a drawstring which is not entirely enclosed by the waistband.(Figure 3) Does this suggest an additional style? I have never seen any other evidence of this sort of undergarment, but it it possible. For the sake of brevity, I will only say “maybe” and move on.

A further detail we can glean from illuminations is that the next layer of garments, hosen, were attached to the braes. In this context, hosen were long single legged stockings made of wool or silk which were made so that the upper edge came to a point at the wearer’s waist or hip and where it attached to the braes, sharing the undergarment’s support mechanism. The precise method of attachment is uncertain, but a few illuminations show braes with cords hanging from the waistline.(Figures 4, 5) I interpret this as cords passing through the braes’ waistband, over the drawstring, and back out the waistband. For the purpose of this document, I will leave the explanation there. The subject of hosen attachment methods will be covered in the hosen documentation.
Underwear was not a popular subject for writing in the medieval period. The best I have been able to produce is a small list of documents which state what material an undertunic should be constructed of. Since braes are also worn under the clothing and against the skin, I think it is reasonable to assume that the undertunic and braes would be constructed of the same material. In this case, I am using linen. This topic is discussed in detail in my post “Undergarments 1: Undertunic”.
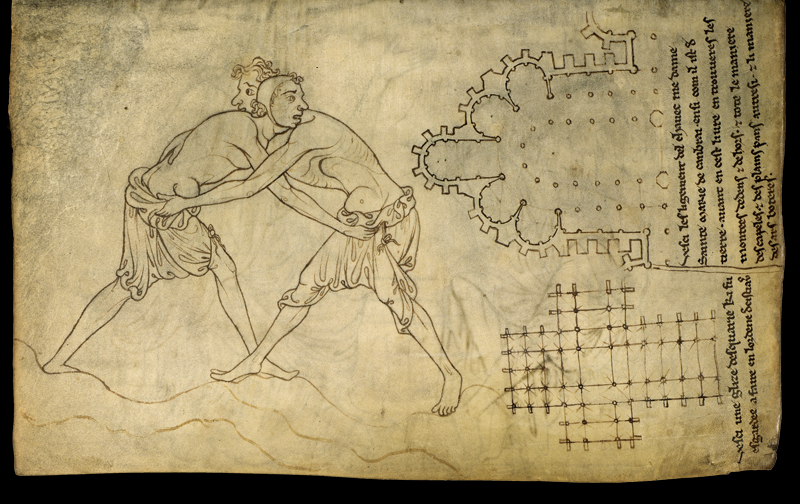
In order to function, the garment needs two sets of cords. First, drawstring which holds up the braes themselves. Second, they need a pair of cords which the hosen will be attached to. The drawstring needs to be strong and comfortable to the wearer, the hosen strings need to be slender and strong, and the garment needs to be designed for the two sets of cords to interface. The two options for a waistband are for a piece of material to be purpose made or for an off-cut to be used. Because of the baggy nature of the garment, the waistband must have considerable length. A waistband cut from regular cloth could be cut with the grain or on the bias. A bias-cut waistband made to the same measurement as the pattern I ended up with, it would be approximately 132cm long. Cut to a 45 degree angle, this bias material would need to be cut out of a loom width of 93cm or multiple pieces joined together. A bias cut waistband takes up a lot of material and potentially causes significant wastage. Bias cut material would also be significantly weaker than grain-cut material because none of the fibers would run the length of the entire band.
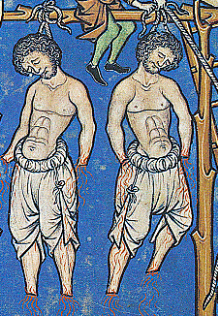
A grain cut waistband would be stronger than bias cut, but provide less elasticity. While there is less potential for wasted material, a waistband which is cut out of the loom’s width with the warp running the length of the piece eats up a fairly significant portion of the loom width. In either case, a waistband which is folded over to create a band which is both relatively strong and wide enough to be comfortable for the user would take a strip of cloth at least five centimeters wide. All of these aspect combine to illustrate that a waistband cut from a regular piece of cloth would not be ideal in this instance.
A purpose made drawstring might take the form of tablet weaving, the technique that I chose for this project. A tablet woven drawstring creates negligible waste, is strong, somewhat elastic, thick enough to provide some comfort. I am not aware of any direct usage of tablet woven material being used for this purpose, but it is a technique used from at least the 1st century CE through the 15th century and beyond, and it fits all of my other criteria.(Crowfoot 130-132) Rather than using any sort of decorative pattern, I have used a wool yarn which is the natural gray of the sheep with a simple all forward and all back card turning pattern. As this is an undergarment and I do not portray an affluent person, I believe this is most appropriate.
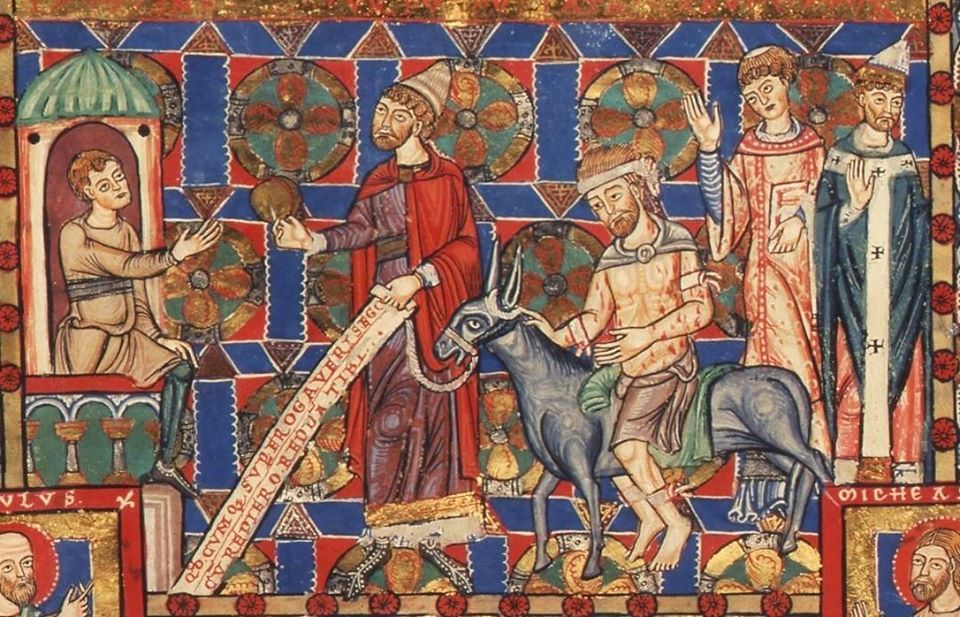
There are fewer options for hosen cords. The primary type of cordage excavated in my context and near to my context in the sources I have available is seven loop finger braiding.(Crowfoot 135) This is the technique I used. Linen or hemp could be used due to a resistance to stretching. I chose the former due to availability. Just as the drawstring was left natural from the fiber source, the linen was in an unbleached and undyed state. I finished each piece of cordage by running it across a piece of beeswax. This sufficiently seals the fibers together and does not meaningfully increase the diameter of the cordage, which is important for tying and untying the hosen.
Patterns of the late twelfth century and early thirteenth century started to incorporate some curves to the piecing, especially to improve the fit. Contrary to fitted outer garments, the appearance of braes in artwork is both wrinkled and baggy, so I decided to stick with a very angular cut, saving as much material as possible. In order to match the look of the period illustrations, I designed the pattern with leg pieces which were oversized and added a square gusset in the middle which is turned on the bias. The resulting diamond shape gives ample mobility and creates the characteristic wrinkles. Previous iterations of this garment have resulted in the back of the garment riding up the seat, especially during athletic activities. To account for this, I designed the back to be five centimeters higher than the front. This drops the whole back side of the garment, bringing it away from the wearer’s seat and prevents the undesired effect.
After completing the project, I discovered that there is an extant example of an undergarment dating to the 8th or 9th century Balkans which follows the pattern I made almost exactly.(Figure 8) While I found out about it too late to directly tie in to this project, the fact that historical people came up with essentially the same pattern when facing the same problems is reassuring.
For my fabric I chose a tabby weave linen in a medium weight. The selvages from this machine woven cloth included warp threads which were a different color than the others, and the type of selvage was not known in period, so I cut them away whenever they were encountered.
Just as in my previous post about linen garments, “Undergarments 1: Undertunic”, I used a flat felled seam for construction of the garment. Since writing that post, additional research has come to light to support that decision. The surviving “Chemise de saint Louis”(1214-1270) and “Aube de sante Claire”(1253) were both constructed with flat felled seams.(Anderlini 42-43) Because of this, I think I am more than justified in continuing to use the seam technique. Hems of the garment were also folded twice before being stitched down with a felling stitch. The particular assembly of the garment and seams used meant that some seams wanted to be folded outwards rather than inwards. As this is an undergarment, I reasoned that outward appearance was less important than proper seam ordering, and felled the seams as they wished.(Figure 10)
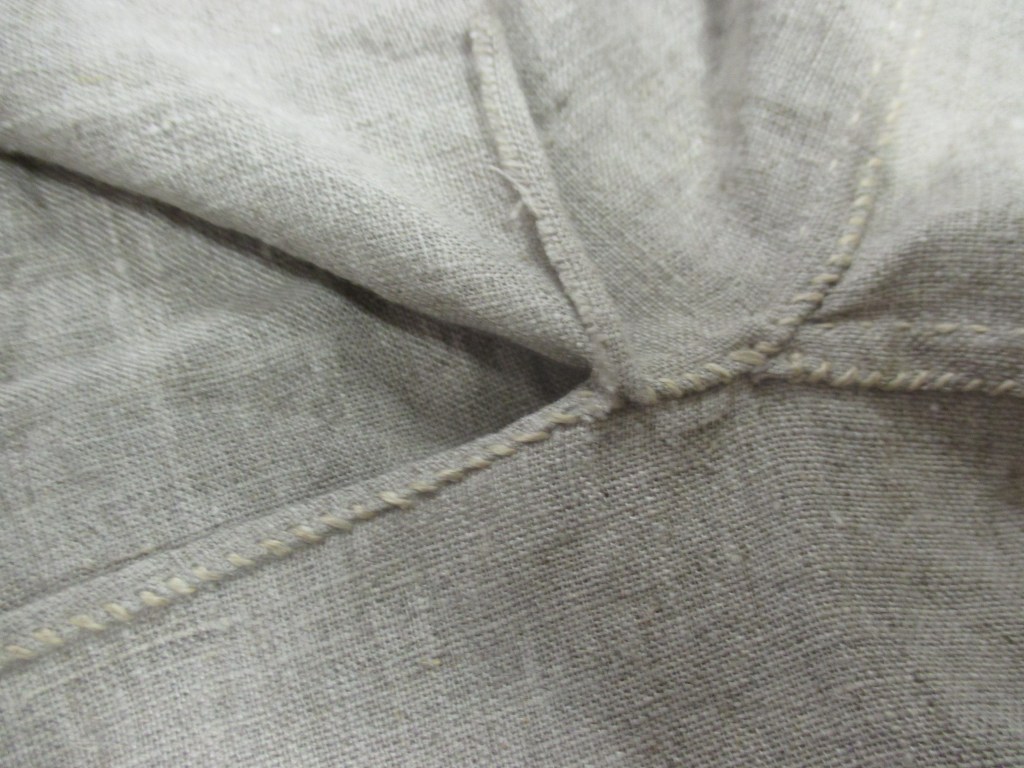
The three pattern pieces were assembled first, ensuring to leave the inside and bottom of each leg open as indicated in the period illustrations and carvings as well as a small gap at the top and front of the garment. This allows access to the drawstring. Once the legs and gusset were attached together and seamed, I proceeded to the hosen cord holes. To facilitate this, I essentially made an eyelet. I used an awl to spread the linen fibers before circling the hole with a buttonhole stitch.(Figures 11, 12)
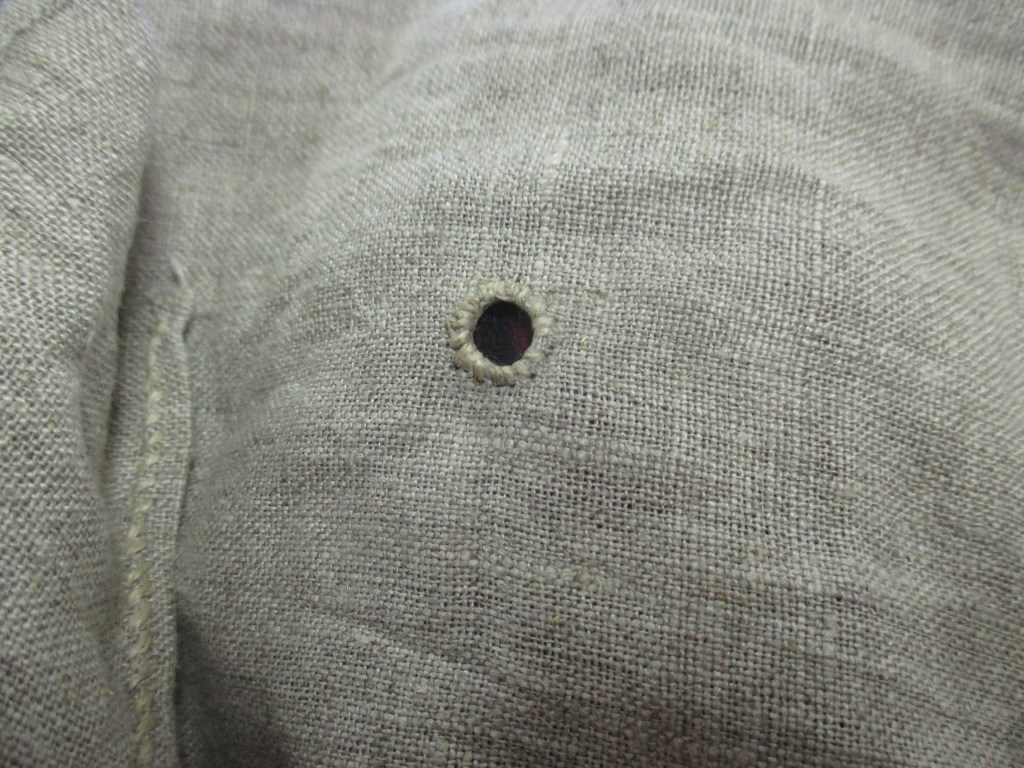
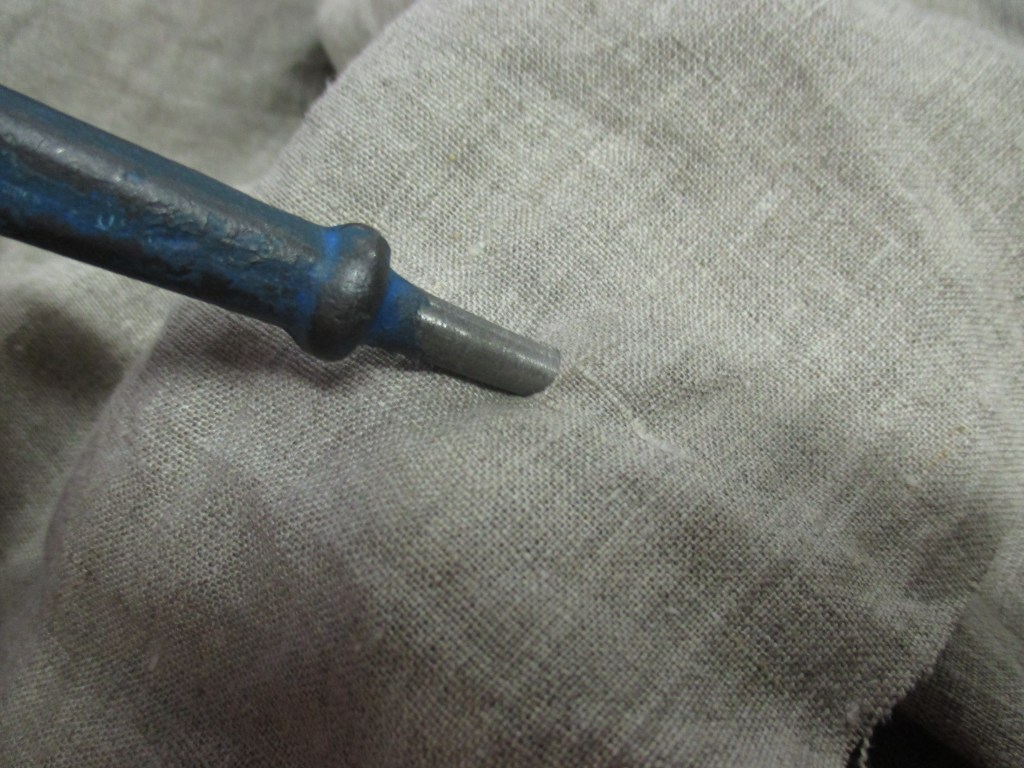
With the hosen cord holes finished, I folded over the waistband and stitched it down with a felling stitch.
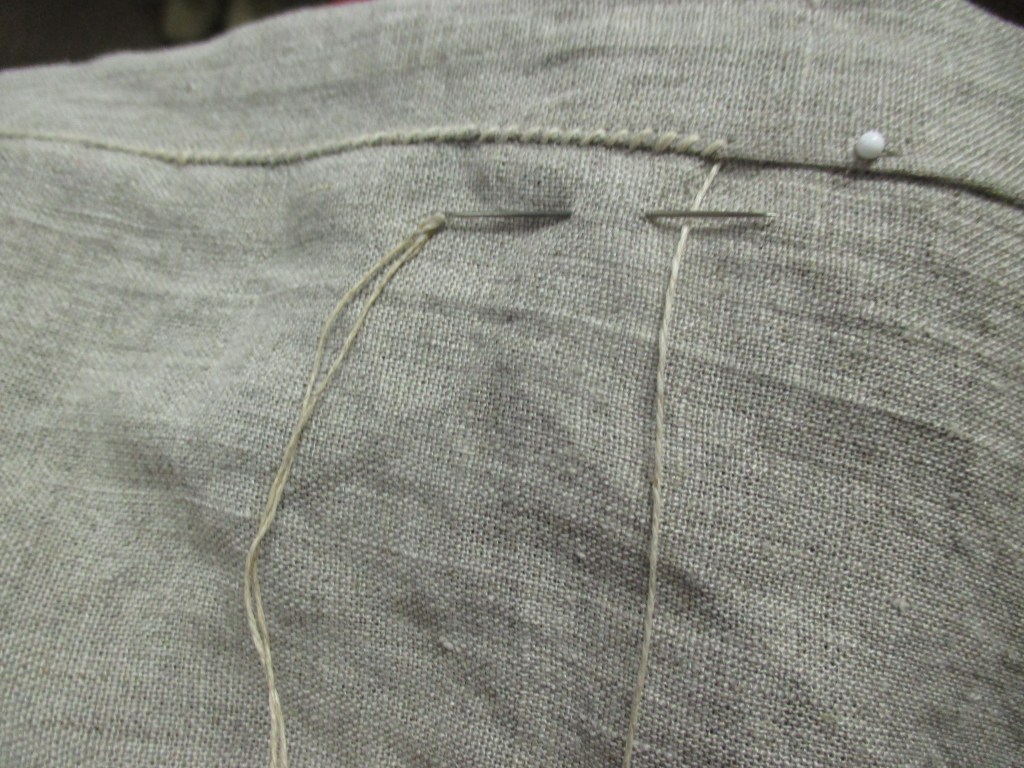
Once the waistband was done, there were only the simple tasks of weaving the drawstring and braiding the braes cords as I have already described. As of writing, the drawstring is a couple inches longer than the waist of the braes, though I may cut it down to get rid of unused material.

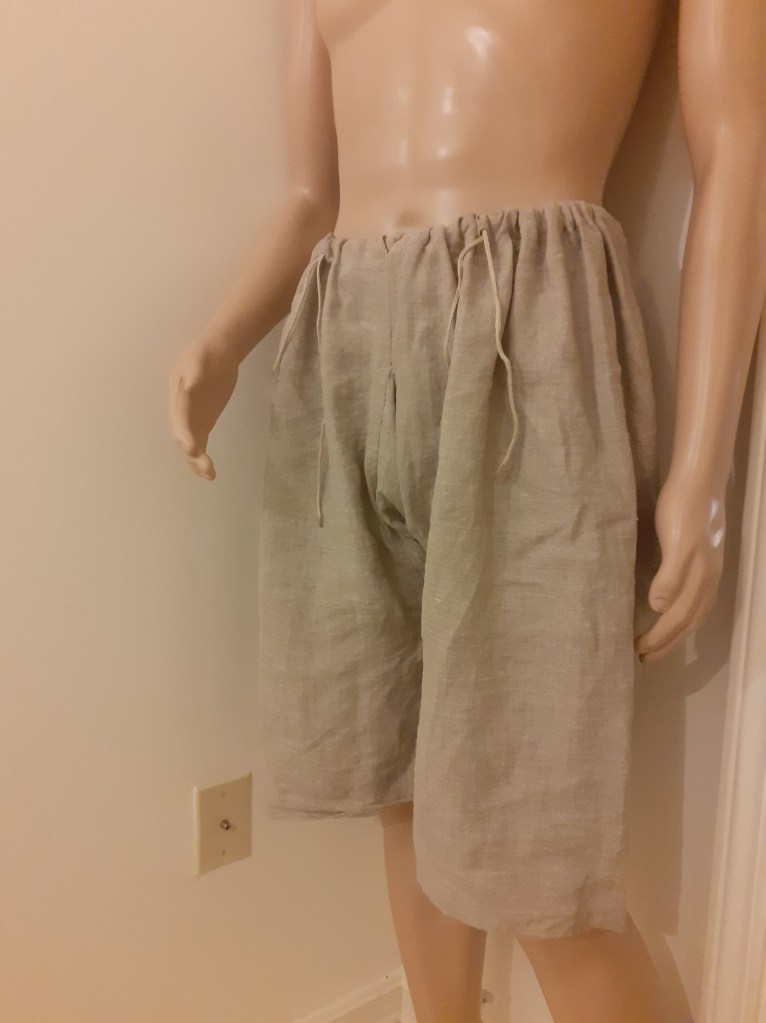
In all, I think this example fulfills my objective of adhering to the patterning style of the twelfth century, matching the aesthetic of the available period artwork, will do its job in suspending the next layer of clothing, and provides a good measure of mobility and comfort to the wearer.
Bibliography
Anderlini, Tina, and Beryl-Alexandra Brard. Le Costume médiéval Au XIIIe siècle: (1180-1320). Heimdal, 2014.
Crowfoot, Elisabeth, et al. Textiles and Clothing C.1150-C.1450. Boydell Press, 2016.
Lanteigne, Benjamin A. “Getulio’s Workshop.” Getulio’s Workshop, 27 Jan. 2020, https://getuliosworkshop.com/2020/01/27/undergarments-1-undertunic/.
Undergarments 1: Undertunic
In a world where most outer clothing was made of wool, a base layer to work as a barrier between it and the wearer’s skin was nearly a necessity. Later centuries would merge layers together, seamstresses and tailors putting linings in doublets and chauces, but in the 12th century these were distinct items of clothing.
Wool was the primary fiber used for textiles throughout medieval Europe. This product of sheep was sorted into grades which ranged from the very fine, similar to modern merino wool, to wool of more primitive breeds of sheep which yield a coarse and hairy overcoat and fine undercoat. (Crowfoot 15) All but the finest grades would require an intermediate layer between the wool and wearer’s skin. In the 12th century this took the form of a long sleeved garment with an overall length depending on the specific fashion of the region and social status of the owner. The relationship between the length of the undergarment likewise changes across the century, cultures, and class.
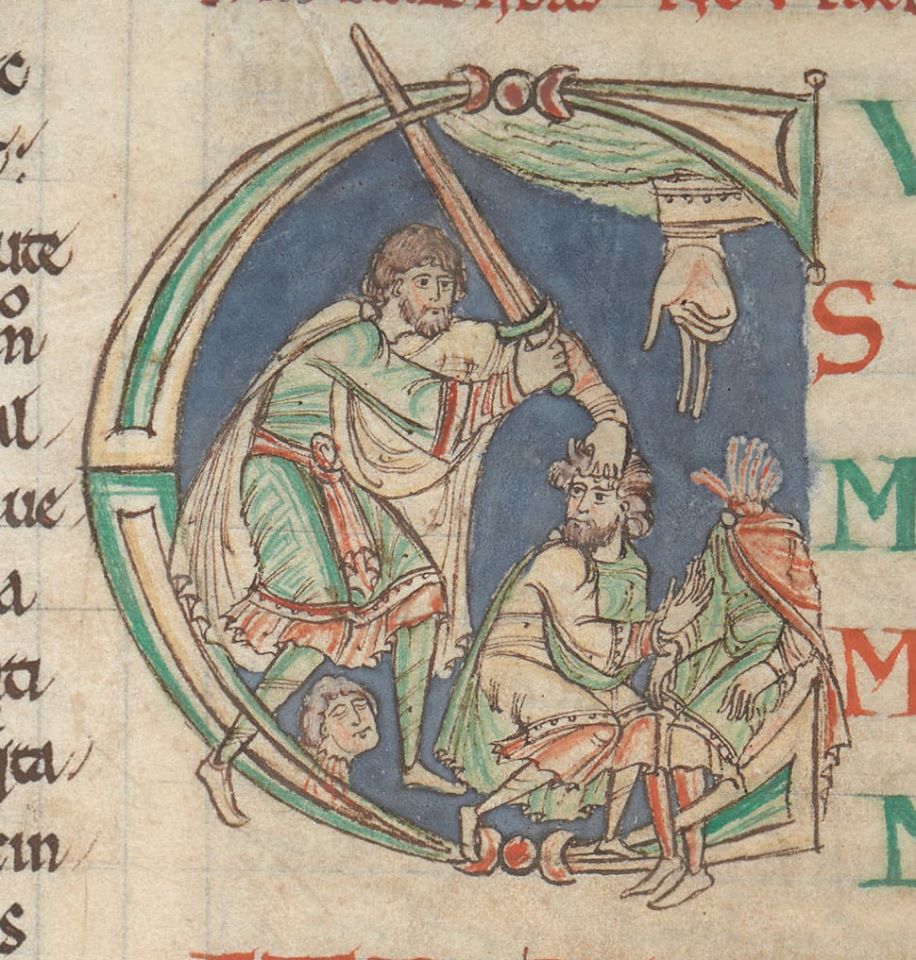
Undertunics may be seen occasionally in artistic depictions such as the figure to the right. In this early 12th century context, the outer layer was distinctly shorter than the under, giving us a glimpse of the latter. In the back half of the same century, the hems had maintained their relative positions, but fallen past the knees (Figure 2). This image however, is ecclesiastic in nature, being a depiction of Jacob (left) and his son Joseph (right). Such images always need to be taken with a grain of salt. These are biblical figures depicted as a period artist imaged they would be, or in a way that the period artist would expect their audience would recognize. My purposes for this image is to illustrate that the figures are wearing both an under layer and outer layer of clothing. This is a detail that I think was so self evident to the illustrator that it was included without specific consideration to the culture or region of the world being depicted.

Undertunics also appear in literary sources. According to Alexander Neckham around 1190, a full compliment of dress included “a cote or bliaut provided with sleeves and openings, slit at the crotch. Braies are needed to cover the lower limbs and stockings or chauces should be worn around the legs, while covering the feet with laced boots or leather shoes. An undershirt of muslin, silk, or cotton, or linen-the fur of the outer mantle should be gris or vair, or rabbit, or lérot, and the mantle’s edging can be of sable or martin, or beaver, or of otter, or of fox fur”(Holmes 159-160). Neckham is even kind enough to specify the materials an undertunic may be made of.
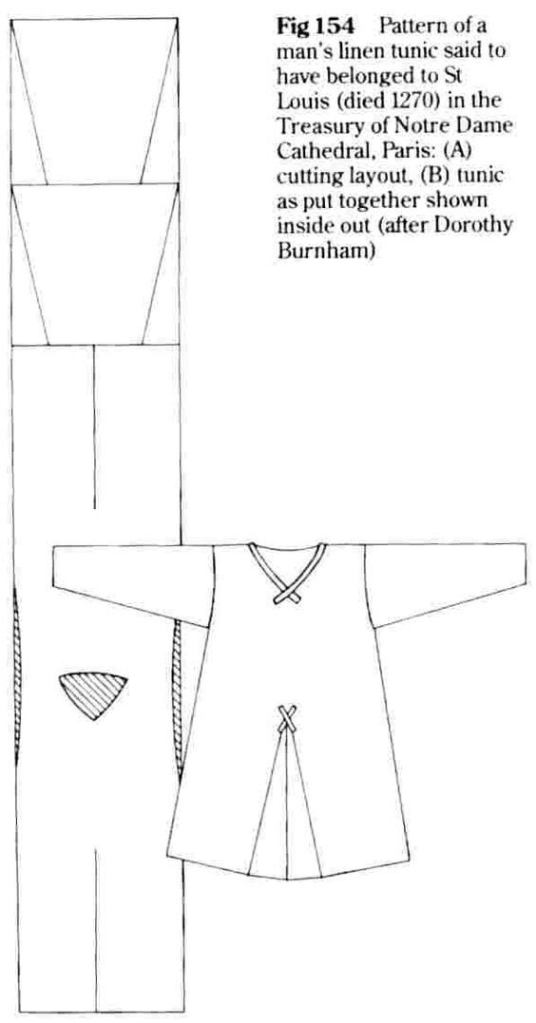
A couple sources which I am surprised do not refer to undertunics or undershirts are the Rules of St. Benedict(Benedict) and the Templars(Wojtowicz). Both refer to the amount and types of clothing approved for wear by the brothers of the orders, but curiously do not reference undergarments at all. The closest is the Rule of the Templars, or Latin Rule, which was laid down in 1129. It states “Among other things, on account of the excessive heat of the eastern region we compassionately consider that one linen shirt only be given to each brother from Easter until the Feast of All Saints; not out of obligation but from grace alone— to that one, I mean, who may wish to use it. But at other times let them generally have woolen shirts…Moreover, let them always sleep clothed in shirts and breeches. Also, let there be a lamp continually until morning for the brothers who are sleeping.”(Wojtowicz 65) The use of the word “shirt” to describe both linen and wool garments is not a feature only of the translation, but were derivatives of “camisi” in all instances.

There is one extant garment I am aware of which can be considered an undertunic and is relatively close to the culture and time period I am focused on. The St. Louis tunic is a garment now stored in the Notre Dame Cathedral Treasury, Paris dated to the middle of the 13th century. It is a fragmentary garment made of linen. Unfortunately, a detailed analysis of the garment has not been allowed due to the religious nature, so the best that can be made is estimations such as in Figure 3. The pattern can be described as a single piece body with sleeves that are wide at the shoulder and narrow toward the wrist, and front and back godets. The relative dimensions of the pieces suggest that they could have all been cut out of one width of fabric for the sake of efficiency of material. This layout is similar to the Kragelund tunic from Denmark dated to 1045-1155 CE, that garment, also having a single piece body with sleeves which are wide at the shoulder and narrow at the wrist, and godets adding fullness to the skirt.(Ostergard 195) The main difference is that Kragelund is wool, has pleats at the top of each godet, godets are added the sides as well as the front and back, and the rear godet is only split about two thirds of the way up to the top of the piece.(Figure 4)

When deciding on how I should pattern this tunic, I first needed to determine what information I could take from what sources and what material to use. The length of sleeves, length of skirt, fit, and shape of neck line I took sources which are as close to my place and time as possible. A good example of this is displayed in Liber Ad Honerem Agusti (Figure 5). This image is dated to 1194-1196 Italy and represents individuals who were contemporary to the author. To be precise, Liber ad Honerem Augusti details the events of a rebellion a couple years prior to the creation of the document in the same area that it was written and illustrated. The slinger in the bottom right of the image is wearing an outer garment which reaches his knees, full length sleeves, and a keyhole neck line.
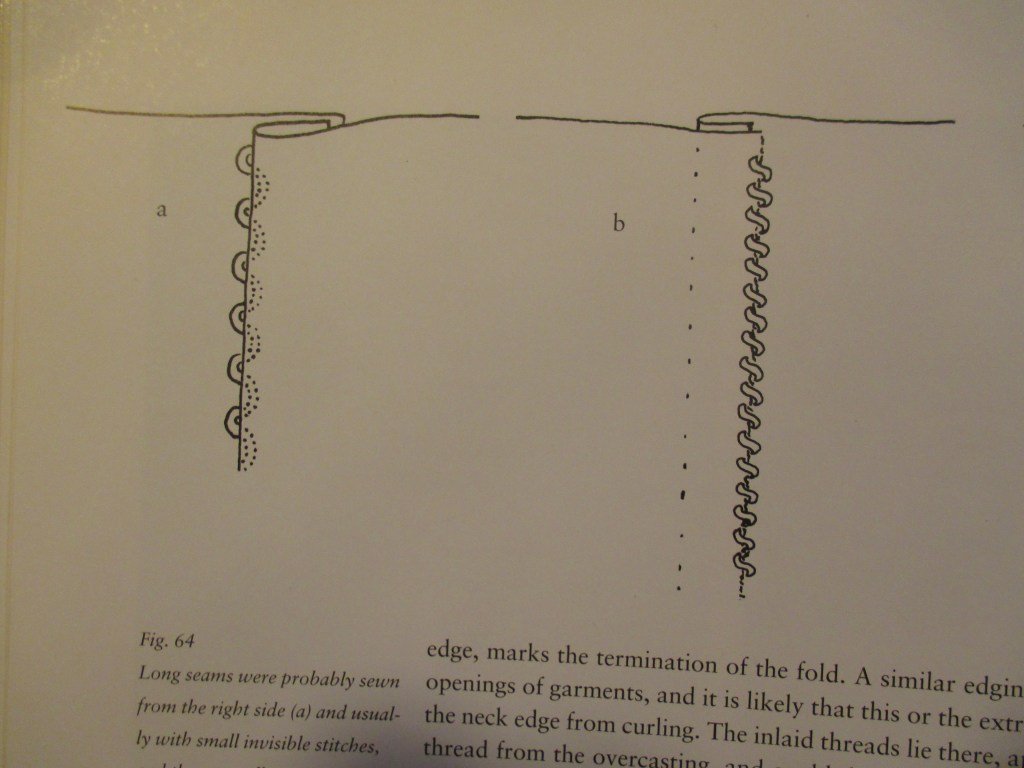

The next set of cues I could take from extant examples. From these I was informed how the garment should be assembled; the type of seams, type and spacing of stitches, proportions of pieces, and patterning cues. The relevant garments I used were the St. Louis shirt (Figure 3) and Kragelund tunic (Figure 4). Unfortunately, I have not been able to find a detailed analysis of the stitches used for the St. Louis shirt. Most linen garments have been annihilated by time and the seams used for assembly have gone with them. We therefore have a wealth of information on how wool was put together and little to none about linen. Wool as a fabric tends to stay together, unlike linen which tends to fray. Because of this, I decided to adapt the common seam techniques detailed in Woven into the Earth (Figure 6). On the wool cloth, the seam was first sewn together with a running stitch, both sides of material folded together, and a row of overcast stitches secures the raw edges. For the linen of my undertunic, I determined most seams and hems would require a second fold of one layer of the linen before the overcast stitches to protect both raw edges, creating what is known as a flat felled seam. I do not know of direct evidence for this stitch in my period. The other seam type used was for the bottom hem. This is a low wear area, and so I determined a single fold before the overcast stitches was sufficient. The cuffs of garments are high wear areas and I decided to fold them twice. Another practice was to add a line of stitching along the edge of a neck line, possibly to stiffen the edge and prevent it from curling. In woolen garments, this was done with a series of stab stitches which passed through the medium at angles so that the stitches were very densely packed.(Figure 7) This is not practical for much thinner linen, so a very dense running stitch must suffice.
The final decision was what material to choose for the undertunic. As I already quoted Alexander Neckham in approximately 1190 CE, they could be made of “muslin, silk, or cotton, or linen.”(Holmes 160) This is a matter of ongoing research for me. I am attempting to portray an individual from the Norman Kingdom of Sicily who has re-settled in the Principality of Antioch. The question of cultural integration between such settlers in the subject of clothing and material culture is somewhat open ended for me. I have attempted to find relative prices of trade goods in the levant without success so far. A 15th century source states the price for a yard of silk as between 120 and 144 denars per yard. A silken tunic would require approximately 2.5 yards of material, making a material price between 300 and 360 denars for a silken tunic. For context, a 13th century high quality riding horse was valued at 200 denars.(Hodges) This sort of expense puts the option of silk well outside the price range of the social status I aim to portray. Muslin and cotton were simply different types of cotton cloth. In the beginning of the 14th century, cotton was a trade good produced in Syria, the Byzantine Empire, Apulia, Calabria, Sicily, and Malta at the least.(Lopez 109) Extant examples are also prevalent in the area, including finds at Jesiret Fara’un Carbon 14 dated between the 9th and 14th centuries. Cotton examples were most common with 289 pieces, linen second with 265, and there were 133 fragments with a linen warp and cotton weft, called fustian.(Boas) Because of this and the fact that cotton was produced in such close proximity to Antioch, I feel I could justify the use of cotton except for the cultural and societal norms from Europe. I am not aware of any sumptuary laws in the region besides the aforementioned Rules of religious orders, but because I am still not confident about the level of integration with the locals and adoption of dress, I am more comfortable not choosing cotton as a fiber. This leave me with linen as the medium for my undertunic.
Linen shows up infrequently in Europe due to a generally unfavorable conditions for preservation. The fragments I just referenced from Jesiret Fara’un are only counted and poorly photographed, I have found no detailed study about their weave structure whatsoever to my great frustration. A few examples of linen textiles have been preserved in Britain fortunately, giving us at least a glimpse into the weaves used. Tabby cloth is common, but also represented is “…a type of huckaback with warp floats on one face and weft floats on the other, a fabric which remains to this day popular for towels…Fragments preserved…include herringbone, lozenge and rosette twills”(Crowfoot 80-81) Unfortunately, almost all linen produced today is a simple tabby weave. For this project I was fortunate enough to find a linen 2/1 twill with both 19 warp and 19 weft threads per cm, both threads Z spun. While the specific weave does not show up in the limited extant examples I have information about, all surviving warp and weft threads are Z spun and the average thread density is about 20 threads per cm, both warp and weft.(Crowfoot 80) The main point is that it is something other than a tabby weave and allows me to depict at least a hint of the rich weaving culture present in the middle ages.

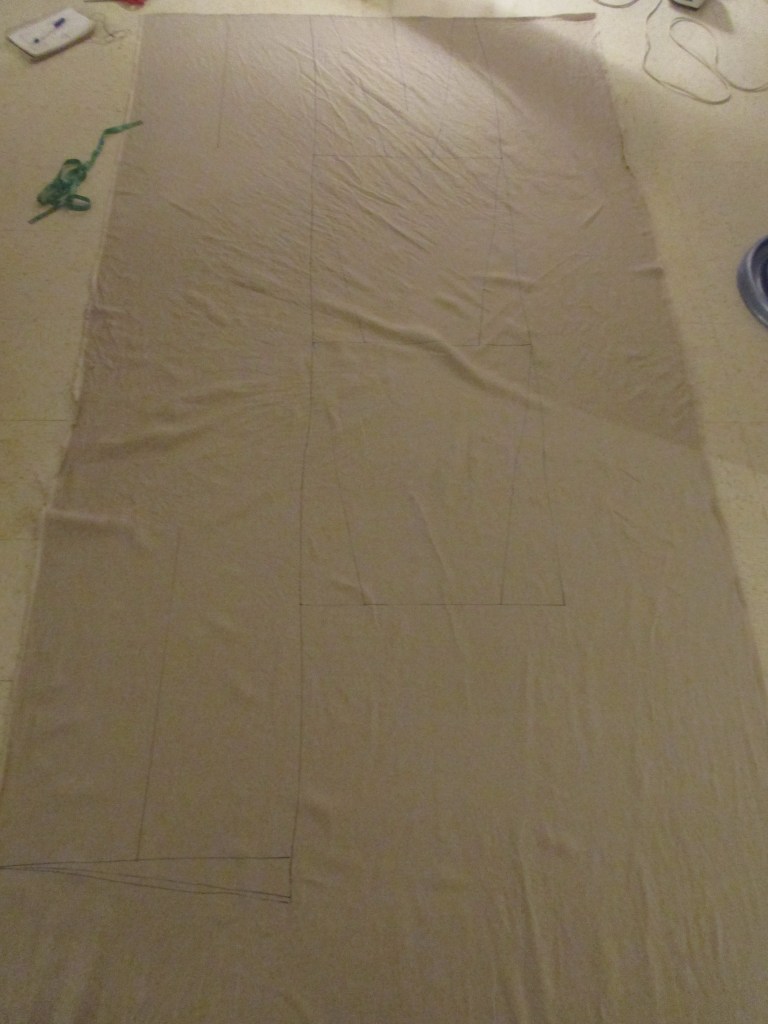
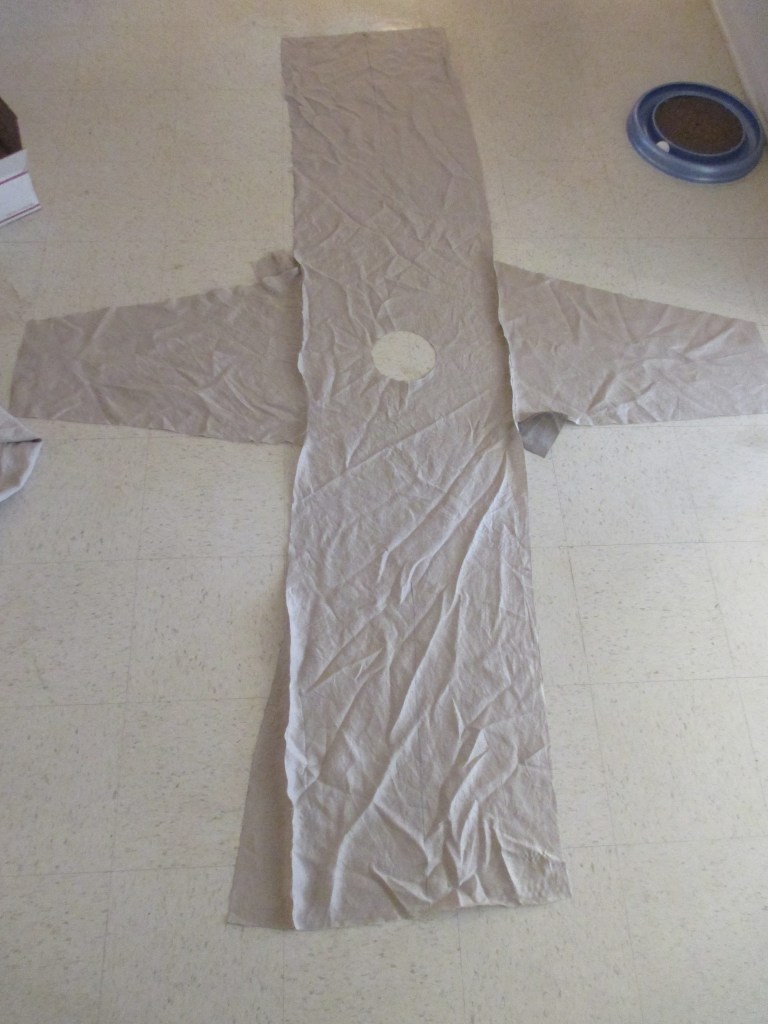
The pattern I arrived at is something of a compromise between the St. Louis tunic and Kragelund tunic.(Figures 3, 4) It is intended to go with a supertunic with a skirt which is split front and back, so I reasoned increased fullness around the bottom hem would be beneficial. An important aspect of this pattern was efficient use of material. I organized the pattern such that the side godets are triangles taken out of the fabric width, then pieced together at the sides. The front and back godets which are completely split in the front and partially split in the back were likewise organized to fit across the same width of material as the body.(Figure 8) The torso was made in a single piece, just as both the St. Louis and Kragelund tunics.(Figures 3, 4) At the initial patterning, I was unsure how high to place the split. I consider pictorial references to be not completely reliable in the matter, because the proportions can be rather exaggerated. I instead returned to the Kragelund tunic dated 1045-1155 CE (Ostergard 125) and the Moselund tunic dated 1050-1155 CE (Ostergard 136-137). Both of these garments are split up the front and rear of the skirt. While the hem line of tunic is variable according to fashion, I reckon the distance between the shoulder and the front/rear split to remain consistent in proportion to the length of the sleeve. This ratio on both garments is approximately 5/6 the length of the sleeve to the skirt split, both front and back. On my garment, applied this same proportion, placing the split close to my belt line and the final length of the garment right at the middle of my knee, the target length.
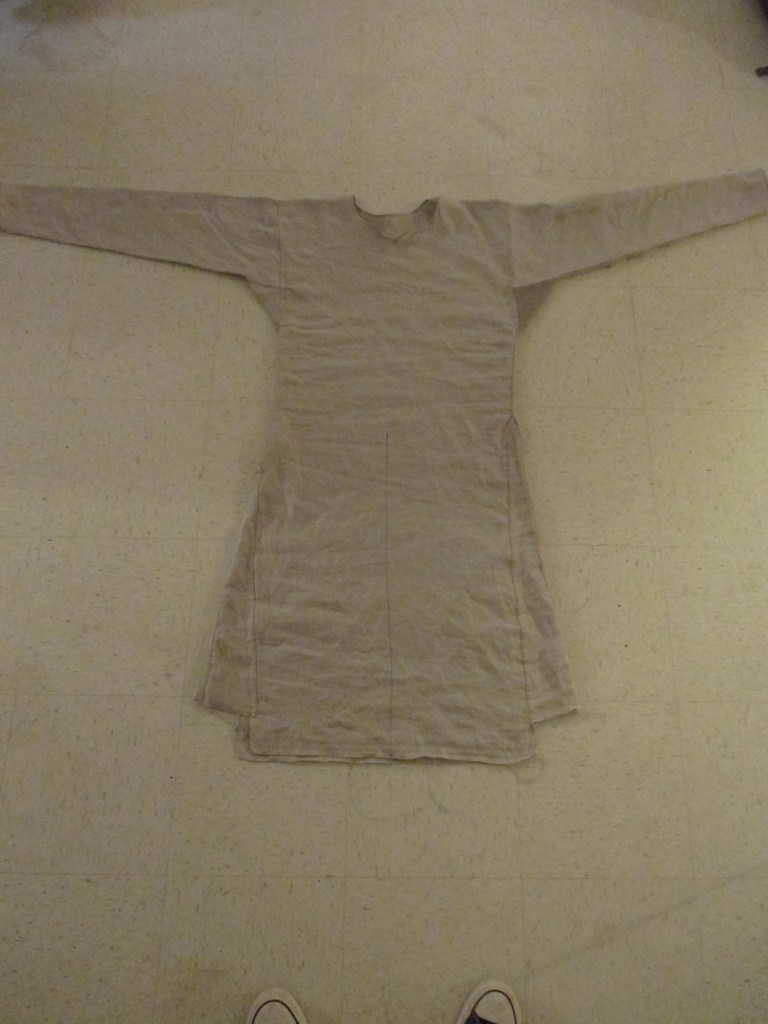

I began assembly by attaching the sleeves to the body and side godets to their places. In the pondering of piecing the garment, I had a thought that I could square off the material removed for the neckhole and use it as an underarm guesset, then use another scrap for the opposite arm. I can only guess this was some form of temporary insanity, as none of my source extant garments have underarm guessets and the sleeves are full enough at the shoulder that they are completely unnecessary. I later came to my senses and removed the guessets. Seams were constructed as I described with flat felled seams and the natural 16/2 linen thread I typically use. Sewing was done initially with a reproduction brass needle, but this was blunted through use and I switched to a reproduction steel needle.
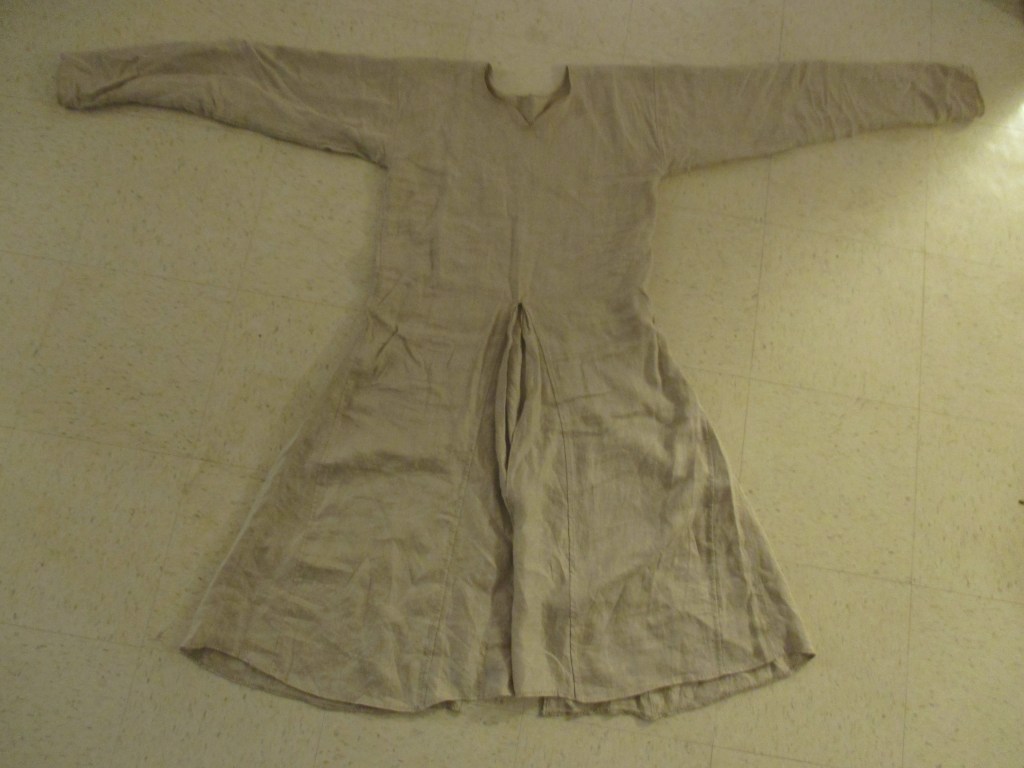
I initially gave the body some extra length because of my uncertainty with how well I had measured myself. Certainly not a period practice, but it made costly mistakes less likely. An important part of this was the order of operations and assembly of seams to make them all lie properly. A second seam type was used for the piecing of the side godets. The sides of the seam were felled opposite directions before being secured by an overcast stitch. This seam type shows up in both Woven into the Earth(p99) and Textiles and Clothing(p156). The front and back godets were assembled with pleats, as the godets of the Kragelund tunic were. The rear was made with a box pleat with knife pleats above it, and the front has a series of knife pleats. One point of uncertainty is the termination of the split of the keyhole neck line and the top of the split skirt. I have never found a good source of information on how these cuts through the weft ended without removing material to facilitate rolling or folding back the edge. The solution I used was to finish the raw edge with a buttonhole stitch. This significantly reinforces the weak point of the pattern. The remainder of the garment was finished as I have detailed above. It has satisfied all of my expectations, and in all I think is a fair attempt at representing an undergarment suitable for a working class individual from Norman Sicily.
Bibliography
Benedict of Nursia, Leonard J. “St. Benedict’s Rule for Monasteries.” Translated by Leonard J Doyle, Project Gutenberg, THE LITURGICAL PRESS, 22 Sept. 2015, http://www.gutenberg.org/files/50040/50040-h/50040-h.html.
Boas, Adrian J. CRUSADER ARCHAEOLOGY: the Material Culture of the Latin East. ROUTLEDGE, 1999.
Crowfoot, Elisabeth, et al. Textiles and Clothing C.1150-C.1450. Boydell Press, 2016.
Hodges, Kenneth. “List of Price of Medieval Items.” Medieval Price List, UC Davis, medieval.ucdavis.edu/120D/Money.html.
Holmes, Urban T., and Alexander Neckham. Daily Living in the Twelfth Century, Based on the Observations of Alexander Neckham in London and Paris. University of Wisconsin, 1980.
Lopez, Robert Sabatino, and Irving Woodworth Raymond. Medieval Trade in the Mediterranean World Illustrative Documents Translated with Introduction and Notes. Oxford University Press, 1955.
Wojtowicz, Robert Thaddeus. “The Original Rule of the Knights Templar: A Translation with Introduction.” The Original Rule of the Knights Templar: A Translation with Introduction, Western Michigan University, June 1990, https://scholarworks.wmich.edu.
Østergård Else. Woven into the Earth: Textiles from Norse Greenland. Aarhus Univ. Press, 2009.
How Much Clothing Should I Have?
I commonly portray a craftsman living in the late 12th century who takes up arms when advantageous, originally from Norman Sicily but now settled in Antioch. Such a person would have some means, but far and away from the knightly or noble classes. In the last couple of years I have arrived at a concept for an amount of clothing which I think is appropriate for such a person. That is two changes of woolens, and two sets of undergarments for each set of woolens. In total that is four pairs of braes, four undertunics, two pair hosen, and two supertunics.
I have a couple pieces of evidence to support this idea of a minimal amount of clothing. The first is the evaluation of consumption of wool in Woven Into the Earth by Else Ostergard. “We hear from Iceland in the eighteenth century that a human being needs at least five kilograms of wool for clothing a year.”, this paraphrased from Island. Politikens Danmarks Historie by Thorsteinsson, B. 1985. Ostergard goes on to weigh extant garments and account for loss over the centuries, coming to an estimate of an entire set of clothing including outer and inner layers, hood, and cloak at eight to ten kilograms. The weight of these garments does not include the wastage created during the spinning, weaving, and sewing processes, but it can give us an idea of annual production, about half of a Greenlandic panoply annually.
The climate in Italy and the Latin East would naturally reduce the amount of wool clothing from what is suggested by Ostergard. Rather than using the same amount of wool per year as in the far north, I think the percentage of a costume replaced every year is the more applicable figure; roughly half a woolen outfit every year. These garments would be so heavy-duty that they would last several years, but after that they would surely require considerable repairs.
Another argument for this amount of woolens is the need. For people who are just a step above subsistence farming, spending the hundreds of hours required to make unnecessary garments for use inside the household instead of, for instance, selling the surplus or spending the time on other tasks seems far fetched. Having a constant rotation of “new” and “old” garments allows for work to continue while the other set is being washed or repaired. For those truly desperate, more than one set of clothing could seem like an extravagance, but that is not the situation of my portrayal.
A final justification for the number of changes of clothing which would be appropriate is ecclesiastic in nature, in fact the Rule of St. Benedict. This is a 7th century document which was adhered to and augmented to the present day. Chapter 55 of the Rule specifically speaks about the clothing to be worn by the Brothers: “We believe, however, that in ordinary places the following dress is sufficient for each monk: a tunic, a cowl (thick and woolly for winter, thin or worn for summer), a scapular for work, stockings and shoes to cover the feet…Let those who receive new clothes always give back the old ones at once, to be put away in the wardrobe for the poor. For it is sufficient if a monk has two tunics and two cowls, to allow for night wear and for the washing of these garments; more than that is superfluity and should be taken away. Let them return their stockings also and anything else that is old when they receive new ones.” Now I do not do a monastic portrayal, but if this was the standard for the ecclesiastic order at the same time as my portrayal, my reasoning cannot be completely defunct.
I believe these three reasons certainly support someone of the standing I portray having two sets of woolens, with the opportunity for three. This would be especially appropriate when the oldest have been repeatedly patched and worn to the point where the owner could consider re-selling or donating the clothing, or the material re-purposed for other domestic applications.
The next question is the linens. I have chosen the number of two changes of linens for every change of woolens for reasons that were just derided by the Rule of St. Benedict. During the day I am rather active, working around encampments, practicing crafts or martial activities, and walking around in the sun. Having a second change of linens means that I can practice some basic level of hygiene and change out my undertunic after washing for dinner or other formal occasions. With a day of airing out or even rinsing with water, the undertunic may be swapped back and I can remain relatively fresh for several days before switching to the second set of clothing. As for period justification, I have none. Our predecessors seem to be fairly tight-lipped about their wear of undergarments. Barring new evidence, I can only hope that my attempt at the mindset of a historical person is somewhat close to the truth.
If anyone else has information or thoughts on the subject, I love to discuss this sort of thing. The next several weeks will be spent building ensemble from the ground up, beginning with braes!
Østergård Else. Woven into the Earth: Textiles from Norse Greenland. Aarhus Univ. Press, 2009.
“St. Benedict’s Rule for Monasteries.” Translated by Leonard J Doyle, Gutenberg, Project Gutenberg, 22 Sept. 2015, http://www.gutenberg.org/files/50040/50040-h/50040-h.html.
